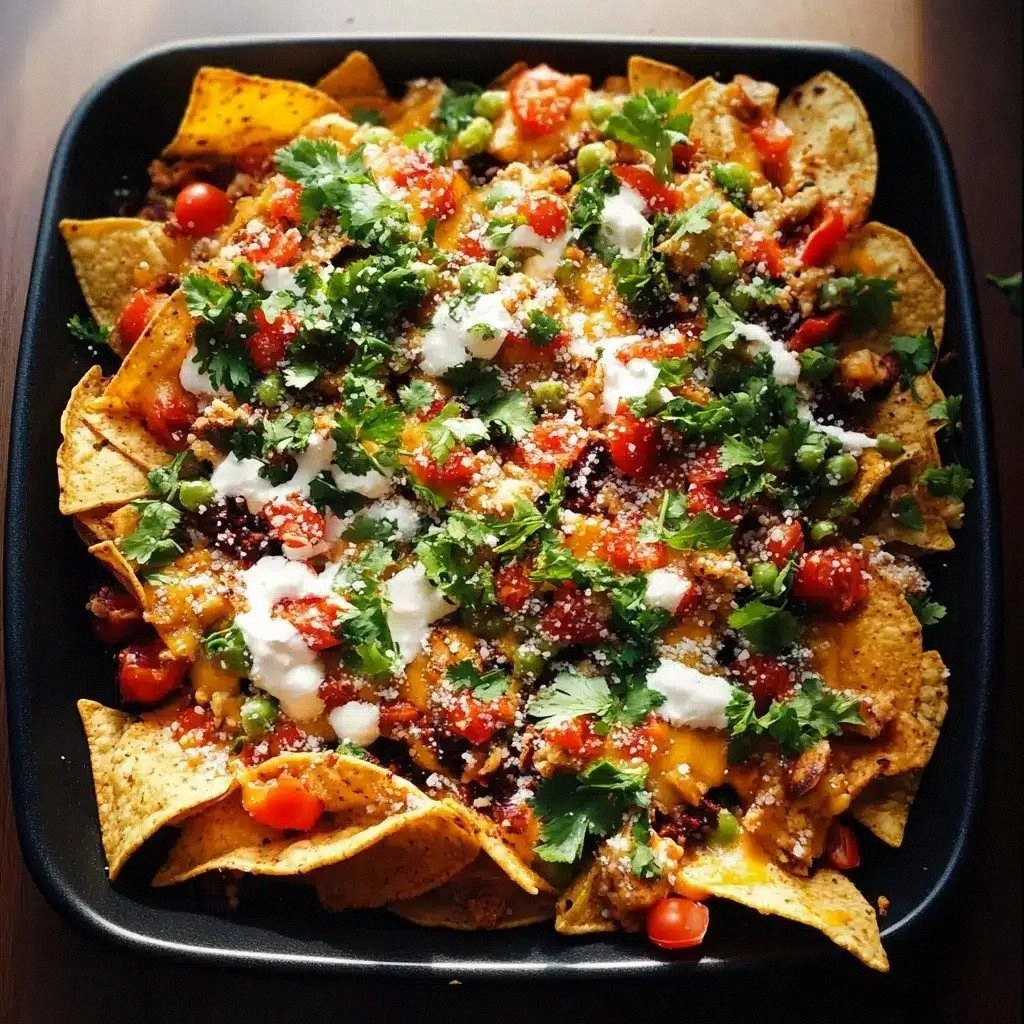
Vegetarian Nachos Recipe
Picture this: I’m standing in my cramped kitchen, the microwave whirring like a distant train, and a friend’s voice crackles over the phone, “You have to try those nachos I heard about.” I had a craving that had been simmering for weeks, a craving that felt like a full‑blown culinary emergency. I grabbed my phone, searched for the perfect recipe, and stumbled on this gem. The moment I saw the first line—“Crispy tortilla chips, melty cheese, and a burst of fresh salsa”—my mind went into overdrive. That was the moment I decided I needed to make them myself, and I’ve never looked back.
The kitchen was a chaotic orchestra: the oven timer beeped, the fridge door opened, and my phone buzzed with notifications. I could taste the anticipation in the air, the faint scent of cumin and chili powder mingling with the buttery aroma of melting cheese. I could already hear the crunch of the chips as they hit the hot oven, the sizzle of beans and corn simmering in a pan, and the zing of lime juice on the finished plate. It was a sensory feast even before the first bite. I could feel the heat radiating off the oven door, the coolness of the fridge, the gentle hum of the blender, and the satisfying weight of the ingredients in my hands.
What makes this version stand out is that it’s not just a copy of a generic nacho recipe. I’ve taken the classic elements—crunch, cheese, beans, salsa—and elevated them with fresh, high‑quality ingredients and a few secret twists that make each bite unforgettable. I’m not just cooking; I’m creating an experience that will make you question every other nacho recipe you’ve ever tried. The texture is a perfect balance of crunch and melt, the flavors are layered and complex, and the presentation is a work of art that will impress any crowd. This is hands down the best version you’ll ever make at home.
I dare you to taste this and not go back for seconds. I’ve poured my heart into this recipe, and the result is a symphony of flavors that will leave you craving more. Picture yourself pulling this out of the oven, the whole kitchen smelling incredible, and the first bite sending a wave of joy through your taste buds. Stay with me here—this is worth it.
What Makes This Version Stand Out
- Crunch: The chips are toasted to perfection, giving a satisfying snap that keeps the layers from getting soggy.
- Cheese Melt: A blend of cheddar and Monterey Jack creates a silky, stretchy coating that clings to every bite.
- Freshness: Fresh cilantro, lime wedges, and diced avocado add a bright, vibrant counterpoint to the savory base.
- Balance: The combination of sweet corn, salty beans, and tangy salsa achieves a harmonious flavor profile.
- Ease: The assembly process is quick, making this an ideal dish for last‑minute gatherings or weeknight cravings.
- Make‑Ahead: You can assemble and refrigerate the nachos, then bake them just before serving for a hassle‑free meal.
- Customization: Swap out ingredients or add extras like diced jalapeños or a sprinkle of queso fresco to suit your taste.
- Visual Appeal: The vibrant colors of the toppings make the dish as pleasing to the eye as it is to the palate.
Alright, let's break down exactly what goes into this masterpiece...
Inside the Ingredient List
The Flavor Base
The foundation of these nachos is the seasoning that brings everything together. I use a blend of cumin and chili powder to give the beans and corn a warm, earthy depth. Cumin’s subtle nutty undertone pairs beautifully with the smoky flavor of the chips, while chili powder adds a gentle heat that doesn’t overpower the fresh toppings. If you’re a fan of extra heat, sprinkle a pinch of cayenne into the mix. Skipping the spices will leave the dish feeling flat and underwhelming.
The Texture Crew
Cheese is the star of the show. I combine shredded cheddar for sharpness and Monterey Jack for a smooth melt. The two cheeses create a gooey, stretchy layer that clings to each chip, forming a protective blanket that keeps the chips from becoming soggy. If you’re looking for a dairy‑free version, try a plant‑based cheese that melts well. The beans and corn provide a hearty, satisfying bite that balances the crispness of the chips.
The Unexpected Star
Fresh avocado is a game‑changer. Its creamy texture and subtle buttery flavor counterbalance the sharpness of the cheese and the heat of the salsa. Avocado also adds healthy fats that make the dish feel more filling. If you’re not a fan of avocado, try a splash of Greek yogurt instead. The key is to add something that will soften the overall bite without drowning the other flavors.
The Final Flourish
The finishing touches—lime wedges, cilantro, and a drizzle of sour cream—add brightness and a cool counterpoint. The lime’s acidity cuts through the richness of the cheese and beans, while cilantro adds a fresh herbal note. A dollop of sour cream or guacamole brings a silky finish that ties everything together. If you prefer a tangier kick, replace sour cream with a spicy mayo.
Everything's prepped? Good. Let's get into the real action...
The Method — Step by Step
- Preheat the oven. Set it to 400°F (200°C). The heat needs to be high enough to toast the chips without burning them. As the oven warms, you’ll hear the faint hum of the heating element, a promise of the crunch to come. This is the moment of truth—no shortcuts here.
- Toast the chips. Spread the tortilla chips in a single layer on the prepared baking sheet. Bake for 6–8 minutes, or until they’re golden brown and crisp. Keep a close eye on them; they can go from perfect to burnt quickly. When they’re done, the chips should crackle when you press them gently. This step locks in the crunch and prevents sogginess.
- Prepare the toppings. While the chips toast, heat a skillet over medium heat and add a splash of olive oil. Sauté the black beans and corn until they’re warm and slightly caramelized. Stir in the diced tomatoes, red onion, jalapeños, and the cumin–chili powder blend. Cook for 5 minutes, allowing the flavors to meld. The aroma that fills the kitchen will make your mouth water.
- Assemble the nachos. Remove the chips from the oven and spread them evenly on a large baking dish or a shallow sheet pan. Sprinkle the shredded cheddar and Monterey Jack cheese over the chips, ensuring every chip gets a generous coating. Then, dollop the warm bean‑corn mixture over the cheese, distributing it evenly. The cheese should start to melt, forming a golden crust that holds everything together.
- Bake the nachos. Return the assembled dish to the oven and bake for 8–10 minutes, or until the cheese is bubbly and the edges of the chips start to pull away. You’ll hear a satisfying sizzle as the cheese melts into a golden glaze. This is when the dish transforms from a simple snack into a feast.
- Finish with fresh toppings. Once the nachos come out of the oven, immediately sprinkle the diced avocado, cilantro, and a drizzle of lime juice over the top. Add dollops of sour cream or guacamole and a few spoonfuls of salsa. The heat from the cheese will slightly soften the avocado, creating a creamy contrast.
- Serve immediately. Transfer the nachos to a large serving platter and cut them into individual portions. The aroma will be irresistible, and the first bite will deliver that perfect combination of crunch, melt, and freshness. I dare you to eat just one and not crave more.
That's it — you did it. But hold on, I've got a few more tricks that'll take this to another level...
Insider Tricks for Flawless Results
The Temperature Rule Nobody Follows
Many people bake nachos at a lower temperature, but that can lead to soggy chips. I always set the oven to 400°F (200°C) to ensure a crisp base and a golden cheese layer. The high heat also helps the spices in the bean‑corn mixture to bloom, creating a richer flavor profile. If you’re using a convection oven, reduce the temperature by 25°F to avoid over‑toasting.
Why Your Nose Knows Best
Trust your nose when the nachos are almost ready. When the cheese is bubbly and the chips are golden, the scent will tell you that it’s time to pull them out. The aroma is a reliable indicator of doneness, more so than the timer alone. I’ve had friends who rely on the timer and end up with over‑baked, rubbery cheese. Use your senses, not just your watch.
The 5-Minute Rest That Changes Everything
After baking, let the nachos rest for five minutes. This brief pause allows the cheese to set, making the nachos easier to serve and preventing the toppings from sliding off. The rest also lets the heat redistribute, creating a more uniform flavor profile. I’ve found that a quick rest is the secret to a perfectly plated nacho platter.
Add a Splash of Water Before Reheating
If you’re reheating leftover nachos, add a tiny splash of water before microwaving. The water creates steam, which helps restore the chips’ crispness and prevents the cheese from drying out. This trick works wonders for making the dish feel fresh again.
Use Fresh Corn, Not Frozen
Fresh corn brings a bright, sweet flavor that frozen corn can’t match. The natural sugars in fresh corn caramelize slightly when toasted, adding depth to the dish. If fresh corn isn’t available, use frozen corn and thaw it completely before adding it to the skillet.
Add a Drizzle of Hot Sauce
A few drops of your favorite hot sauce can elevate the dish’s heat profile without overpowering the other flavors. I like to use a smoky chipotle sauce for a subtle kick. Just remember, a little goes a long way—taste as you go.
Creative Twists and Variations
This recipe is a playground. Here are some of my favorite ways to switch things up:
Mexican Street‑Style Nachos
Replace the beans with refried beans and top with shredded lettuce, diced mango, and a squeeze of lime. Add a sprinkle of crumbled queso fresco for a tangy finish. This version is perfect for a sunny afternoon.
Mediterranean Nachos
Swap the black beans for chickpeas and add diced cucumbers, kalamata olives, and feta cheese. Finish with a drizzle of tzatziki instead of salsa. The result is a refreshing, herbaceous take on the classic.
BBQ Pulled Jackfruit Nachos
Use shredded BBQ jackfruit as the protein and top with coleslaw and a drizzle of smoky BBQ sauce. The sweet, smoky flavor pairs beautifully with the crunchy chips. Ideal for a vegetarian barbecue.
Vegan Nachos
Replace dairy cheese with a plant‑based cheese that melts well. Use vegan sour cream and guacamole. The flavors remain just as vibrant, and the dish feels lighter.
Spicy Tex‑Mex Nachos
Add diced jalapeños, a handful of crushed tortilla chips, and a sprinkle of crushed tortilla strips for extra crunch. Finish with a drizzle of chipotle mayo. The heat will keep everyone coming back for more.
Breakfast Nachos
Top the nachos with scrambled eggs, diced tomatoes, and a sprinkle of cheddar. Add a side of salsa and avocado for a hearty, protein‑rich breakfast that’s both fun and filling.
Storing and Bringing It Back to Life
Fridge Storage
Cool the nachos completely before covering them tightly with plastic wrap. Store in the refrigerator for up to 2 days. When ready to serve, reheat in a 350°F oven for 10 minutes, or until the cheese is melted and the chips are crisp again.
Freezer Friendly
For longer storage, freeze the assembled nachos in an airtight container for up to 3 months. Thaw overnight in the refrigerator, then bake at 375°F for 12–15 minutes. The texture may be slightly different, but the flavor remains intact.
Best Reheating Method
The oven is the best method for reheating because it preserves the crunch. Place the nachos on a parchment‑lined sheet and bake at 350°F for 8–10 minutes. Add a splash of water before microwaving if you prefer a quick fix, but the oven delivers the most authentic experience.