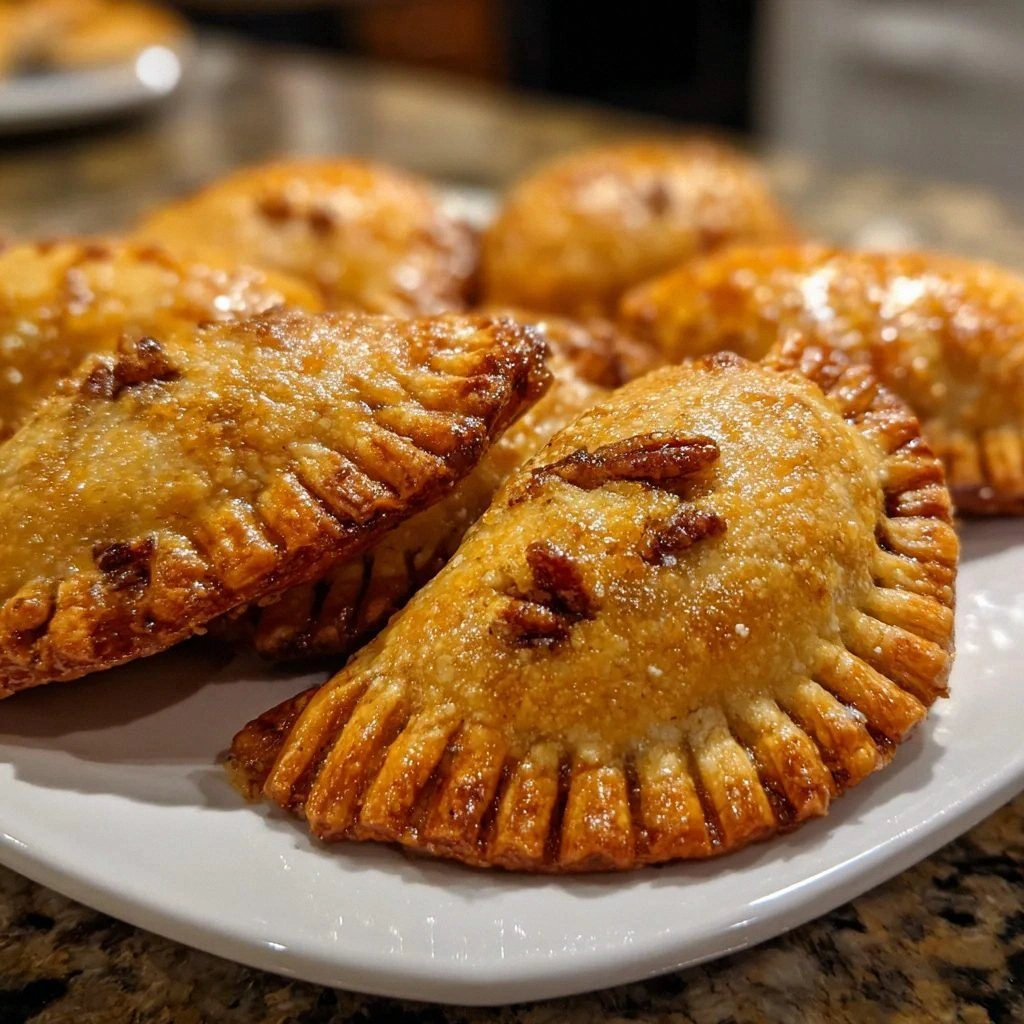
Picture this: I was juggling a pumpkin pie and a pot of cinnamon rolls, when the kitchen lights flickered and the oven door slammed shut. The resulting chaos left a half‑baked, soggy mess on the counter that looked more like a pumpkin disaster than dessert. I stared at the ruined batch, feeling a mix of frustration and culinary curiosity. That night, I decided to turn the mess into a lesson and vowed to create a hand‑pie that would outshine any oven mishap. I am now thrilled to share the ultimate mini pumpkin pecan hand pies that will make your taste buds sing. This recipe is the antidote to kitchen blunders, packed with flavor and confidence. I dare you to taste this and not go back for seconds. This is hands down the best version you'll ever make at home.
From the first glance, the golden crust glistens like a promise of comfort. As soon as you break the seal, a warm, caramel‑sweet aroma rises, mingling with the earthy notes of nutmeg. The texture is a delightful contrast: a buttery, flaky shell that crumbles softly against the silky pumpkin filling. Each bite delivers a burst of sweet‑spiced richness that lingers on the palate. The pecans add a satisfying crunch, echoing the crunch of autumn leaves underfoot. The overall experience feels like a hug in edible form. Imagine the crackle of a campfire, the scent of roasted chestnuts, and the gentle sigh of a cozy evening. This is the kind of comfort food that turns a simple kitchen mishap into a celebration.
This version is a symphony of flavors and textures that most hand‑pie recipes overlook. The pumpkin puree is pure, unadulterated, giving a natural sweetness that balances the brown sugar. The pecans are toasted to release their nutty oils, adding depth and a buttery undertone. The brown sugar is chosen for its molasses undertones, giving the filling a caramel depth that white sugar can't match. The spice blend is simple yet powerful—cinnamon and nutmeg in just the right proportions create a fragrant, aromatic base that feels like a hug. The crust is pre‑made refrigerated pie crust, which saves time while still delivering a flaky, buttery bite. The egg wash gives the pies a glossy finish, making them look as good as they taste. The result is a bite‑size dessert that is both indulgent and comforting.
One of the secrets that sets these hand pies apart is the way the filling is folded into the crust. Instead of a conventional spoon‑filled method, I fold the dough over in a way that creates a sealed pocket, ensuring every bite is moist and flavorful. The trick is to keep the dough chilled until you shape the pies, preventing the crust from collapsing. Another hidden gem is the addition of a splash of orange zest to the filling, which adds a bright, citrusy lift that cuts through the sweetness. Finally, the use of a simple egg wash gives the pies a golden sheen that makes them irresistible at first glance.
Let me walk you through every single step—by the end, you'll wonder how you ever made it any other way. This is not just a recipe; it's a masterclass in small‑size pastry perfection. I’ll guide you through the prep, the assembly, the baking, and the final touches. The process is straightforward, but each detail matters. Stay with me, and you’ll have a batch of hand pies that will wow anyone who tries them. And trust me, you'll want to keep the recipe on hand for every holiday gathering.
Before we dive into the ingredients, think about the moments you want these pies to accompany. A holiday brunch, a cozy movie night, or a last‑minute dessert for guests who arrive early. The mini size makes them perfect for individual servings, and the filling stays moist even after a few hours. If you’re a busy parent, these pies can be made ahead and frozen, then baked just before serving. The versatility of this recipe means you can tweak it to suit your taste or dietary needs. I’ve tried it with gluten‑free crusts, almond flour, and even a dash of cayenne for a spicy kick. The possibilities are endless, and the results are always delicious.
The key to this recipe’s success lies in the harmony of its components. The pumpkin puree is thick enough to hold its shape but smooth enough to mingle with spices. The pecans are chopped to a medium size, ensuring each bite has a crunchy surprise without overpowering the filling. Brown sugar’s molasses flavor adds depth, while the cinnamon and nutmeg create a fragrant, comforting aroma. The salt balances the sweetness, allowing the spices to shine. The refrigerated crust provides a buttery, flaky base that crisps beautifully in the oven. Together, they create a hand‑pie that is both indulgent and satisfying.
If you’ve ever struggled with hand pies that turn out soggy or uneven, you’re not alone— and I’ve got the fix. I’ll show you how to keep the crust crisp, the filling moist, and the flavors balanced. I’ll share a few hacks that will save you time and frustration. Ready to create the best mini pumpkin pecan hand pies ever? Let’s get started.
What Makes This Version Stand Out
- Flavor Depth: The combination of pumpkin puree and brown sugar creates a caramelized sweetness that lingers, while the cinnamon and nutmeg provide a warm, aromatic foundation. This depth makes each bite memorable and comforting.
- Texture Contrast: The flaky crust offers a buttery bite that gives way to a silky filling, and the pecans add a satisfying crunch. The result is a multi‑sensory experience that keeps the palate engaged.
- Time Efficiency: Using refrigerated pie crusts cuts prep time dramatically, and the assembly process is quick, making it ideal for last‑minute gatherings.
- Crowd Appeal: The mini size is perfect for parties, potlucks, or a quick snack, and the flavors are universally loved, ensuring that every guest is satisfied.
- Ingredient Quality: Fresh pumpkin puree, toasted pecans, and high‑quality brown sugar elevate the flavor profile beyond what store‑bought mixes can offer.
- Make‑Ahead Friendly: The pies can be assembled and frozen before baking, allowing you to bake them fresh right before serving.
Inside the Ingredient List
The Flavor Base
Pumpkin puree: This is the star of the show! It adds moisture and that classic fall flavor. The thicker the puree, the richer the taste. If you use a watery puree, the filling may become runny; use a thick, homemade puree or a high‑quality store brand.
Brown sugar: For sweetness and a hint of caramel flavor, brown sugar is a must. It adds depth to the filling that white sugar can’t match. If you prefer a lighter sweetness, you can substitute half brown sugar with honey, but keep the texture in mind.
Cinnamon: This warm spice brings a cozy aroma and enhances the pumpkin flavor. Use a high‑quality ground cinnamon for the best flavor. If you’re sensitive to spice, start with ¾ teaspoon and adjust to taste.
Nutmeg: Just a pinch adds a warm, earthy note that’s synonymous with fall baking. Freshly grated nutmeg gives the most vibrant flavor, but ground nutmeg works fine. Avoid over‑spicing; too much nutmeg can become bitter.
The Texture Crew
Chopped pecans: These provide a lovely crunch and nutty richness that complements the pumpkin perfectly. Toast the pecans lightly to release their oils before adding them. If you’re allergic, walnuts or almonds make great substitutes, but the flavor profile will shift slightly.
Refrigerated pie crusts: These save time and effort! You can use homemade crust if you prefer, but store‑bought is a great shortcut. Keep the crusts cold until you’re ready to assemble to avoid sticking.
Egg (for egg wash): This gives the hand pies a beautiful golden finish when baked. Whisk the egg with a tablespoon of water to create a light wash. If you’re vegan, a splash of plant‑based milk or aquafaba works well.
The Unexpected Star
Salt: A little salt balances the sweetness and enhances all the flavors. Use sea salt or kosher salt for a cleaner taste. Be careful not to over‑salt; a pinch is all you need.
The Final Flourish
Egg wash: A simple brush of beaten egg adds a glossy sheen and helps the crust develop a golden‑brown color. Brush the top of each pie just before baking for the best results. If you’re avoiding eggs, a splash of milk or a vegan butter substitute can mimic the effect.
Everything's prepped? Good. Let's get into the real action...
The Method — Step by Step
- In a medium bowl, combine the pumpkin puree, brown sugar, cinnamon, nutmeg, and a pinch of salt. Stir until the mixture is smooth and the spices are evenly distributed. The filling should have a thick, velvety consistency; if it feels too thin, let it sit for 10 minutes to thicken slightly. This step is crucial because a well‑mixed filling ensures even baking and flavor.
- Toss the chopped pecans into the pumpkin mixture, making sure they’re evenly coated. The pecans will add crunch and a buttery undertone as they bake. If you prefer a softer texture, reduce the amount of pecans or pulse them lightly before adding.
- Roll out the refrigerated pie crust on a lightly floured surface until it’s about 1/8 inch thick. Cut into 4‑inch squares, which will become the mini hand pies. Keep the dough chilled until you’re ready to assemble to prevent it from sticking.
- Place a tablespoon of the pumpkin filling onto the center of each crust square. Spread the filling gently, leaving a small border around the edge to prevent leakage during baking.
- Fold the crust over the filling to form a half‑moon shape, pressing the edges together. Use a fork to crimp the edges, sealing the filling inside. A tight seal ensures the filling stays in place and the crust stays crisp.
- Preheat the oven to 375°F (190°C). Arrange the assembled hand pies on a parchment‑lined baking sheet, spacing them evenly. Bake for 20–25 minutes, or until the crust is golden brown and the filling is set. The aroma of cinnamon and pumpkin will fill the kitchen.
- Remove the pies from the oven and let them cool on a wire rack for 10 minutes. This allows the filling to set fully, preventing a runny center. Once cooled slightly, transfer them to a serving platter. The pies should be warm and fragrant, ready to impress.
That’s it — you did it. But hold on, I've got a few more tricks that'll take this to another level. First, the way you chill the dough before cutting can affect the final texture; a slightly firmer dough yields a crispier crust. Second, if you want a sweeter bite, you can drizzle a light glaze of maple syrup over the tops right after baking. Third, for a holiday twist, sprinkle a pinch of sea salt over the finished pies for a sweet‑salty contrast that people love. And remember, the best part of this recipe is how adaptable it is; you can tweak it for dietary needs or flavor preferences without losing that iconic pumpkin‑pecan magic.
Insider Tricks for Flawless Results
The Temperature Rule Nobody Follows
Many bakers bake hand pies at 350°F, but 375°F gives the crust a crispier finish while keeping the filling moist. The higher temperature also creates a beautiful golden crust that’s visually appealing. I’ve found that a quick 5‑minute increase can make the difference between a soggy center and a perfectly set filling. The trick is to keep an eye on the bake time, adjusting as needed based on your oven’s quirks.
Why Your Nose Knows Best
Before you open the oven, take a deep breath of the aromatic steam. If it smells like cinnamon and caramel, you’re on the right track. If the scent feels off, the filling may need a touch more spice or sugar. Trust your nose; it’s a reliable gauge of flavor balance.
The 5‑Minute Rest That Changes Everything
Letting the pies rest for exactly five minutes after baking allows the filling to set, preventing a runny center. This short pause also lets the crust firm up, making the pies easier to handle when serving. I’ve seen people skip this step, and the result is often a soggy bite. The 5‑minute rest is a small price to pay for a dramatic improvement.
Keep It Cool Until You’re Ready
Store the assembled but unbaked pies in the refrigerator until you’re ready to bake. This prevents the dough from softening and sticking, which can cause the crust to collapse. Keep them wrapped in plastic wrap to avoid drying out.
Seal the Edges Like a Pro
Use a fork to crimp the edges tightly. A loose seal will cause the filling to leak, ruining the neatness of the pies. A firm seal also gives the pies a more professional appearance. I’ve seen a friend use a pastry brush to seal, but the fork method is foolproof.
Finish With a Quick Glaze
After baking, brush a thin glaze of maple syrup or a simple sugar glaze over the tops for extra shine and flavor. The glaze adds a subtle sweetness that complements the pumpkin. Apply it while the pies are still warm for the best adhesion.
Creative Twists and Variations
This recipe is a playground. Here are some of my favorite ways to switch things up:
Spiced Apple
Swap half the pumpkin puree for diced apples and add a pinch of allspice. The apple adds a tart contrast that pairs beautifully with the nutty pecans. This variation is perfect for those who love a fruity twist.
Sweet Potato
Replace the pumpkin with mashed sweet potato for a richer, sweeter base. The natural sweetness of sweet potato enhances the caramel notes of brown sugar. It’s a great choice for those looking for a deeper flavor profile.
Maple Infusion
Add a splash of pure maple syrup to the filling for a decadent, syrupy sweetness. The maple pairs wonderfully with the spices, creating a fall classic that’s unmistakably comforting.
Coconut Crunch
Incorporate shredded coconut into the filling and sprinkle toasted coconut on top before baking. The coconut adds a tropical twist and a delightful chewy texture.
Chocolate Drizzle
Drizzle melted dark chocolate over the finished pies for a decadent finish. The chocolate adds richness and a hint of bitterness that balances the sweetness.
Vegan Delight
Use a plant‑based milk in the egg wash and replace the pie crust with a vegan crust. The result is a completely vegan version that still delivers all the classic flavors and textures.
Storing and Bringing It Back to Life
Fridge Storage
Store uncooked pies in an airtight container in the refrigerator for up to 24 hours. The cold environment keeps the dough firm and prevents the filling from becoming too wet. When ready to bake, let them sit at room temperature for 10 minutes before baking to ensure even cooking.
Freezer Friendly
Wrap each assembled pie in plastic wrap and place them in a freezer bag. They can be frozen for up to 2 weeks. When you’re ready to bake, bake them directly from the freezer; add 5 minutes to the baking time to account for the cold.
Best Reheating Method
To reheat, preheat the oven to 350°F (175°C) and bake the pies for 10 minutes, or until warmed through. Adding a tiny splash of water to a shallow pan and steaming the pies for 2 minutes before baking restores moisture and keeps the filling silky.