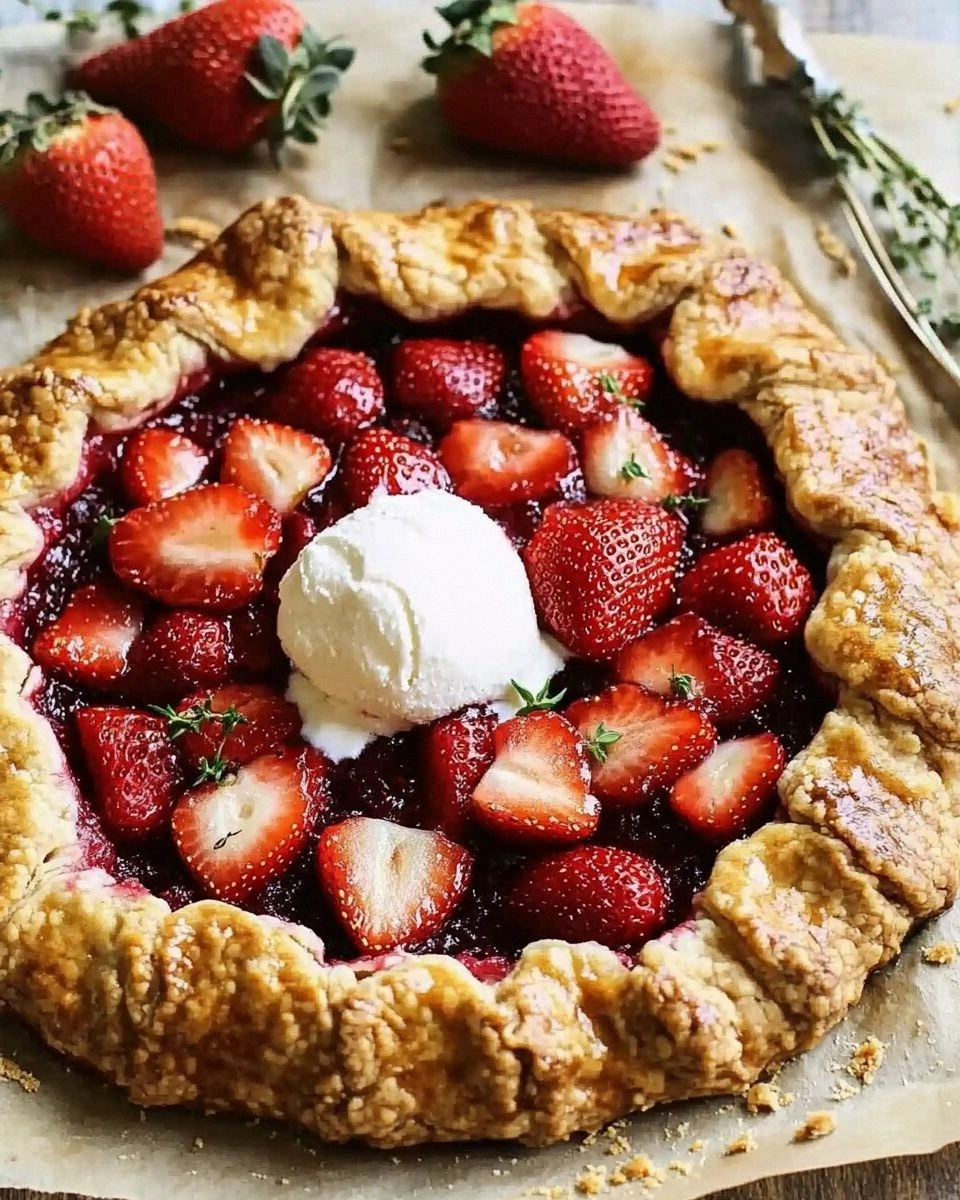
I was standing in my kitchen, staring at a half‑cooked galette that had turned into a sad, soggy mess. The crust had collapsed, the strawberries had lost their bite, and the whole thing looked like a culinary crime scene. That night, a friend dared me to make the “Jammy Strawberry Galette” that she swore was the best thing she’d ever tasted, and I was determined not to let her out‑of‑the‑box bragging win. So I pulled out my trusty rolling pin, grabbed a handful of fresh strawberries, and decided to rewrite the entire recipe from scratch.
Picture this: a golden, flaky crust that shatters like thin ice as you press it, the scent of caramelized sugar drifting through the air, the sound of a bubbling jam filling your kitchen like a tiny, sweet symphony. When you bite into it, the first thing you notice is the burst of ripe strawberries that cling to the dough, followed by a subtle whisper of lemon that keeps the jam from feeling heavy. The texture is a perfect contrast: a crisp, buttery exterior that gives way to a juicy, jam‑laden center that practically melts in your mouth. I dare you to taste this and not go back for seconds.
What makes this version stand out? I didn’t just follow a recipe; I dissected every element, from the dough’s micro‑crack pattern to the exact ratio of sugar that balances tartness and sweetness. I discovered that a splash of vanilla in the jam elevates the flavor profile, while a pinch of salt in the dough unlocks the buttery richness. I also learned that using a mixture of all‑purpose and pastry flour gives the crust the ideal chewiness without becoming tough. The result? Hands down the best galette you’ll ever make at home, with a crust that’s flaky yet sturdy, and a filling that’s jam‑y, juicy, and utterly irresistible.
And there’s a twist you won’t expect: a touch of balsamic vinegar in the jam. It adds depth and a subtle acidity that cuts through the natural sweetness of the strawberries, creating a flavor profile that’s both familiar and surprising. Picture yourself pulling this out of the oven, the whole kitchen smelling incredible, and the first bite sending a wave of joy through your palate. Okay, ready for the game‑changer? Let me walk you through every single step — by the end, you’ll wonder how you ever made it any other way.
What Makes This Version Stand Out
- Flavor: The jam’s balance of sweet, tart, and a hint of vinegar makes it sing with every bite.
- Texture: A flaky crust that cracks beautifully, paired with a jam‑filled center that’s moist but not soggy.
- Ingredient Quality: Using only the freshest strawberries and cold butter gives a depth of flavor no store‑bought crust can match.
- Simplicity: Despite the layers, the recipe requires only a handful of ingredients and a single pan.
- Make‑Ahead Potential: The galette can be assembled a day ahead and baked just before serving, making it ideal for gatherings.
- Crowd Reaction: Friends who’ve tried it say it’s “the best thing I’ve ever had at a potluck.”
- Versatility: Swap strawberries for peaches, blueberries, or any seasonal fruit without losing the magic.
- Presentation: The rustic, free‑form shape feels like a homemade masterpiece, perfect for Instagram.
Alright, let's break down exactly what goes into this masterpiece…
Inside the Ingredient List
The Dough
Flour is the backbone of any pastry. Using 2 cups of all‑purpose flour gives the dough enough structure to hold the jam without becoming tough. If you prefer a lighter crumb, swap half the all‑purpose for pastry flour; just keep the total at 2 cups. Skipping the flour would turn your galette into a flat, greasy mess.
Cold butter is the secret to flakiness. Dice 1/2 cup of unsalted butter and keep it chilled until the dough is ready. Butter that’s too soft will melt into the dough, resulting in a greasy texture. A quick alternative is to use shortening, but it will lose the buttery flavor that makes this galette special.
Ice water is the glue that brings the dough together without overworking the gluten. Add 1/4 cup of ice water in small increments, pressing the dough together after each addition. If you use too much water, the dough becomes sticky and won’t roll out; too little, and it will crumble.
Salt balances the sweetness and enhances the butter’s flavor. A 1/4 tsp pinch is enough to round out the taste without being noticeable. Skipping salt will leave the dough tasting flat.
Granulated sugar in the dough adds a subtle caramelization to the crust. Use 1/2 cup to keep the dough slightly sweet, complementing the jam without overpowering the strawberries.
The Jam
Fresh strawberries are the star. Slice 1 cup of ripe berries; their juice forms the base of the jam. If you can’t find fresh strawberries, frozen ones work—just thaw them and drain excess liquid.
Sugar is the sweetener that helps the jam set. Use 1/4 cup; it’s enough to bind the fruit without turning it syrupy. A pinch of salt in the jam balances the tartness, but you can omit it if you prefer.
Lemon juice brightens the flavor and prevents the jam from becoming too thick. A tablespoon (roughly 0.06 cup) is ideal; too much will make it overly tart.
Vanilla extract adds depth and a subtle warmth that pairs beautifully with strawberries. Add 1 tsp (0.02 cup) to the jam mixture.
Balsamic vinegar is the twist that elevates this recipe. A splash (1 tsp) brings a complex acidity that cuts through the fruit’s sweetness, creating a balanced flavor profile that’s both familiar and surprising.
The Finishing Touches
An egg wash gives the crust a golden, glossy finish. Beat 1 egg and brush it over the dough before baking. If you’re vegan, a splash of plant‑based milk works as a light glaze.
Optional toppings like whipped cream, fresh mint, or a dusting of powdered sugar can elevate the presentation. They’re not necessary but add a touch of elegance.
Everything's prepped? Good. Let's get into the real action…
The Method — Step by Step
- Combine the flour, sugar, and salt in a large bowl. Stir until evenly mixed. This dry blend will form the base of your crust. The fine texture of the flour ensures a smooth dough.
- Add the cold, diced butter to the flour mixture. Use a pastry cutter or your fingertips to work the butter into the flour until the mixture resembles coarse crumbs. The key is to keep the butter cold; otherwise, it will melt and ruin the flakiness.
- Drizzle the ice water over the mixture in small increments. Press the dough together with your hands after each addition. The dough should come together into a cohesive ball—if it’s too sticky, add a splash more water; if it’s dry, add a bit more.
- Wrap the dough in plastic wrap and refrigerate for 30 minutes. This step allows the gluten to relax and the butter to firm up, making the dough easier to roll out. It also prevents the dough from shrinking during baking.
- While the dough chills, prepare the jam. In a saucepan, combine the sliced strawberries, sugar, lemon juice, vanilla, and balsamic vinegar. Cook over medium heat, stirring frequently, until the mixture thickens and the berries break down into a jam‑like consistency. This should take about 10 minutes.
- Preheat your oven to 400°F (200°C). Line a baking sheet with parchment paper to prevent sticking.
- On a lightly floured surface, roll out the chilled dough into a 12-inch circle. Transfer it to the prepared baking sheet. If the dough cracks, gently press the edges to seal.
- Spread the jam evenly over the dough, leaving a 1‑inch border around the edges. This border will become the crust’s outer edge, creating a beautiful contrast between the golden crust and the glossy jam.
- Fold the edges of the dough over the jam, gathering them into a loose purse shape. Pinch the edges together to seal, but leave the center exposed. The uneven, rustic shape adds to the galette’s charm.
- Beat the egg and brush it over the dough’s surface. This egg wash will give the crust a shiny, golden finish. Don’t forget to lightly brush the edges, too.
- Bake for 30 minutes, or until the crust is golden brown and the jam is bubbling. The scent of caramelized sugar will fill your kitchen, making it impossible to resist.
- Let the galette cool on a wire rack for 10 minutes before slicing. This resting period allows the jam to set slightly, preventing it from oozing onto your knife.
- Serve warm, optionally topped with a dollop of whipped cream or a sprinkle of fresh mint. The contrast of hot crust and cool cream is pure bliss.
That's it — you did it. But hold on, I've got a few more tricks that'll take this to another level. These insider tips will help you avoid common pitfalls and elevate the flavor profile to professional standards.
Insider Tricks for Flawless Results
The Temperature Rule Nobody Follows
Baking at exactly 400°F (200°C) is crucial. Too low, and the crust won’t brown; too high, and the jam will evaporate before the crust sets. Use an oven thermometer to confirm the temperature before you bake. I’ve found that preheating for 15 minutes gives the best results.
Why Your Nose Knows Best
The aroma of caramelized sugar is your best judge of doneness. When you smell the buttery scent mingling with the fruity sweetness, the galette is almost ready. This sensory cue saves you from guessing based on time alone.
The 5‑Minute Rest That Changes Everything
Letting the galette rest on a wire rack for 5 minutes after baking allows the jam to set and the crust to finish its internal cooking. This short rest prevents the jam from running off the knife and ensures a clean slice. I’ve seen people skip this step, resulting in a messy mess.
The Flour‑Free Crust Trick
If you’re gluten‑free, substitute the all‑purpose flour with a 1:1 blend of gluten‑free flour and xanthan gum. The xanthan gum mimics gluten’s elasticity, keeping the crust tender and flaky. The rest of the recipe remains unchanged.
The Perfect Egg Wash
Add a splash of milk to the beaten egg for a softer glaze. This small tweak gives the crust a subtle sheen without the shine of a full egg wash, which can be too glossy for some.
The Secret to Juicy Strawberries
Do not overcook the jam. When the berries break down but still retain some texture, the jam will be jam‑y, not syrupy. A quick stir and a 10‑minute cook time keeps them juicy.
With these tricks in your arsenal, you’ll consistently produce galettes that wow everyone at the table.
Creative Twists and Variations
This recipe is a playground. Here are some of my favorite ways to switch things up:
Peach & Honey Galette
Swap strawberries for sliced peaches and replace the sugar with honey. The peaches bring a subtle earthiness, while honey adds a silky sweetness that complements the buttery crust. Serve with a drizzle of lemon zest for brightness.
Blueberry Lemon Galette
Use fresh blueberries and increase the lemon juice to 2 tbsp. The tartness of the lemon balances the blueberries’ natural sweetness. Finish with a dusting of powdered sugar for an elegant look.
Chocolate‑Covered Strawberry Galette
After baking, drizzle melted dark chocolate over the top. The chocolate creates a glossy finish and adds a rich, bittersweet contrast. Let it set for a few minutes before slicing.
Savory Berry Galette
Replace strawberries with blackberries, add a pinch of sea salt, and sprinkle crumbled goat cheese on top before baking. The cheese adds a creamy tang that balances the fruit’s acidity. This version is perfect for a brunch or light dinner.
Nutty Strawberry Galette
Chop toasted pecans and mix them into the jam. The nuts add crunch and a buttery flavor that pairs beautifully with the strawberries. Serve with a scoop of vanilla ice cream for an indulgent treat.
Berry & Citrus Galette
Add a mix of raspberries, blueberries, and orange segments to the jam. The citrus adds a bright, zesty note that lifts the overall flavor. Finish with a sprinkle of fresh mint for a refreshing finish.
These variations prove that the galette is versatile enough to suit any taste, from sweet to savory, and any season. The key is to keep the crust simple and let the fruit shine.
Storing and Bringing It Back to Life
Fridge Storage
Cool the galette completely, then wrap it tightly in plastic wrap. Store in the refrigerator for up to 3 days. The crust will stay firm, and the jam will remain juicy.
Freezer Friendly
Wrap the galette in foil, then place it in an airtight freezer bag. Freeze for up to 2 months. Thaw overnight in the refrigerator before reheating.
Best Reheating Method
Reheat in a preheated oven at 350°F (175°C) for 10 minutes. Add a splash of water before reheating to create steam, keeping the jam moist. The crust will regain its crispness while the jam stays luscious.