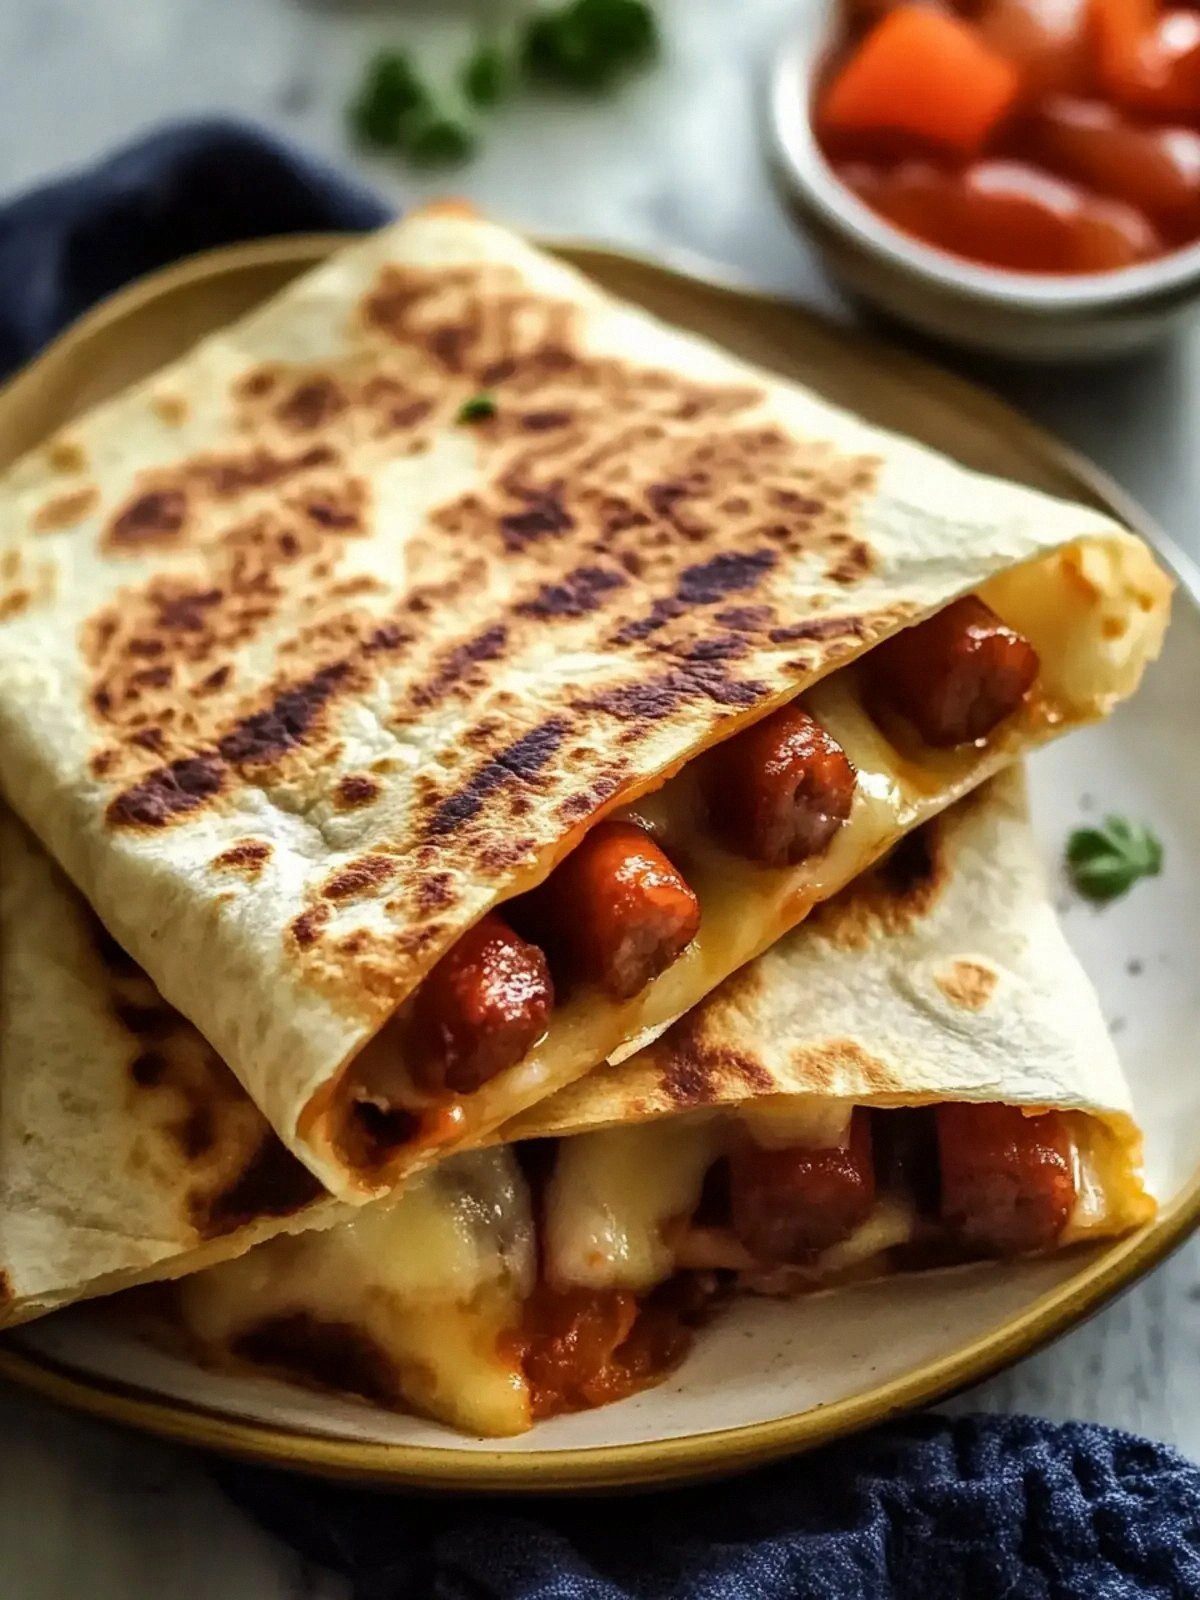
Picture this: a late‑night kitchen, the fridge humming, and a sudden craving that feels more like a culinary dare than a snack. I was staring at a pile of hot dogs and flour tortillas, thinking, “What if I could turn this ordinary combo into something that makes everyone stop mid‑conversation?” The answer arrived in a sizzling pan, a splash of cheese, and a whisper of salsa that turned the humble ingredients into a flavor explosion. That moment was a revelation—this isn’t just a hot‑dog snack; it’s a passport to a crispy, gooey adventure that even the most seasoned foodie would brag about. I’ve been rehearsing the recipe in my head, ready to share every secret so you can taste the same fireworks without the kitchen chaos.
The first thing you notice is the aroma: melted cheese, a hint of smoked pork, and a faint sweetness from the tortillas, all dancing together like a well‑tuned orchestra. As the pan heats, a gentle hiss signals the beginning of the transformation, and you can almost taste the crunch before it even hits the tongue. The texture is a glorious contrast—soft, buttery tortillas with a golden, crackly edge that shatters like thin ice when you bite. The flavor profile is a balanced duet: the savory hot dog, the creamy cheese, and the bright, tangy salsa that cuts through the richness. And the best part? Every bite feels like a mini celebration, a quick escape from the ordinary into a world of bold, comforting flavors.
What makes this version stand out is that it doesn’t rely on a single gimmick; it’s the harmony of simplicity and indulgence. I dare you to taste this and not go back for seconds—once you feel that cheese melt, you’ll be hooked. The technique I’ll reveal uses a quick sear that locks in juices while giving the tortilla a crisp finish that feels like a crunchy cookie. The result is a handheld masterpiece that can be served as a quick lunch, a party snack, or a midnight craving. The recipe is so versatile that you can swap ingredients or tweak the sauces without losing that signature wow factor.
Picture yourself pulling this out of the oven, the whole kitchen smelling incredible, and friends gathering around the table like they’re at a food festival. The moment the first bite hits your palate, you’ll feel the crunch, the melt, and the punch of salsa all in one harmonious bite. I’ll guide you through every single step—by the end, you’ll wonder how you ever made it any other way. The anticipation of that first bite is almost a ritual, a reminder that cooking can be both simple and spectacular. Let’s dive in and turn those ordinary ingredients into a crowd‑pleasing, unforgettable dish.
What Makes This Version Stand Out
- Taste: The combination of smoky hot dog, creamy cheese blend, and zesty salsa creates a flavor profile that feels both familiar and adventurous. The cheese melts into silky ribbons that coat the hot dog, while the salsa adds a bright, citrusy punch that balances the richness. This layered taste ensures each bite is a revelation, not just a repetition of the same flavors.
- Texture: The tortillas are toasted to a golden crisp that snaps with every bite, while the interior remains soft and buttery. The hot dog’s juices mingle with the melted cheese, creating a luscious, gooey center that contrasts with the crunchy edges. The result is a multi‑sensory experience where crunch and melt play off each other like a well‑composed dance.
- Simplicity: With only seven core ingredients, the recipe is accessible to anyone, even those who feel overwhelmed by complex menus. The preparation steps are straightforward, requiring no advanced techniques or exotic tools. This simplicity makes it ideal for quick weeknight meals or spontaneous gatherings.
- Crowd Reaction: Friends and family will line up for seconds after the first plate is served. The dish’s eye‑catching presentation and bold flavors make it a conversation starter at parties. Even the most skeptical palate will be won over by the irresistible combination of textures.
- Ingredient Quality: Choosing fresh hot dogs and high‑quality cheese blend elevates the dish from ordinary to extraordinary. The tortillas should be soft yet sturdy to hold the fillings without tearing. These small choices in quality create a noticeable difference in taste and mouthfeel.
- Make‑Ahead Potential: The quesadillas can be assembled ahead of time, stored in the fridge, and reheated with a quick pan‑fry or toaster oven. This makes it a perfect prep‑for‑later option for busy schedules. The flavors deepen when the quesadillas rest, offering an even richer experience.
Inside the Ingredient List
The Flavor Base
The hot dogs are the star of this dish, providing a savory foundation that carries the other flavors. Opt for a quality smoked or beef variety to enhance the depth of the overall taste. If you prefer a milder profile, choose a turkey or chicken hot dog, but be aware the flavor will shift slightly. The hot dog’s natural juices mingle with the cheese, creating a sauce that coats the tortilla like velvet. Skipping the hot dog entirely would change the dish into a pure cheese quesadilla, losing that signature meaty punch.
The Texture Crew
Flour tortillas bring the essential chewy structure, acting as a vessel for the fillings. They should be warm and pliable; cold tortillas can tear when folded. A small pinch of salt enhances their flavor, but too much can make them tough. The cheese blend melts into a silky coating, creating a gooey center that contrasts with the crisp edges. Oil, used sparingly, helps the tortilla crisp up without making it greasy. If you’re watching calories, a non‑stick spray can replace the tablespoon of oil while still achieving a golden finish.
The Unexpected Star
Salsa adds a bright, acidic counterpoint that cuts through the richness of the cheese and hot dog. A chunky tomato salsa offers a satisfying bite, while a smoother pico de gallo provides a cleaner palate. The choice of salsa can shift the dish’s profile from sweet to spicy or from classic to exotic. If you’re feeling adventurous, try a roasted poblano salsa for a smoky depth. Skipping the salsa would leave the quesadilla feeling flat and indulgent, lacking that essential zing.
The Final Flourish
Sour cream and guacamole are served as accompaniments, turning the dish into a complete flavor experience. Sour cream adds a cool, tangy note that balances the heat of the salsa. Guacamole introduces creamy, buttery texture and a subtle earthy flavor that complements the cheese. These dips can be mixed together for a “mole” effect or served separately to let each flavor shine. If you’re a fan of extra heat, sprinkle a dash of cayenne or chipotle powder into the guacamole for a kick.
Everything's prepped? Good. Let's get into the real action, where the magic happens and the flavors collide.
The Method — Step by Step
- Step 1: Prep the Hot Dogs. Slice each hot dog into 1/2‑inch thick rounds, leaving the ends intact for a fun presentation. Arrange the slices on a plate and set aside. The slicing creates more surface area for the cheese to cling to, ensuring every bite is packed with flavor. If you prefer a chunkier bite, leave the hot dogs whole and cut them into bite‑sized pieces later.
- Step 2: Warm the Tortillas. Heat a non‑stick skillet over medium heat. Lightly brush each tortilla with a thin layer of oil, then place it in the skillet for 30 seconds on each side. The oil helps the tortilla develop a golden crust while keeping it pliable. Watch for a light golden color; this indicates the tortilla is ready to hold the fillings without tearing.
- Step 3: Assemble the Quesadilla. Spread a generous spoonful of cheese blend on one half of the warm tortilla. Layer the hot dog slices evenly, then top with a drizzle of salsa. Fold the tortilla over, pressing gently to seal. This step is the heart of the dish; the cheese will melt into a silky sauce that clings to the hot dog and tortilla. Kitchen Hack: Use a spatula to press the edges firmly; this prevents the filling from spilling during the final flip.
- Step 4: Cook the Quesadilla. Place the assembled quesadilla back into the skillet. Cook for 3–4 minutes on each side, or until the cheese is fully melted and the tortilla is a deep golden brown. The sizzle you hear is the cheese bubbling, a sign that the flavors are coming together. Flip carefully to avoid tearing the tortilla; a gentle, steady motion works best.
- Step 5: The Final Touch. Once the quesadilla is cooked, remove it from the skillet and let it rest for 1 minute. This short rest allows the cheese to set slightly, preventing a gooey mess when you cut. Slice the quesadilla into wedges and serve immediately with sides of sour cream, salsa, and guacamole. Watch Out: Don’t let the cheese over‑melt; it will become runny and make the tortilla soggy.
- Step 6: Serve with Confidence. Plate the quesadilla wedges on a warmed platter to keep them crisp. Add small bowls of sour cream, salsa, and guacamole on the side. The trio of dips offers a spectrum of flavors—cool, spicy, and creamy—that elevate each bite. This presentation transforms the dish into a party‑ready centerpiece.
- Step 7: Optional Garnish. Sprinkle fresh cilantro or chopped green onions over the top for a burst of color and freshness. A squeeze of lime juice adds a bright citrus note that cuts through the richness. These garnishes are optional but recommended for an extra layer of flavor.
- Step 8: Enjoy! Dig in while the quesadilla is still warm and the cheese is at its most luscious. The first bite should be a harmonious blend of crunch, melt, and zesty punch. This is the moment you’ll feel like you’ve mastered a culinary secret, and your friends will beg for the recipe.
That's it—you did it. But hold on, I've got a few more tricks that'll take this to another level, ensuring each bite is a masterpiece.
Insider Tricks for Flawless Results
The Temperature Rule Nobody Follows
Many cooks underestimate the importance of skillet temperature. A medium‑high heat ensures the tortilla crisps quickly without burning, while the cheese melts evenly. If the pan is too hot, the tortilla will brown too fast and the cheese may burn; if too cool, the tortilla stays soggy. I use a small drop of water to test the heat—if it dances, the pan’s ready. This simple test guarantees a perfect golden finish every time.
Why Your Nose Knows Best
The aroma of cheese melting is a reliable indicator of doneness. When the cheese starts to bubble and emit a rich, buttery scent, it’s time to flip. The smell precedes the visual cue, so trust your nose to catch the moment before the tortilla over‑bakes. This sensory check reduces the risk of burnt edges and ensures a melt that’s both creamy and flavorful.
The 5‑Minute Rest That Changes Everything
After removing the quesadilla from the skillet, let it rest on a wire rack for five minutes. This brief pause allows the cheese to set, preventing a gooey mess when you cut. The rest also lets the tortilla’s heat distribute evenly, ensuring a consistent crunch throughout. A quick 5‑minute rest is a game‑changer for presentation and texture.
Use a Heavy‑Bottom Pan for Even Heat
A heavy‑bottom skillet retains heat better, distributing it uniformly across the tortilla. This prevents hot spots that could burn the cheese or leave the tortilla undercooked. If you don’t have a heavy pan, a cast‑iron skillet works wonders, but be careful not to pre‑heat it too long. Even heat is the secret to a consistently golden, crisp edge.
Keep the Tortilla Warm While You Assemble
If you’re making multiple quesadillas, keep the already cooked ones warm in a low oven (around 200°F). This prevents them from cooling and losing their crispness before serving. A warm tortilla also helps the cheese melt more smoothly when you assemble the next batch. This trick is essential for parties or large gatherings.
Creative Twists and Variations
This recipe is a playground. Here are some of my favorite ways to switch things up:
Mexican Street Food Vibes
Swap the cheese blend for Oaxaca or Chihuahua cheese, and add a splash of lime juice to the salsa. Top with a drizzle of crema and a sprinkle of chopped cilantro for an authentic street‑food feel. The fresh lime brightens the dish, making it feel like a bite of Mexico’s bustling markets.
Mediterranean Twist
Replace the hot dog with sliced grilled halloumi or roasted eggplant. Use a tzatziki sauce instead of salsa, and finish with a sprinkle of oregano. This variation transforms the quesadilla into a Mediterranean‑inspired snack with a briny, tangy profile.
Breakfast Edition
Add scrambled eggs and chorizo between the tortilla and cheese. Serve with a side of pico de gallo and a drizzle of hot sauce. The breakfast version turns the quesadilla into a hearty, protein‑packed start to the day.
Vegan Delight
Use vegan hot dogs and a dairy‑free cheese blend. Substitute the sour cream with coconut yogurt and the guacamole with a cashew‑based dip. The flavors stay bold, but the dish becomes plant‑based and cruelty‑free.
Sweet & Spicy Fusion
Add a sprinkle of brown sugar to the salsa and a dash of chipotle powder. Top the quesadilla with a drizzle of honey after cooking. The sweet‑spicy combo creates a surprising contrast that excites the palate.
Cheese‑Heavy Indulgence
Layer extra cheese between each hot dog slice and use a double layer of tortillas. Cook until the cheese is bubbling and slightly browned. This version is the ultimate comfort food, perfect for a cozy night in.
Storing and Bringing It Back to Life
Fridge Storage
Wrap each quesadilla tightly in parchment paper or foil and store in an airtight container. Keep them in the refrigerator for up to 3 days. When ready to eat, reheat in a skillet over medium heat for 2–3 minutes on each side until the cheese is warm again. This method preserves the crunch and flavor without drying out the tortilla.
Freezer Friendly
For longer storage, freeze the assembled quesadillas before cooking. Place each wrapped quesadilla on a baking sheet and freeze until solid, then transfer to a freezer bag. They stay good for up to 2 months. To cook, bake at 350°F for 15 minutes or until heated through, then finish in a skillet for a crisp finish.
Best Reheating Method
The most reliable way to revive a stored quesadilla is the skillet method. Warm a non‑stick pan over medium heat, place the quesadilla, and cook for 2–3 minutes on each side. If the tortilla feels dry, add a teaspoon of water to the pan and cover briefly to steam it back to life. The result is a warm, gooey center with a freshly crisp exterior.