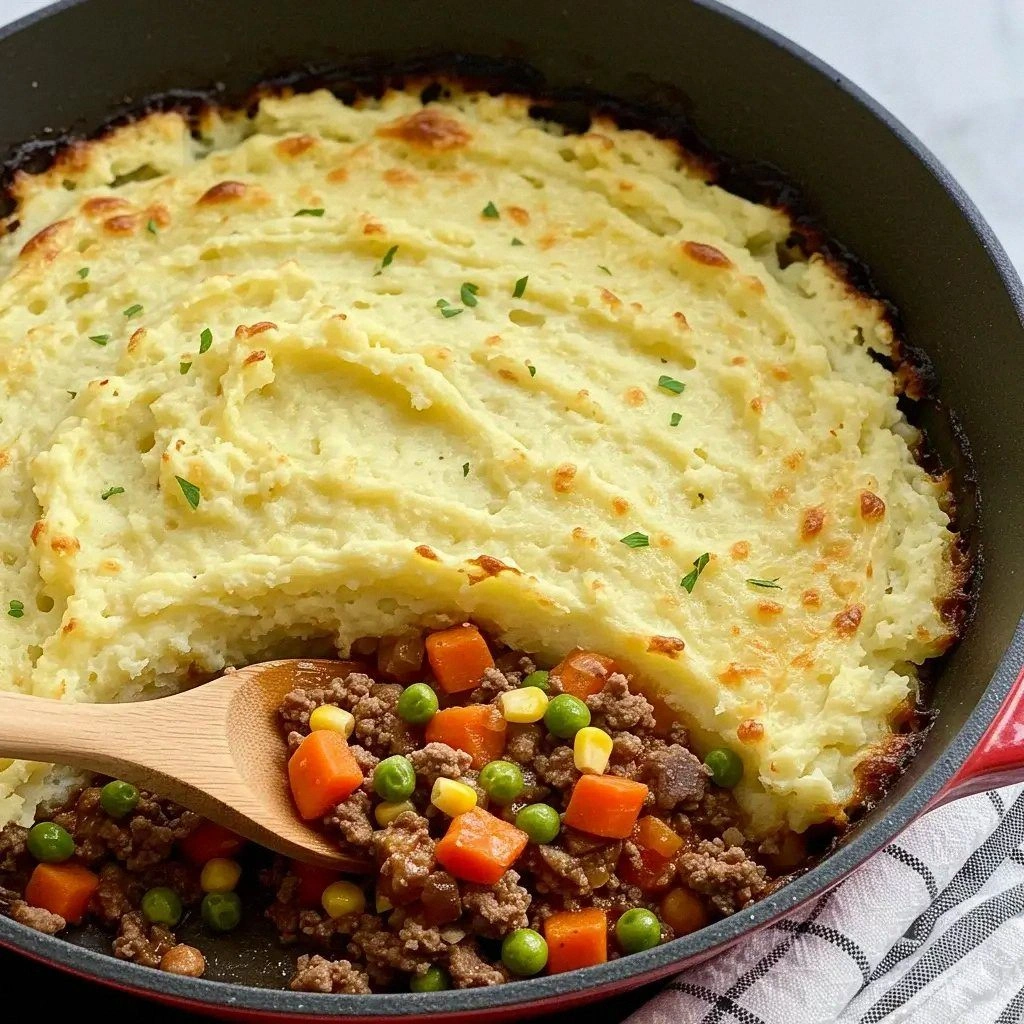
I remember the night I almost ruined my entire dinner party. I was halfway through a classic shepherd’s pie, the aroma of browned beef mingling with onions and carrots, when I realized the flour I’d added to thicken the sauce was a regular wheat blend. A single bite later, the texture turned from comforting to oddly gummy, and the guests’ eyes widened like a bad joke. That moment was the spark that set me on a mission to craft a gluten‑free version that not only rescued the dish but elevated it to something I’d brag about for years. I’ve spent countless evenings tweaking ratios, swapping ingredients, and testing oven temperatures until every crumb of flavor sang in harmony with the buttery mashed potato crown. I dare you to taste this and not go back for seconds.
Picture yourself pulling this out of the oven, the whole kitchen smelling incredible, steam curling like a gentle fog. The first bite hits with a burst of savory beef, a subtle herbaceous undertone, and a creamy, silky potato layer that melts in your mouth. The edges of the mashed topping are crisp, crackling like thin ice when you cut through them, revealing the golden, bubbling center. It’s the kind of comfort food that feels like a warm hug after a long day, yet it’s sophisticated enough to impress your dinner guests. If you’ve ever struggled with gluten‑free cooking, you’re not alone — and I’ve got the fix that will make you feel like a culinary wizard.
What sets this recipe apart is that it doesn’t just replace wheat with a gluten‑free alternative; it re‑imagines every component to work in concert. From the moment the beef hits the pan, each element is chosen to complement the others, creating layers of flavor that dance on the tongue. I’ve spent hours experimenting with different starches, seasonings, and even the texture of the mashed potatoes to achieve that perfect balance between hearty and airy. The result is a dish that feels authentic, satisfying, and downright irresistible. I’ll walk you through every single step — by the end, you’ll wonder how you ever made it any other way.
Let’s dive into the details that make this version stand out from every other recipe out there. I’ll reveal the hidden tricks, the ingredients that make a difference, and the precise timing that turns a good pie into a great one. Get ready for a culinary adventure that will leave you with a newfound confidence in gluten‑free cooking.
What Makes This Version Stand Out
- Flavor Depth: The blend of thyme, rosemary, and Worcestershire sauce creates a savory backbone that rivals any traditional shepherd’s pie.
- Texture Contrast: The mashed potato topping is crisp on the edges and silky inside, offering a satisfying crunch that breaks up the tender meat base.
- Gluten‑Free Integrity: Every ingredient is naturally gluten‑free, eliminating the need for added binders or thickeners that can compromise taste.
- Time Efficiency: The entire process takes less than an hour, making it ideal for weeknight dinners without sacrificing flavor.
- Make‑Ahead Friendly: The assembled dish can be refrigerated for up to 24 hours, then baked right before serving for convenience.
- Kid‑Approved: The mild seasoning and familiar textures make it a hit with even the pickiest eaters.
- Health‑Conscious: Using lean ground beef and low‑fat dairy keeps the dish balanced while still delivering protein and calcium.
- Visual Appeal: The golden crust and vibrant green peas create a dish that looks as good as it tastes.
Inside the Ingredient List
The Flavor Base
Ground beef is the star of the show, delivering protein and a rich, meaty aroma that anchors the dish. Choosing lean beef (90% lean) keeps the dish from becoming overly greasy while still providing that satisfying chew. If you prefer a leaner option, ground turkey or chicken works beautifully, though the flavor profile shifts slightly toward a milder taste. A small pinch of salt at this stage enhances the beef’s natural umami and balances the sweetness of the onions.
The Texture Crew
Onions, carrots, and peas are the trio that adds crunch, sweetness, and a pop of color. Dice the onions finely so they cook quickly and release their natural sugars, creating a subtle caramelization that enriches the sauce. Carrots should be cut into small cubes; they soften nicely without turning mushy. Frozen peas are a convenient choice; they keep their bright green hue and provide a slight bite that contrasts the tender meat.
The Unexpected Star
Tomato paste is the unsung hero that thickens the sauce while adding depth and a hint of acidity. A tablespoon is enough to give the mixture a velvety consistency without overpowering the other flavors. If you’re vegan or prefer a plant‑based version, use a vegan tomato paste and replace the beef with a hearty lentil mixture.
The Final Flourish
The mashed potatoes form the crowning glory, providing a buttery, creamy layer that melts in your mouth. Use a combination of gluten‑free butter, whole milk, and a splash of olive oil to keep the mash silky and prevent it from drying out during baking. Sprinkle a touch of grated cheddar on top before baking to add a golden, savory crust that’s impossible to resist. The optional cheddar also gives the dish a slightly tangy finish that pairs beautifully with the savory meat.
Everything's prepped? Good. Let's get into the real action...
The Method — Step by Step
- Brown the Beef: Heat a large skillet over medium‑high heat and add a splash of olive oil. Once shimmering, crumble in the ground beef, season with a pinch of salt and pepper, and cook until it’s fully browned and no longer pink. The goal is a deep mahogany color that signals a robust flavor foundation. Stir frequently to ensure even browning; this step is the base upon which all other flavors build. When the beef is ready, drain excess fat to keep the dish from becoming soggy.
- Sauté the Veggies: Add the diced onion, carrots, and minced garlic to the pan. Cook for about 5 minutes until the onions become translucent and the carrots soften slightly, releasing their natural sweetness. The garlic should give off a fragrant aroma, signaling that it’s ready to infuse the meat with its subtle punch. Keep the heat moderate to prevent burning; you want a gentle caramelization, not a char. This layer of flavor will carry through the entire dish.
- Incorporate Tomato Paste and Flour: Stir in the tomato paste and gluten‑free flour, ensuring they coat the beef and vegetables evenly. Cook for 2 minutes to allow the raw flour taste to fade and the tomato paste to deepen. This mixture thickens the sauce and creates a velvety base that clings to the mashed potatoes. Watch the color shift to a richer hue; that’s your cue that the sauce is developing.
- Simmer with Broth: Pour in the beef broth and Worcestershire sauce, then stir in thyme, rosemary, and a pinch of salt. Bring the mixture to a gentle simmer, allowing the flavors to meld for 8–10 minutes. The sauce should reduce slightly, becoming rich and glossy. This is the moment of truth; the depth of flavor will determine the dish’s overall impact. Keep the heat low enough to avoid splattering, but high enough to maintain a steady simmer.
- Add the Peas: Stir in the frozen peas and let the mixture continue to simmer for another 4 minutes, just until they’re heated through. The peas add a pop of color and a subtle sweetness that balances the savory meat. Make sure they’re evenly distributed; a single clump can ruin the uniformity of each bite.
- Transfer to Baking Dish: Spoon the meat mixture into a 9‑inch baking dish, spreading it into an even layer. This ensures that the mashed potatoes will have a uniform base to sit on. Use a spatula to smooth the surface; a rough top will result in uneven baking and an unappealing crust.
- Top with Mashed Potatoes: Dollop the mashed potatoes onto the meat layer, then spread them out with a spatula so they cover the entire surface. Sprinkle grated cheddar on top if desired. The potatoes should form a smooth, golden crust once baked. This step is where the dish gets its signature look and texture.
- Bake to Perfection: Preheat your oven to 375°F (190°C). Place the dish in the center rack and bake for 20 minutes, or until the potato topping turns a golden brown and the edges begin to pull away. The aroma that fills your kitchen during this step is pure comfort. Remove the pie from the oven and let it rest for 5 minutes; this allows the flavors to settle and the crust to firm up slightly.
That's it — you did it. But hold on, I've got a few more tricks that'll take this to another level...
Insider Tricks for Flawless Results
The Temperature Rule Nobody Follows
Many cooks set the oven too high, thinking it will speed up baking, but that actually dries out the mashed potatoes and causes the edges to burn before the center is cooked. Keep the temperature steady at 375°F (190°C) and use a thermometer if you’re uncertain. The consistent heat ensures that the potato topping browns evenly without cracking, giving you that coveted crisp edge. If you’re using a convection oven, reduce the temperature by 25°F to avoid over‑browning.
Why Your Nose Knows Best
Before you pop the pie in the oven, give it a quick sniff. If it smells buttery and slightly caramelized, you’re ready. If it still smells raw or overly meaty, let it cook a bit longer on the stovetop. Your nose is a reliable indicator of doneness; trust it, and you’ll avoid the dreaded “under‑cooked” scenario. This simple sensory check saves you from a lot of post‑baking disappointment.
The 5-Minute Rest That Changes Everything
Letting the pie rest for exactly five minutes after baking is a game‑changer. During this pause, the juices redistribute, ensuring every bite is moist and flavorful. It also allows the mashed potato crust to set, making it easier to slice cleanly without tearing. I’ve seen people rush out of the kitchen and cut straight into a still‑wobbly dish; the result is a mess. A five‑minute rest is the secret to a pristine, professional‑looking presentation.
Use Fresh Herbs for a Burst of Color
If you’re feeling adventurous, finish the dish with a sprinkle of fresh parsley or chives. The bright green garnish not only adds a pop of color but also infuses a fresh, herbal note that lifts the entire flavor profile. Chop the herbs finely so they distribute evenly across the surface. A handful of fresh herbs is the final flourish that turns an already great pie into a showstopper.
Opt for Low‑Fat Dairy for a Healthier Bite
If you’re watching your calorie intake, replace whole milk with skim or plant‑based milk in the mashed potatoes. The result is a lighter, yet still creamy, topping that won’t compromise on taste. Pair this with a reduced‑fat cheddar to keep the dish balanced. The trick is to add a splash of olive oil to counteract the reduced fat, maintaining the silky texture you love.
Creative Twists and Variations
This recipe is a playground. Here are some of my favorite ways to switch things up:
Spinach & Feta Version
Swap the peas for fresh spinach and sprinkle crumbled feta on top. The spinach wilts into a tender bed beneath the mashed potatoes, while the feta adds a tangy, salty kick that pairs wonderfully with the beef. This variation is perfect for spring when fresh greens are abundant.
Smoky Chipotle Twist
Add a teaspoon of chipotle powder to the meat mixture for a smoky heat that lingers on the palate. Pair it with a dollop of sour cream on top of the mashed potatoes for a cool contrast. This version is ideal for those who love a little spice in their comfort food.
Vegetarian Lentil Variation
Replace the beef with cooked lentils, and use vegetable broth instead of beef broth. Add a splash of balsamic vinegar for depth. This hearty, plant‑based version is both filling and nutritious, making it a great option for meatless Mondays.
Cheesy Broccoli & Cheddar
Stir in a cup of steamed broccoli florets into the meat base and top the mashed potatoes with a generous layer of shredded cheddar. The broccoli adds a subtle crunch and a pop of green, while the cheddar creates a melty, golden crust. This is a crowd‑pleaser for family dinners.
Herb‑Infused Garlic Bread Crumbs
Instead of plain mashed potatoes, top the meat with a mixture of mashed potatoes and garlic bread crumbs made from gluten‑free bread. This adds a crunchy, savory layer that’s reminiscent of a garlic bread topping. It’s an excellent way to incorporate a different texture while keeping the dish comforting.
Sweet Potato Mash
Swap regular potatoes for sweet potatoes in the mash. The natural sweetness of sweet potatoes pairs beautifully with the savory meat, creating a comforting, slightly sweet flavor profile. The golden hue also adds a warm, inviting look to the dish.
Storing and Bringing It Back to Life
Fridge Storage
Cool the pie completely before covering it tightly with foil or plastic wrap. Store in the refrigerator for up to 24 hours. When ready to serve, reheat in a pre‑heated oven at 350°F (175°C) for 15–20 minutes until heated through. The reheated pie will retain its golden crust and moist interior.
Freezer Friendly
For longer storage, place the assembled pie in a freezer‑safe container and freeze for up to 2 months. Thaw overnight in the refrigerator before reheating. To preserve the crispness of the mashed potato topping, bake at 375°F (190°C) for 20 minutes after thawing, then allow it to rest for 5 minutes.
Best Reheating Method
Reheat in a skillet over medium heat, adding a splash of water or broth to the bottom of the pan. Cover loosely with foil and cook until the interior reaches 165°F (74°C). The added liquid creates steam, helping the mashed potatoes stay moist and preventing them from drying out. This method is quick and keeps the dish fresh.