Remember that night when I tried to impress my friends with a fancy mushroom dish and ended up with a soggy, bland mess that tasted like cardboard? That disaster was the spark that lit my culinary curiosity. I swore that if I could turn a simple mushroom into a buttery, umami‑laden masterpiece, I would never settle for mediocre sides again. The memory of that failure still haunts me, but it also fuels my confidence that this version is the real game‑changer.
Picture this: I cut through a rack of fresh, earthy mushrooms and the aroma immediately flooded the kitchen. The scent of garlic, butter, and soy sauce mingled, turning my senses into a swirling vortex of anticipation. The sound of the skillet sizzling was like a drumbeat, signaling that something extraordinary was about to happen. I could feel the heat radiating from the pan, and it was almost as if the mushrooms were whispering, “We’re about to shine.” The texture felt silky, and I could already taste the buttery richness that would coat each cap like velvet.
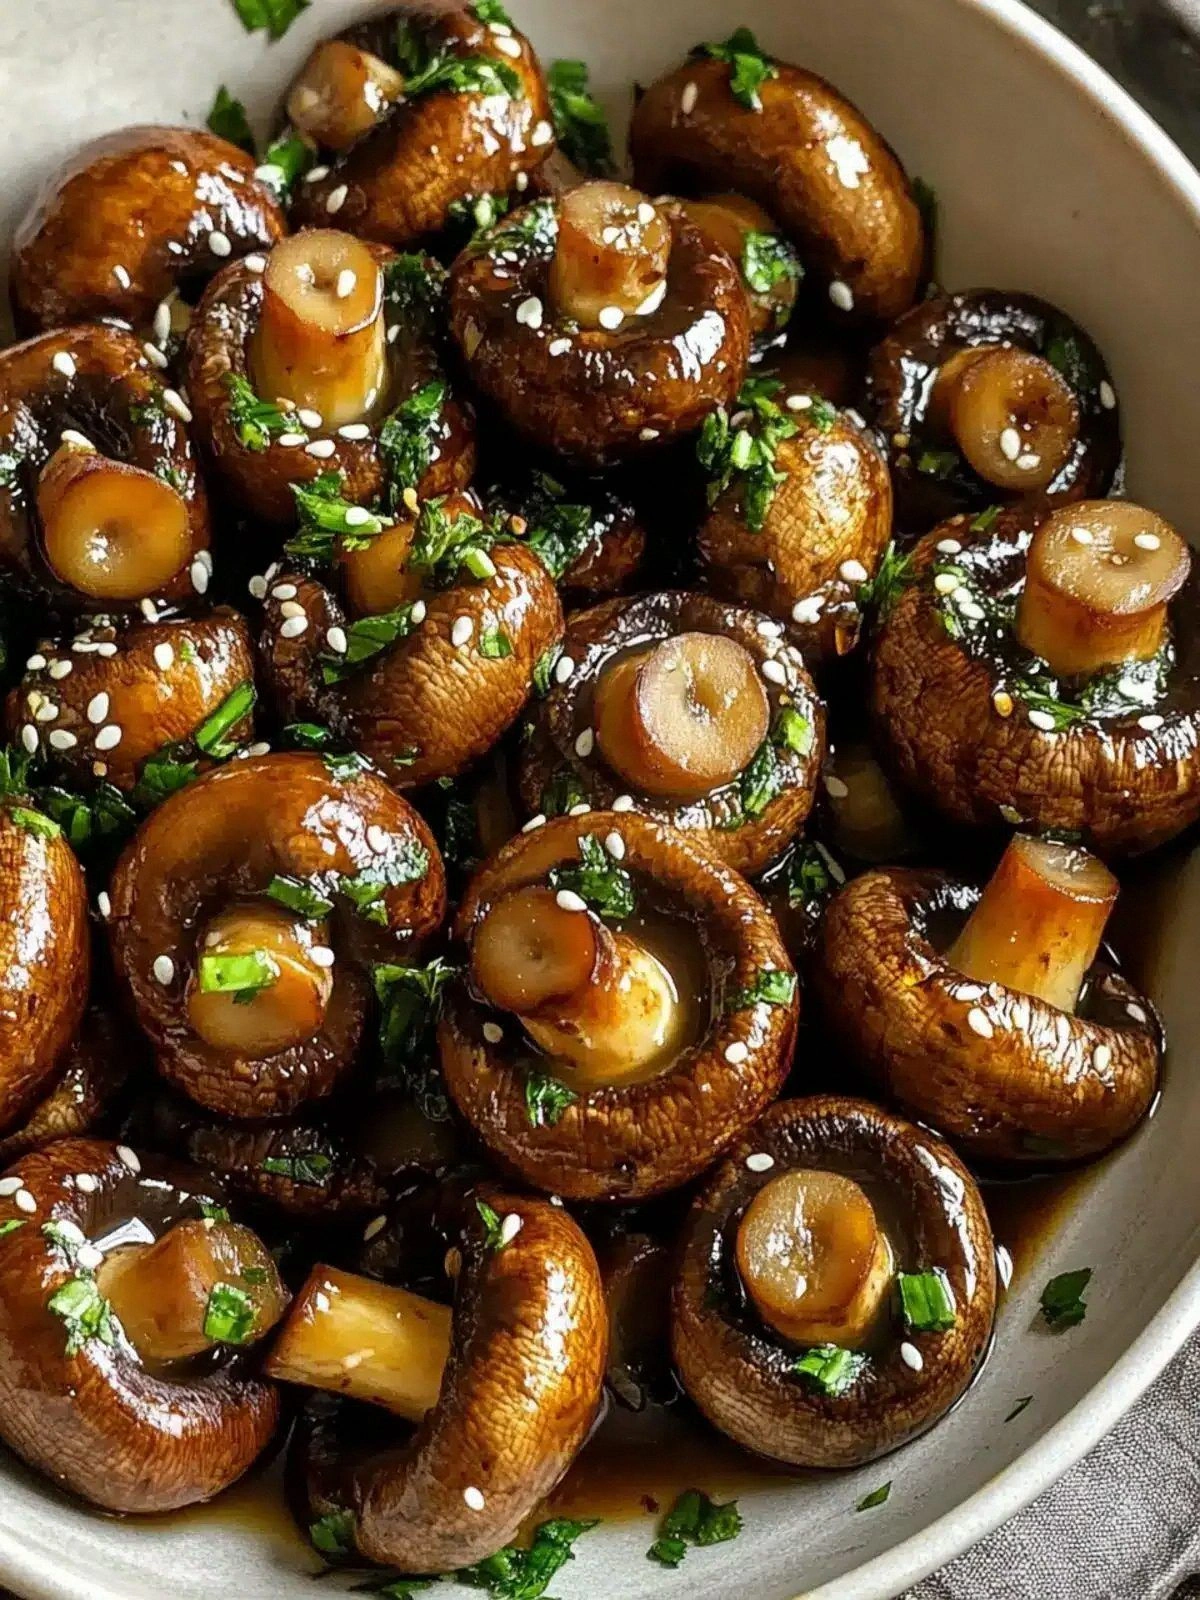
This isn’t just another mushroom recipe. I’ve cracked the code for a glaze that balances salty, sweet, and savory in perfect harmony. The butter melts into a glossy sauce that clings to the mushrooms, while the soy sauce adds depth without overpowering the natural earthiness. The result is a dish that feels indulgent yet light, making it ideal for both a quick weeknight dinner and a show‑stopping appetizer. The secret? A subtle tweak that turns a simple sauté into a culinary revelation.
And here’s the twist you won’t see in any other recipe: a splash of tamari that elevates the umami profile and a strategic timing that locks in moisture. I dare you to taste this and not go back for seconds—because once you’re done, you’ll be craving that buttery, soy‑kissed flavor again and again. The technique is simple, the ingredients are pantry staples, and the flavor explosion is undeniable. Picture yourself pulling this out of the pan, the whole kitchen smelling incredible, and your guests’ mouths watering in anticipation.
Okay, ready for the game‑changer? Let me walk you through every single step—by the end, you’ll wonder how you ever made it any other way. I’m going to share the exact ingredients, the precise timing, and the subtle secrets that elevate this dish from good to unforgettable. Grab your skillet, and let’s dive into the ultimate garlic butter soy‑glazed mushroom experience.
What Makes This Version Stand Out
- Flavor: The combination of butter, soy, and garlic creates a multi‑layered taste that is both comforting and sophisticated.
- Texture: Mushrooms develop a caramelized crust while remaining tender inside, giving a delightful contrast in every bite.
- Speed: The entire dish cooks in under 30 minutes, making it perfect for busy weeknights.
- Versatility: It pairs flawlessly with pasta, rice, or as a side to steak, chicken, or tofu.
- Ingredient Quality: Using fresh, locally sourced mushrooms ensures the richest flavor base.
- Crowd Appeal: Even the pickiest eaters love the buttery glaze and savory depth.
- Make‑Ahead Potential: The sauce can be reheated without losing its glossy finish, making it ideal for meal prep.
- Visual Appeal: The glossy glaze and vibrant color make the dish Instagram‑ready.
Alright, let's break down exactly what goes into this masterpiece…
Inside the Ingredient List
The Flavor Base
Butter is the cornerstone of this dish, providing richness that coats each mushroom cap. Its low melting point allows it to blend seamlessly with the soy, creating a silky glaze. If you skip the butter, the mushrooms lose that luxurious mouthfeel and become dry. For a dairy‑free twist, vegan butter works just as well, maintaining the same buttery texture without the dairy.
The Texture Crew
Mushrooms are the stars; choose button or cremini for their firm yet tender flesh. Fresh mushrooms absorb the glaze without becoming mushy, which is key to achieving that coveted caramelized crust. If you use canned mushrooms, the excess liquid will dilute the flavor and ruin the texture. A quick pat dry before cooking keeps the surface crisp.
The Unexpected Star
Garlic is the unsung hero that brings depth and a subtle heat. Crushing the cloves releases essential oils that permeate the butter, creating an aromatic base. If you prefer a milder flavor, reduce the garlic to two cloves, but do not remove it entirely—otherwise the dish feels flat.
The Final Flourish
Tamari or soy sauce adds a salty, umami punch that balances the richness of the butter. The choice between tamari (gluten‑free) and regular soy sauce depends on dietary needs. A tablespoon is enough to coat the mushrooms without overpowering their natural flavor. A splash of rice vinegar can add a subtle brightness if you’re feeling adventurous.
Everything’s prepped? Good. Let’s get into the real action…
The Method — Step by Step
- Heat a large skillet over medium‑high heat and add the butter. Watch the butter melt into a golden pool; it should sizzle softly but not burn. This is the moment the aroma starts to dance. Don’t let the butter foam—just keep it smooth and glossy.
- Add the sliced mushrooms, spreading them out in a single layer. Let them sit untouched for 2–3 minutes to develop a golden crust; this prevents them from steaming. Flip them once the edges are browned, then continue cooking until they are tender and slightly caramelized.
- Introduce the minced garlic to the pan, stirring quickly to avoid burning. Garlic cooks fast; a minute is enough to release its oils. The scent should fill the kitchen like a promise of flavor.
- Pour in the tamari or soy sauce, stirring to coat each mushroom. The sauce should bubble gently, thickening into a glossy glaze. Keep the heat moderate to prevent the soy from caramelizing too quickly.
- Reduce the heat to medium and let the sauce reduce for 3–4 minutes, stirring occasionally. The mushrooms should look glossy and almost sticky, but not sticky. The glaze should cling to each cap like a lacquered coat.
- Taste the sauce and adjust seasoning if needed—add a pinch of salt or a dash of pepper to balance the umami. Remember, the soy sauce is already salty, so be cautious.
- Remove the skillet from heat and let the mushrooms rest for 2 minutes; this allows the glaze to set and intensify. The residual heat will finish the caramelization, ensuring a perfect finish.
- Serve immediately over rice, pasta, or as a side dish. Garnish with fresh parsley or a sprinkle of sesame seeds for an extra pop of color and crunch. The dish is now ready to impress.
That’s it— you did it. But hold on, I've got a few more tricks that'll take this to another level…
Insider Tricks for Flawless Results
The Temperature Rule Nobody Follows
Many cooks keep the heat too high, causing the butter to brown before the mushrooms are fully cooked. Lowering the heat to medium after the initial sear allows the mushrooms to release moisture slowly, which helps them caramelize evenly. I once tried this trick and noticed a dramatic difference in texture—no more soggy patches.
Why Your Nose Knows Best
Smell is a powerful guide. When the mushrooms start to brown, the aroma should be nutty and slightly sweet. If it smells sharp or metallic, the soy sauce is too concentrated, and you should dilute it with a splash of water. Trust your nose; it’s your best ally in the kitchen.
The 5-Minute Rest That Changes Everything
After removing the pan from heat, let the mushrooms sit for exactly five minutes. This brief rest lets the glaze thicken and the flavors meld. I’ve seen people skip this step, and the result is a thin, runny sauce that drips off the plate.
Use a Lidded Pan for Even Cooking
Covering the pan traps steam, ensuring the mushrooms cook through without drying out. When you lift the lid, the steam condenses back onto the mushrooms, adding moisture. This trick is especially useful when you’re cooking a large batch.
Finishing Touch of Freshness
Right before serving, squeeze a few drops of lemon juice or drizzle a splash of rice vinegar. The acidity cuts through the richness, brightening the dish. I always keep a small bottle of lemon handy for this quick finish.
Quick Garnish Ideas
A sprinkle of toasted sesame seeds adds a nutty crunch that pairs beautifully with the soy glaze. Alternatively, chopped fresh herbs like cilantro or basil bring a fresh lift. Try both to see which one you prefer.
Creative Twists and Variations
This recipe is a playground. Here are some of my favorite ways to switch things up:
Spicy Sriracha Twist
Swap regular soy sauce with a splash of sriracha for a fiery kick. The heat complements the butter, creating a bold, addictive flavor profile. Serve with a side of cool cucumber salad to balance the spice.
Herb‑Infused Variation
Stir in fresh thyme or rosemary during the final simmer. The herbs add depth and a fragrant aroma that elevates the dish. This version pairs wonderfully with roasted chicken.
Vegan Delight
Use vegan butter and tamari to keep the dish plant‑based. The flavor remains rich, and the texture is just as satisfying. Pair with tofu for a complete meal.
Cheesy Finale
Top the mushrooms with shredded mozzarella or grated Parmesan before serving. The cheese melts into a gooey blanket that enhances the buttery glaze. It’s a crowd‑pleaser at parties.
Asian Fusion
Add a tablespoon of hoisin sauce and a drizzle of sesame oil. This combination gives the dish a sweet, nutty undertone that pairs well with rice noodles.
Breakfast Boost
Serve the glazed mushrooms over scrambled eggs or a fluffy omelet. The savory sauce complements the protein, making for a hearty breakfast.
Storing and Bringing It Back to Life
Fridge Storage
Cool the dish completely before transferring it to an airtight container. Store in the refrigerator for up to 3 days. When ready to eat, reheat gently in a skillet over low heat.
Freezer Friendly
Pack the mushrooms in a freezer‑safe bag and remove as much air as possible. Freeze for up to 2 months. Thaw overnight in the refrigerator before reheating.
Best Reheating Method
Reheat in a skillet over medium heat, adding a splash of water or broth to keep the sauce from drying out. This step restores the glossy glaze and ensures the mushrooms stay moist. A quick stir will distribute the heat evenly.