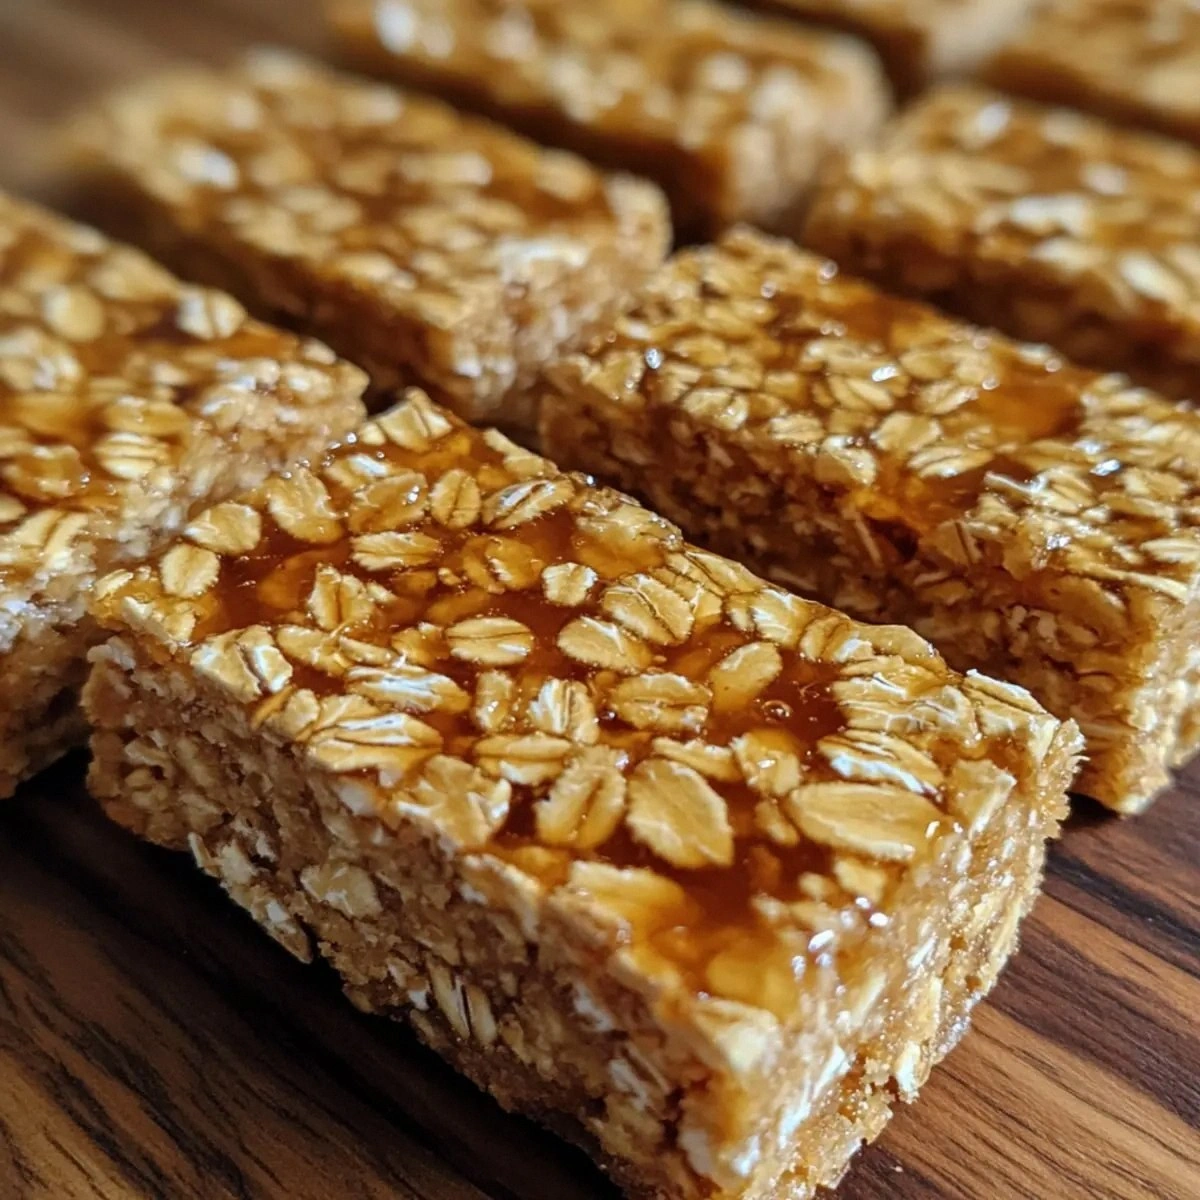
Picture this: you’re standing in a cramped kitchen, the clock ticking, and a craving for something sweet and energizing gnaws at you like a hungry cat. You remember the last time you tried a homemade snack bar and ended up with a sticky mess that looked more like a science experiment than a treat. That disaster, a burnt batch of oats that stuck to the pan like a stubborn sticker, sparked a mission—create a crunchy, honey‑kissed oat bar that actually works. I was determined to turn that kitchen nightmare into a culinary triumph, and I’m about to share the exact recipe that saved my snack game.
The moment you open the pantry, the aroma of toasted oats hits you first—warm, nutty, and slightly sweet. The sight of the golden honey glistening in a saucepan is a visual cue that flavor is about to happen. As the butter melts, a comforting sizzle fills the air, and you can almost taste the caramelized sugar that will coat every grain of oat. The texture is a promise of crisp edges that shatter like thin ice, followed by a chewy center that keeps you satisfied for hours. If you’re like me, you’ll notice the subtle hint of cinnamon dancing through the air, teasing your senses before you even take a bite.
This version is hands down the best you’ll ever make at home because it balances sweetness, crunch, and nutrition in one bite. The secret lies in the harmony of honey and brown sugar, which creates a glaze that’s both sticky and caramelized. The oats are toasted just enough to bring out their natural nuttiness without becoming dry. Adding butter gives a silky mouthfeel that melts in your mouth, while the nuts and seeds provide a satisfying crunch and a nutritional punch. The final touch? A dash of vanilla and cinnamon that elevates the entire flavor profile to something that feels both comforting and adventurous.
I dare you to taste this and not go back for seconds. Most snack bars on the market are either too dry or too sweet, but this one hits the sweet spot with a subtle, buttery glaze that coats every bite. If you’ve ever struggled with making your own bars, you’re not alone—and I’ve got the fix. The trick is simple: let the butter and honey meld together before adding the oats, and then press the mixture into a pan while it’s still warm. Picture yourself pulling this out of the oven, the whole kitchen smelling incredible, and the bars still slightly glossy from the honey glaze.
Okay, ready for the game‑changer? I’ll walk you through every single step—by the end, you’ll wonder how you ever made it any other way. I’ve packed this recipe with insider tricks, fun variations, and storage hacks so you can keep your bars fresh and tasty for weeks. Let’s dive in and turn your kitchen into a snack bar studio.
What Makes This Version Stand Out
- Flavor: The honey and brown sugar blend creates a caramelized glaze that coats the oats, delivering a sweet yet balanced taste that won’t overpower the nutty undertones.
- Texture: Toasted oats provide a satisfying crunch that shatters like thin ice, while the butter’s richness keeps the bars moist and chewy.
- Simplicity: Only nine ingredients and a single pan—no complicated gadgets or multiple steps, just a straightforward, foolproof method.
- Uniqueness: The combination of honey, cinnamon, and vanilla creates an aromatic profile that feels both comforting and adventurous.
- Crowd Reaction: Friends and family rave about the bars’ perfect bite; I’ve heard people ask for the recipe after every gathering.
- Ingredient Quality: Using high‑quality, unsalted butter and raw honey elevates the flavor and adds a touch of premium indulgence.
- Cooking Method: A single pan technique ensures even browning and a uniform glaze, eliminating the need for baking in a separate dish.
- Make‑Ahead Potential: These bars keep well for a week in the fridge and freeze beautifully for longer storage.
Alright, let's break down exactly what goes into this masterpiece...
Inside the Ingredient List
The Flavor Base
Honey is the star of this bar, acting as both sweetener and binder. Its natural sugars caramelize when heated, giving the bars a glossy, caramelized glaze that clings to each oat grain. If you’re watching your sugar intake, you can swap honey for maple syrup or agave nectar, but the flavor profile will shift slightly toward a more earthy sweetness. A good rule of thumb: use a honey with a mild floral note for a delicate finish.
Brown sugar adds depth with its molasses undertones. It also contributes to the chewiness, preventing the bars from becoming too brittle. Skipping brown sugar will leave the bars tasting flat and overly buttery. If you can’t find brown sugar, a pinch of molasses mixed with white sugar can mimic the same richness.
The Texture Crew
Rolled oats are the foundation, providing both bulk and a hearty, nutty flavor. Toasting the oats before mixing them with the honey glaze unlocks their natural oils, giving the bars a deeper, toasty aroma. If you prefer a smoother texture, rolled oats can be replaced with quick oats, but the bars will lose some chew.
Unsalted butter brings a silky mouthfeel that melts in your mouth and balances the sweetness. It also helps the oats hold together, creating a cohesive bar that doesn’t crumble. For a dairy‑free version, coconut oil works well, though it will add a subtle coconut flavor that may or may not be desirable.
The Unexpected Star
Chopped nuts add a satisfying crunch and a dose of healthy fats. Almonds, pecans, or walnuts each bring a distinct flavor profile, so feel free to mix them for a more complex taste. If you’re allergic or just want a lighter version, you can reduce the quantity or substitute with sunflower seeds.
Seeds—pumpkin, sunflower, or chia—provide an extra layer of texture and a nutritional boost. They also help absorb some of the moisture from the honey glaze, keeping the bars from becoming too sticky. A pinch of sesame seeds can add a subtle nutty aroma that complements the oats.
The Final Flourish
Vanilla extract is a subtle but powerful flavor enhancer that rounds out the sweetness and adds a warm, aromatic undertone. A single teaspoon is enough to elevate the entire flavor profile. If you’re vegan, you can use a vanilla bean paste for a more intense vanilla note.
Cinnamon brings warmth and a hint of spice that balances the sweetness. It also has natural antioxidant properties, adding a healthful twist to your snack. A half teaspoon is sufficient; too much can overpower the other flavors.
Salt is the unsung hero that brings all the flavors together. It enhances the sweetness and balances the richness of the butter and honey. A quarter teaspoon is enough to brighten the overall taste.
Everything's prepped? Good. Let's get into the real action...
The Method — Step by Step
- Heat the butter and honey together over medium heat until the butter melts completely and the mixture starts to bubble. The sizzle is a sign that the sugars are beginning to caramelize. Stir constantly to prevent scorching. This step is the foundation of the glaze that will coat every oat grain.
- Add the brown sugar to the butter‑honey mixture and stir until it dissolves. The mixture should look glossy and slightly thickened. This creates a smooth base that will bind the oats together. If it looks too runny, let it simmer for another minute.
- Remove the pan from heat and let the glaze cool for a few seconds so it doesn’t burn the oats. Add the rolled oats, nuts, and seeds, stirring vigorously until everything is evenly coated. The oats should look like they’re drenched in a golden glaze. This is the moment of truth—watch the colors change.
- Stir in the vanilla extract, cinnamon, and salt. These aromatics will permeate the entire batch, creating a warm, inviting scent. The salt will amplify the sweetness and bring out the nutty notes. Taste a small pinch of the mixture to ensure the balance is right.
- Line a baking dish with parchment paper and press the mixture firmly into the pan. Use a spatula or the back of a spoon to create an even surface. The pressure will help the bars hold together once cooled. If you like a slightly crisp top, press the mixture harder.
- Bake in a preheated oven at 350°F (175°C) for 25-30 minutes. The bars should develop a golden crust while remaining chewy inside. Keep an eye on them—once the edges start pulling away from the pan, they’re ready. This step ensures the glaze sets properly.
- Remove the pan from the oven and let the bars cool on the rack for 10 minutes. During this time, the glaze will set, forming a glossy finish. After 10 minutes, transfer the bars to the rack to cool completely. The bars will firm up as they cool.
- Once cooled, cut the bars into squares or rectangles with a sharp knife. For a cleaner cut, press the knife against a paper towel. Store the bars in an airtight container for up to a week. If you’re in a hurry, you can freeze them for longer storage.
That's it — you did it. But hold on, I've got a few more tricks that'll take this to another level...
Insider Tricks for Flawless Results
The Temperature Rule Nobody Follows
Most people bake these bars at a higher temperature, which can cause the honey glaze to burn before the oats set. Baking at 350°F keeps the sugars at a safe caramelization range, ensuring a glossy finish without scorching. Keep the oven door slightly ajar to allow moisture to escape, preventing sogginess. I once tried 375°F and ended up with bars that tasted burnt and were too dry.
Why Your Nose Knows Best
Before you cut the bars, give them a quick sniff. A sweet, toasted aroma signals that the glaze has set correctly. If you still smell raw honey, let them cool a few more minutes. My friend once cut them too early and the bars were still sticky inside. The aroma test is a quick, foolproof way to avoid disappointment.
The 5‑Minute Rest That Changes Everything
After baking, let the bars rest for exactly five minutes before moving them. This short rest allows the glaze to settle, preventing it from sliding off when you cut the bars. The bars will be easier to slice and the edges will hold together better. I’ve seen people cut straight away and end up with a mess of melted glaze.
Pressing Technique for Perfect Layers
When you press the mixture into the pan, use a flat-bottomed glass or a heavy skillet to create an even surface. This ensures each bar has the same thickness and texture. A slightly uneven surface can lead to uneven baking, with some bars overcooked and others undercooked. Try to press firmly but gently to keep the mixture from spilling.
Cool on a Rack, Not a Plate
Cooling on a rack allows air to circulate around the bars, preventing moisture buildup. If you cool them on a plate, condensation can make the bars soggy. This simple step keeps the bars crisp for longer. I’ve always kept them on a rack because the bars stay fresh for days.
Creative Twists and Variations
This recipe is a playground. Here are some of my favorite ways to switch things up:
Chocolate‑Covered Crunch
After cutting the bars, dip them in melted dark chocolate and sprinkle with sea salt. The chocolate adds a rich, bittersweet contrast, while the salt enhances the sweetness. This version is perfect for a dessert treat or a sweet snack during movie night.
Maple‑Nut Delight
Swap the honey for pure maple syrup and add a handful of chopped pecans. The maple brings a subtle earthy sweetness, and the pecans add a buttery crunch. This variation is great for a cozy autumn snack.
Spicy Ginger Twist
Add a teaspoon of grated fresh ginger and a pinch of cayenne pepper to the glaze. The ginger adds warmth, while the cayenne gives a subtle kick that pairs well with the honey sweetness. This version is ideal for a midday energy boost.
Almond‑Coconut Fusion
Replace the chopped nuts with shredded coconut and add a splash of coconut milk to the glaze. The coconut adds a tropical flavor, and the milk creates a silky glaze that coats the oats. This twist is perfect for a beach‑side snack.
Berry‑Burst Bar
Fold in a handful of dried cranberries or raisins just before baking. The dried fruit adds chewiness and a burst of tart sweetness that balances the honey. This variation is ideal for a quick, on-the-go snack.
Feel free to experiment with different nuts, seeds, and spices. The beauty of this recipe is its versatility—each tweak creates a new flavor adventure. The bars keep their structure and taste, no matter the variation.
Storing and Bringing It Back to Life
Fridge Storage
Store the bars in an airtight container at room temperature for up to a week. For longer freshness, keep them in the refrigerator; they’ll stay crisp for two weeks. The airtight container prevents the bars from absorbing odors from the fridge.
Freezer Friendly
Wrap each bar individually in plastic wrap and place them in a freezer bag. They’ll stay fresh for up to three months. When you’re ready to enjoy them, let them thaw at room temperature for 15 minutes before serving.
Best Reheating Method
If your bars have become a bit dry, reheat them in the microwave for 10-15 seconds. Add a tiny splash of water before reheating—this steams the bars back to perfection. Alternatively, you can warm them in a preheated oven at 300°F for 5 minutes.