I was in the middle of a frantic kitchen scramble, the kind that ends with a burnt batch of cookies and a lingering taste of disappointment. My friend had dared me to recreate the iconic Kinder Riegel, but with a twist that would make it entirely vegan. I stared at the chocolate bar, the glossy wrapper reflecting the flicker of the stove, and thought, “Why not make something that feels like a chocolate hug but is kinder to the planet?” That moment sparked a culinary rebellion and a recipe that would soon become my favorite midnight snack.
The kitchen smelled like a sweet promise – dark chocolate melting, a hint of coconut oil, and the faintest whisper of oat milk powder. The sound of the chocolate pieces clinking together in the bowl was like a tiny drumbeat of anticipation. When the chocolate finally melted into a silky pool, the air filled with a velvety aroma that made my mouth water before I even touched the mixture. I could already taste the first bite: rich, smooth, and impossibly creamy, with a subtle nutty undertone from the oat powder.
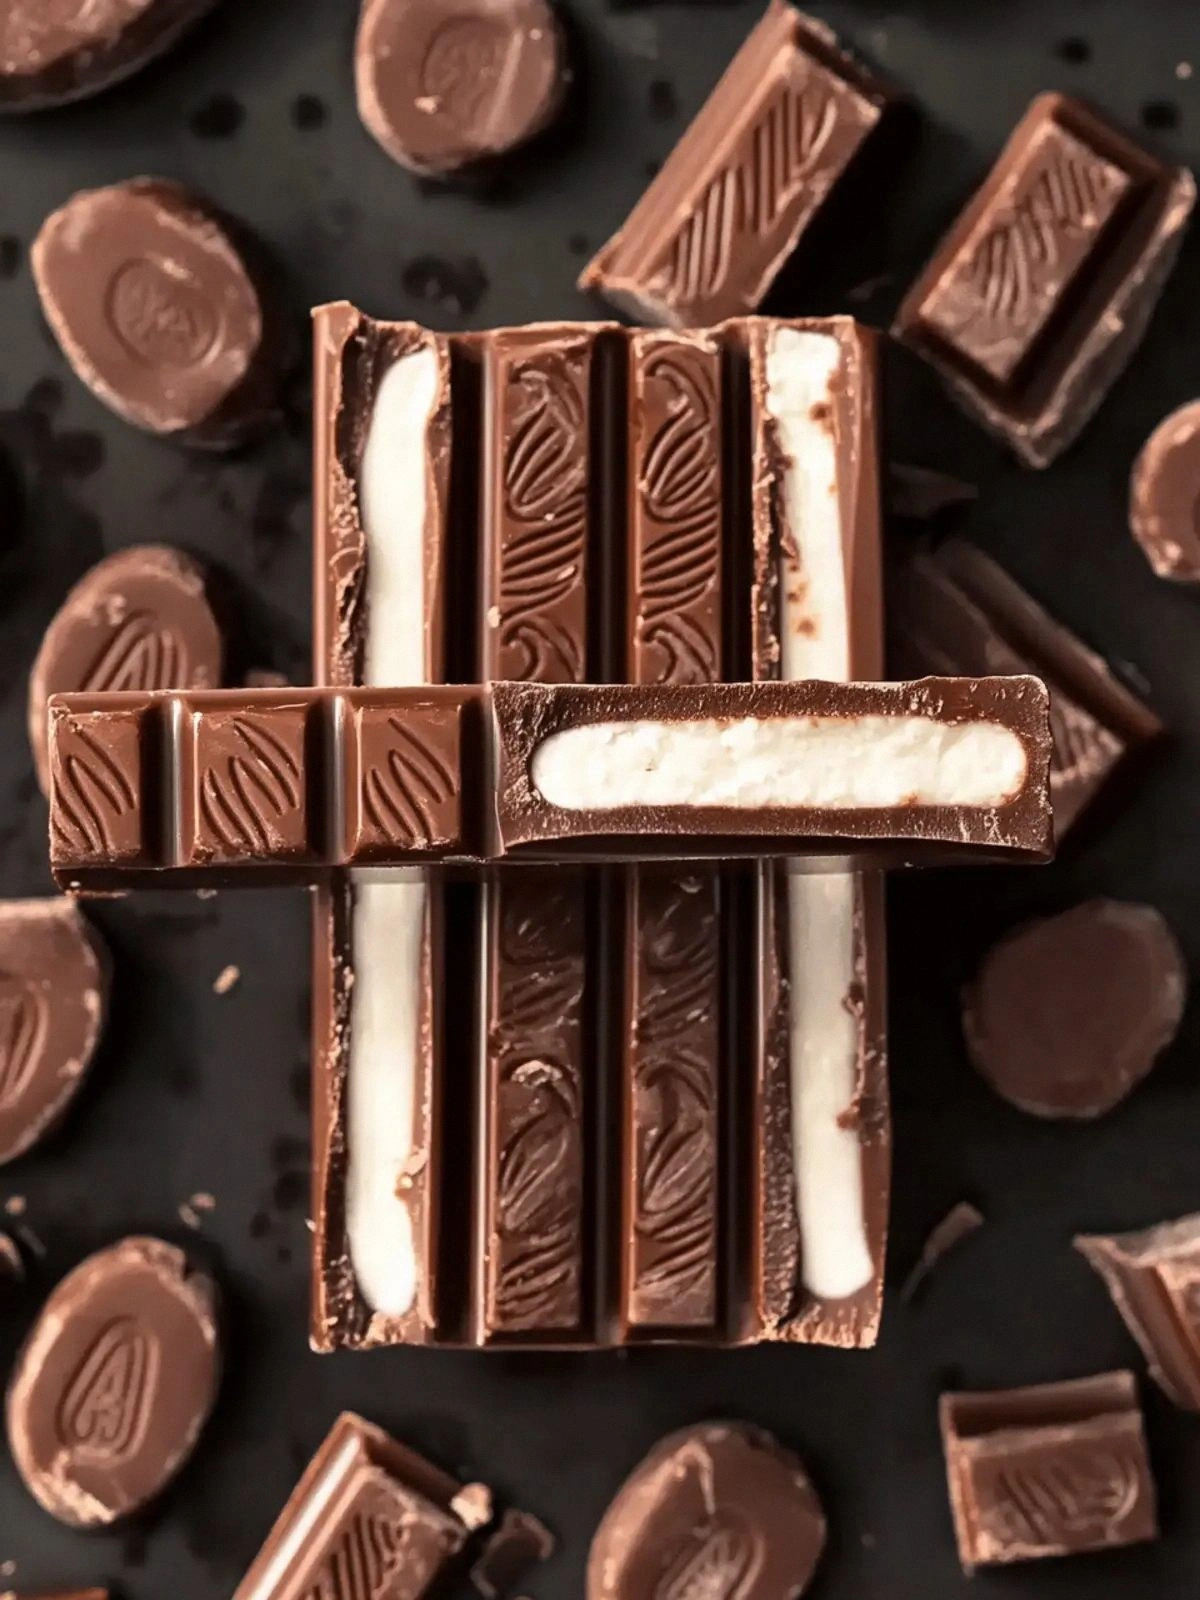
What makes this version stand out is that it captures the original Kinder Riegel’s indulgence while stripping away dairy and animal fats. It’s a pure, plant‑based confection that still delivers that iconic crunch and creamy center, all in a single, self‑contained bar. The recipe is deceptively simple, yet the result feels like a gourmet treat you’d find in a high‑end chocolate shop. I dare you to taste this and not go back for seconds – once you’ve had a bite, you’ll be craving the whole bar.
There’s a secret ingredient that gives this chocolate its silky texture: oat milk powder. It’s a subtle game‑changer that thickens the chocolate without adding extra sugar or fat. And the coconut oil? It’s the secret to that glossy finish and that buttery mouthfeel that makes every bite feel like a luxury indulgence. Picture yourself pulling this out of the oven, the whole kitchen smelling incredible, the chocolate bar glistening like a miniature sun. Let me walk you through every single step – by the end, you’ll wonder how you ever made it any other way.
What Makes This Version Stand Out
- Richness: The blend of milk and white chocolate creates a depth of flavor that feels like a chocolate waterfall. The result is a bar that is both indulgent and sophisticated.
- Texture: The oat milk powder gives the chocolate a velvety consistency, while the coconut oil ensures a silky melt that doesn’t feel greasy.
- Zero Dairy: By using plant‑based chocolate, the recipe stays completely vegan, making it suitable for lactose‑intolerant friends.
- Low Sugar: The natural sweetness of the chocolate is enough; no added sugar means you can indulge guilt‑free.
- Simple Prep: The recipe requires only a single pan and a heat‑proof bowl, so you can whip up a batch in under 30 minutes.
- Make‑Ahead: Once set, the bars keep well in the fridge for up to a week, and they even freeze nicely for longer storage.
- Versatile: Add a sprinkle of sea salt or a pinch of chili for a savory twist, or top with crushed nuts for extra crunch.
- Eco‑Friendly: The ingredients are sustainably sourced, and the minimal packaging reduces waste.
Alright, let's break down exactly what goes into this masterpiece…
Inside the Ingredient List
The Flavor Base
The 120 g of vegan milk chocolate is the backbone of this confection. It provides the sweet, slightly acidic undertone that balances the richness of the white chocolate. If you skip this, the bar loses its classic chocolate flavor and becomes too creamy and bland. A good rule of thumb: choose a dark chocolate with at least 60 % cacao for depth.
The Creamy Core
The 60 g of vegan white chocolate is what gives the bar that unmistakable creamy center. It’s the star that melts into a silky filling when you bite into the bar. Without it, the texture would be too uniform and the bar would feel like a solid chocolate slab. If you’re looking for a twist, try a dairy‑free white chocolate that’s sweetened with maple syrup for a subtle maple note.
The Unexpected Star
The 20 g of oat milk powder is the secret to that luscious, almost custard‑like consistency. It thickens the chocolate without adding extra sugar or fat, and it brings a faint nutty flavor that complements the chocolate beautifully. Skipping it would result in a thinner, more brittle bar that doesn’t hold its shape as well. For a gluten‑free version, be sure to use a certified gluten‑free oat milk powder.
The Final Flourish
The single tablespoon of coconut oil is the final touch that gives the bar a glossy sheen and a buttery mouthfeel. It also helps the chocolate set evenly, preventing cracks or uneven edges. If you’re avoiding coconut, a tiny splash of neutral‑flavored plant oil will work, but you’ll miss the subtle tropical undertone.
Everything's prepped? Good. Let's get into the real action…
The Method — Step by Step
- Heat the water in a saucepan to a gentle simmer, then place a heat‑proof bowl on top, making sure the bottom of the bowl doesn’t touch the water. This double boiler method ensures the chocolate melts evenly and prevents scorching. Watch the steam rise; it’s the sign that the water is at the right temperature.
- Add the 120 g of vegan milk chocolate to the bowl, breaking it into small pieces for faster melting. Stir continuously with a silicone spatula, allowing the chocolate to soften into a glossy pool. The aroma will begin to fill the room, and you’ll know the melting process is underway.
- Once the chocolate is fully melted, remove the bowl from the heat and stir in the 60 g of vegan white chocolate. The white chocolate will add a creamy contrast to the dark chocolate base. Keep stirring until the mixture is smooth and homogeneous.
- Blend in the 20 g of oat milk powder, whisking vigorously to avoid clumps. This step is critical for achieving the silky texture; a smooth blend ensures the bars will have a melt‑in‑your‑mouth quality.
- Add the tablespoon of coconut oil and stir until fully incorporated. The oil will give the chocolate a glossy sheen and a buttery finish. You should see a slight sheen on the surface, indicating the oil is properly distributed.
- Line a baking sheet with parchment paper and pour the chocolate mixture into a shallow dish or a silicone mold. Spread it evenly with a spatula to a thickness of about 1 cm. The bar should look smooth and uniform, ready for setting.
- Place the dish in the refrigerator for 20–25 minutes, or until the chocolate has set firmly. During this time, the chocolate will firm up, creating a crisp outer shell with a creamy interior.
- Once set, cut the chocolate into bars or squares using a sharp knife. Wipe the knife with a paper towel between cuts to maintain clean edges. Each bar should have a crisp, clean cut that showcases the glossy surface.
- Wrap each bar in parchment paper or store them in an airtight container at room temperature for up to 3 days, or in the fridge for a week. If you plan to keep them longer, freeze them for up to a month.
That's it – you did it. But hold on, I've got a few more tricks that'll take this to another level…
Insider Tricks for Flawless Results
The Temperature Rule Nobody Follows
Chocolate is a fickle friend; it loves to seize if it gets too hot. Keep the water at a gentle simmer and never let the chocolate touch the bottom of the pan. I once had a batch that turned into a gritty mess because I was too impatient. Stick to the double boiler method and you’ll always get a silky finish.
Why Your Nose Knows Best
Before you even taste the chocolate, let your nose do the judging. The aroma of freshly melted chocolate should be sweet, rich, and slightly nutty. If you detect a burnt or metallic scent, pull the bowl from the heat immediately. Your senses are the best quality control.
The 5-Minute Rest That Changes Everything
After pouring the chocolate onto the parchment, let it rest for 5 minutes before cutting. This brief pause allows the chocolate to set slightly, making the cutting process smoother and preventing the bars from sticking to the knife. I’ve found that a short rest can save a lot of frustration.
The Secret of a Glossy Finish
The last trick for that glossy sheen is a quick wipe with a paper towel after the bars have set. This removes any excess oil or dust that might dull the surface. The result is a bar that looks as good as it tastes.
Storing Like a Pro
If you’re storing the bars in the fridge, wrap them in parchment paper before placing them in an airtight container. This prevents condensation from forming and keeps the chocolate from absorbing odors. For longer storage, freeze the bars in a single layer and then transfer them to a zip‑lock bag.
Creative Twists and Variations
This recipe is a playground. Here are some of my favorite ways to switch things up:
Sea Salt Surprise
Sprinkle a pinch of flaky sea salt on top of the bars before they set. The salt enhances the chocolate’s sweetness and adds a delightful crunch. This version is perfect for a sophisticated snack that feels indulgent.
Nutty Crunch
Add chopped almonds or pistachios into the chocolate mixture before pouring it into the mold. The nuts provide a satisfying crunch and a nutty aroma that complements the chocolate’s richness. It’s a great way to add protein and texture.
Spicy Kick
Mix in a pinch of cayenne pepper or a few drops of chili oil. The heat balances the sweetness, giving the chocolate an exciting twist. This version is ideal for adventurous eaters who love a bit of spice.
Maple Infusion
Replace the oat milk powder with a tablespoon of maple syrup. The syrup adds a subtle maple flavor that pairs wonderfully with chocolate. It also adds a touch of natural sweetness without the need for additional sugar.
Citrus Zest
Grate a small amount of orange zest into the chocolate before it sets. The citrus adds a bright, fresh note that cuts through the chocolate’s richness. This variation is especially refreshing during the warmer months.
Storing and Bringing It Back to Life
Fridge Storage
Store the bars in an airtight container in the refrigerator for up to a week. Wrap each bar in parchment paper first to prevent condensation and keep the chocolate from absorbing fridge odors. Keep the container away from strong‑smelling foods.
Freezer Friendly
For longer storage, freeze the bars on a parchment‑lined tray for 1–2 hours until solid, then transfer them to a zip‑lock bag. They’ll stay fresh for up to 3 months. When you’re ready to enjoy, let them thaw at room temperature for 15 minutes.
Best Reheating Method
To bring the bars back to their silky glory, gently reheat them in a microwave at 30‑second intervals, stirring in between, until they’re warm and smooth. Add a tiny splash of water before reheating; it steams back to perfection and keeps the chocolate from drying out.