Picture this: it’s a rainy Saturday, the kitchen is a chaotic symphony of clattering pans, and you’re staring at a bag of gluten‑free flour that feels more like a threat than a promise. I had just tried a cookie recipe that turned out as dry as the desert, and my friend dared me to make something that would make the whole house smell like a candy shop. The stakes were high, and I was ready to prove that gluten‑free baking can be as indulgent as its wheat‑based cousin.
I opened the pantry, pulled out the unsalted butter that had been sitting there like a silent sentinel, and let it soften while I whisked the dark brown sugar into a glossy, caramel‑scented swirl. The aroma that hit me first was that of toasted sugar and butter—warm, buttery, and unmistakably comforting. The sound of the whisk was rhythmic, a metronome that kept my nerves at bay. I could almost taste the first bite, the moment the cookie hits the tongue and releases a burst of minty chocolate, followed by a subtle chocolate undertone that lingers like a secret.
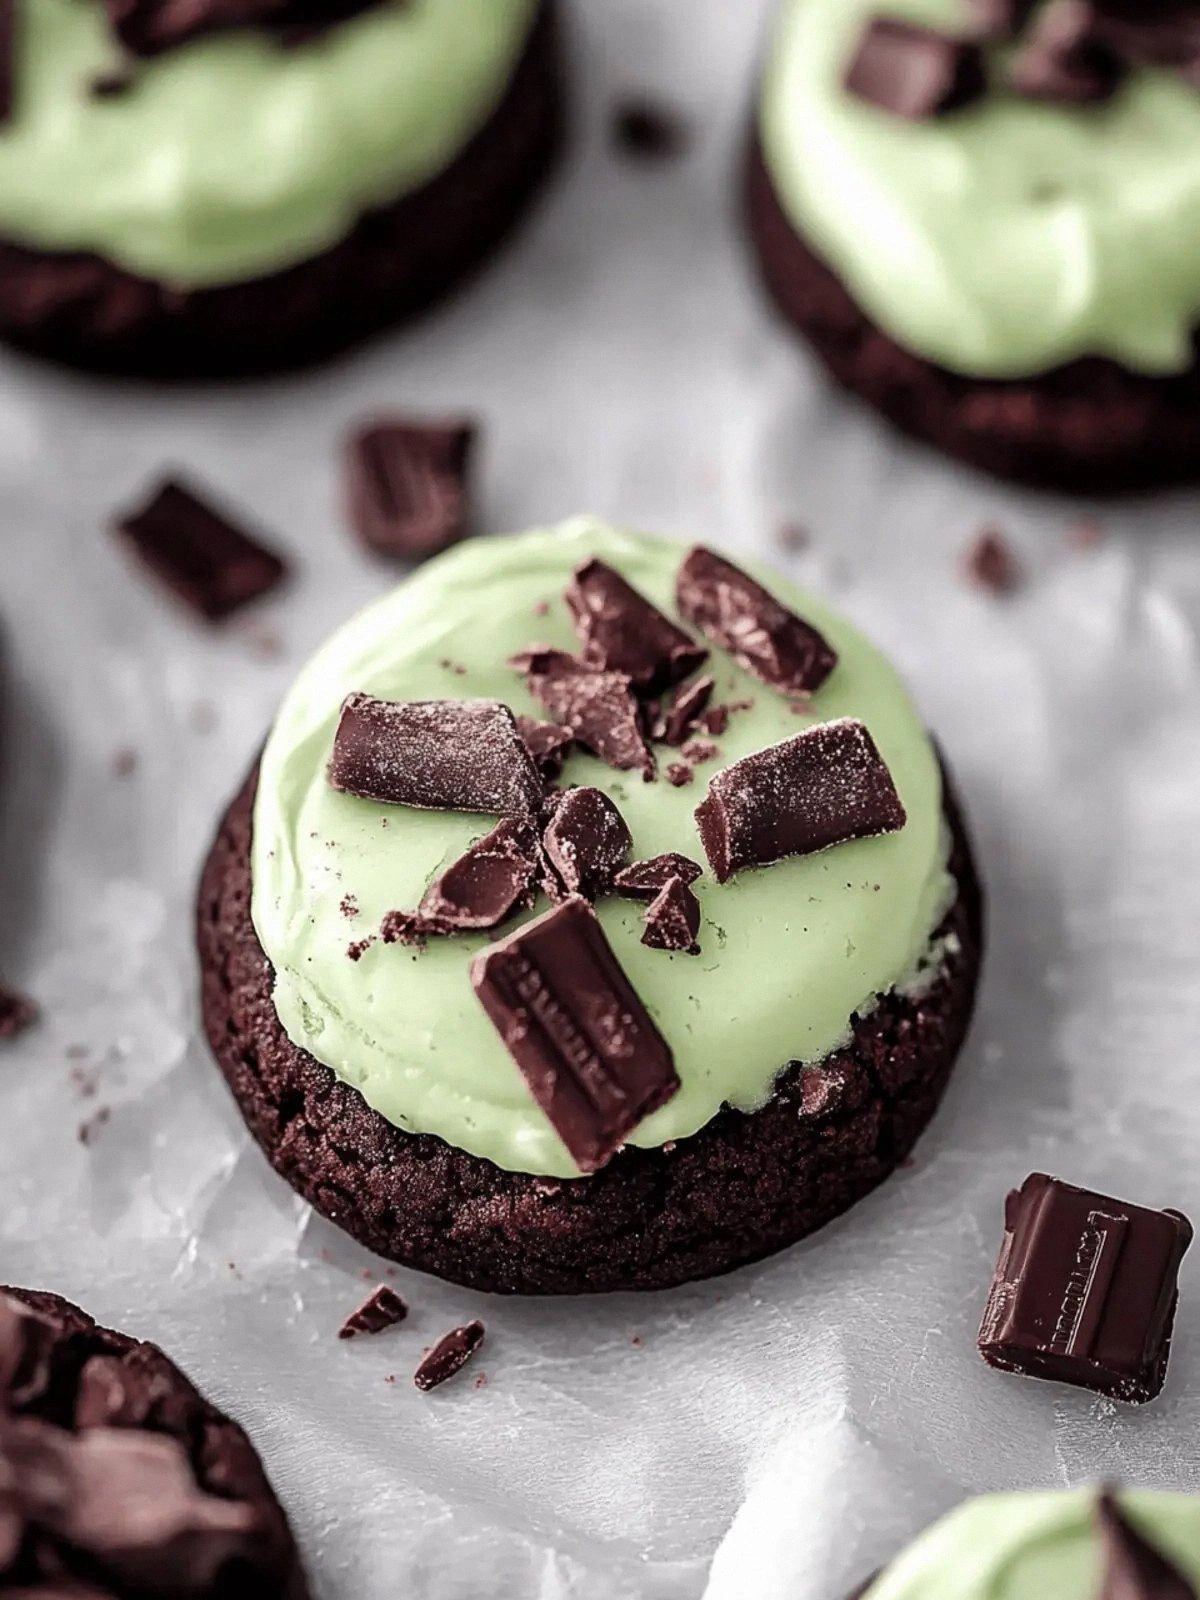
What makes this version stand out? It’s the meticulous balance of flavors and textures that I discovered after countless failed attempts. The peppermint extract is not just a garnish; it’s the heart that beats beneath the chocolate. The gluten‑free flour gives a light, airy crumb that refuses to be dense or gummy. And the Andes Mint chocolate, crumbled into the dough, provides a delightful crunch that punctuates every bite. I dare you to taste this and not go back for seconds.
If you’ve ever struggled to find a gluten‑free cookie that feels luxurious, you’re not alone—and I’ve got the fix. This is hands down the best version you’ll ever make at home. The next section will break down exactly what goes into this masterpiece and why it’s a game‑changer. Let me walk you through every single step — by the end, you’ll wonder how you ever made it any other way.
What Makes This Version Stand Out
- Flavor: The combination of dark brown sugar and peppermint extract creates a depth that feels both nostalgic and fresh, a duality that makes each bite memorable.
- Texture: The gluten‑free flour and cocoa powder work together to give a tender crumb, while the crumbled Andes mint chocolate adds a satisfying snap that contrasts the softness.
- Visual Appeal: The green food coloring gives a vibrant hue that instantly signals minty freshness, making the cookies as eye‑catching as they are edible.
- Simplicity: With only eleven ingredients, this recipe is straightforward enough for beginners yet sophisticated enough to impress seasoned bakers.
- Make‑ahead Potential: These cookies hold up beautifully; they can be baked in advance and stored for up to a week, keeping their crisp edges and chewy centers.
- All‑Day Appeal: Whether you’re serving them at a brunch or a dessert table, they pair wonderfully with coffee, tea, or a glass of milk.
- Healthier Option: By using dark brown sugar and a modest amount of butter, the cookies strike a balance between indulgence and a slightly lighter profile.
- Kid‑Friendly: The mint flavor is subtle enough to avoid overwhelming young palates, making it a crowd‑pleaser for all ages.
Alright, let's break down exactly what goes into this masterpiece…
Inside the Ingredient List
The Flavor Base
Unsalted butter and dark brown sugar form the sweet backbone of this cookie. The butter, softened to a spreadable consistency, allows the sugar to dissolve and create a silky batter that glides into the oven. Dark brown sugar, with its molasses content, adds a rich caramel note that complements the mint. If you skip the butter, the cookies will feel dry and crumbly; if you substitute white sugar, the depth of flavor will be lost.
The Texture Crew
Gluten‑free flour and cocoa powder are the duo that gives the cookies their body. The flour provides structure without the elasticity of wheat gluten, while the cocoa powder adds moisture and a subtle bitterness that balances the sweetness. A pinch of baking soda lifts the dough, creating light pockets of air. If you omit the baking soda, the cookies will be denser and flat.
The Unexpected Star
Peppermint extract is the star that sets this cookie apart. A single teaspoon is enough to infuse the dough with a refreshing minty aroma that lingers after each bite. The extraction process concentrates the essential oils, so a little goes a long way. If you can’t find peppermint extract, a splash of peppermint tea brewed to strength can be a suitable substitute, though the flavor profile will be slightly different.
The Final Flourish
The crumbled Andes mint chocolate is the crunch that gives the cookie its signature bite. It’s added at the very end of mixing to preserve its texture. Powdered sugar and cold milk create a glaze that gives the cookies a glossy finish and a slight sweetness on the surface. Green food coloring is used sparingly to give a vibrant hue without overwhelming the natural flavors. Skipping the coloring will result in a more muted cookie, but the taste remains unchanged.
Everything's prepped? Good. Let's get into the real action…
The Method — Step by Step
- Begin by preheating your oven to 350°F (175°C) and lining a baking sheet with parchment paper. The parchment prevents sticking and ensures even browning. While the oven warms, bring the butter to room temperature so it becomes creamy and easy to mix. I often place the butter in a small bowl and let it sit for about ten minutes.
- In a large mixing bowl, combine the softened butter with the dark brown sugar. Using an electric mixer on medium speed, beat until the mixture is light and fluffy—about two minutes. The texture should resemble a creamy frosting, with the sugar fully incorporated. This step is crucial for a tender crumb.
- Add the large egg to the butter–sugar mixture and whisk vigorously until the egg is fully blended. The batter should look glossy and smooth, with no streaks of egg. If you notice lumps, give it another minute of whisking. The egg acts as a binder and adds moisture to the cookies.
- Stir in the peppermint extract and green food coloring until the mixture takes on a pale green hue. The peppermint should give a faint aroma that signals the minty flavor to come. The coloring is optional but adds visual appeal that makes the cookies pop.
- Sift together the gluten‑free flour, cocoa powder, and baking soda into a separate bowl. Sifting removes any lumps and ensures an even distribution of the dry ingredients. Gradually add this dry mixture to the wet batter, stirring gently with a spatula until just combined. Overmixing can lead to a tough cookie.
- Fold in the crumbled Andes mint chocolate, making sure each piece is evenly distributed. The chocolate should be visible in the dough, giving a visual cue of the crunch that will appear in the finished cookie. If you prefer a stronger chocolate flavor, increase the amount of chocolate slightly.
- Using a tablespoon or a small cookie scoop, drop dough onto the prepared baking sheet, spacing them about 2 inches apart. The cookies will spread slightly, so give them room to expand. I like to use a small offset knife to flatten the tops slightly, which helps them bake evenly.
- Bake for 12–14 minutes, or until the edges are set but the centers remain soft. The cookies should have a faint sheen and a slight crack on the top. This is the moment of truth—if they’re overbaked, they’ll be dry; underbaked, they’ll be gooey.
- Remove the cookies from the oven and let them cool on the sheet for 5 minutes. This short cooling period allows the cookies to firm up and makes them easier to transfer to a wire rack. Then slide them onto the rack to cool completely.
- While the cookies cool, whisk together the powdered sugar and cold milk to create a glaze. Drizzle the glaze over the cooled cookies, letting it seep into the nooks and crannies. The glaze gives the cookies a glossy finish and a subtle sweetness that balances the mint.
That's it — you did it. But hold on, I've got a few more tricks that'll take this to another level. These tweaks will make your cookies even more memorable.
Insider Tricks for Flawless Results
The Temperature Rule Nobody Follows
Many bakers bake at the highest temperature they can, but this cookie thrives at a moderate 350°F. A lower temperature allows the cookies to rise slowly, creating a light crumb and preventing the edges from burning. I’ve tried 375°F, and while the cookies were crispier, they lost that tender center. Keep the oven at 350°F and use a calibrated thermometer to ensure consistency.
Why Your Nose Knows Best
The moment the cookies hit the oven, your nose will be the first to tell you if they’re done. A sweet, buttery scent with a hint of mint is the sweet spot. If you smell a burnt chocolate note, pull them out immediately. Trust your nose; it’s a reliable indicator of doneness.
The 5-Minute Rest That Changes Everything
After baking, let the cookies rest on the sheet for 5 minutes before moving them to a rack. This short rest allows the structure to set, preventing cracks. If you transfer them too quickly, the cookies may crumble. I always use a timer to ensure I don’t skip this step.
Glaze Timing Is Key
Glazing the cookies while they’re still warm lets the glaze seep into the micro‑cracks, creating a glossy finish. If you wait until they’re cool, the glaze will sit on top and may slide off. I mix the glaze just before the cookies cool to 15°C, then drizzle immediately.
Storage Secrets
Store the cookies in an airtight container at room temperature for up to a week. If you need to keep them longer, freeze them for up to two months. To revive frozen cookies, let them thaw at room temperature for 20 minutes before reheating in a 325°F oven for 5 minutes.
Creative Twists and Variations
This recipe is a playground. Here are some of my favorite ways to switch things up:
Chocolate‑Infused Delight
Swap the dark brown sugar for a mix of dark and white sugar, and add a tablespoon of espresso powder to the batter. The espresso will deepen the chocolate flavor, giving the cookies a mocha twist that pairs wonderfully with a latte.
Almond Crunch Edition
Replace half the Andes mint chocolate with chopped toasted almonds. The nuts add a nutty crunch and a subtle buttery taste that complements the mint. This variation is great for those who love a bit of texture.
Spiced Mint Surprise
Add a pinch of ground ginger or cinnamon to the dry mix. The warmth of the spices balances the coolness of the peppermint, creating a complex flavor profile that’s perfect for fall or winter gatherings.
Low‑Sugar Version
Use a sugar substitute like stevia or erythritol in place of the dark brown sugar. Keep the butter quantity the same to maintain moisture. This version is ideal for those monitoring their sugar intake without sacrificing taste.
Nut‑Free Take
Omit the Andes mint chocolate entirely and replace it with shredded coconut. The coconut adds a tropical vibe and a chewy texture that keeps the cookies interesting for those with nut allergies.
Storing and Bringing It Back to Life
Fridge Storage
Place the cookies in a single layer in an airtight container. They’ll stay fresh for up to 5 days, retaining their crisp edges and chewy centers. If you notice them drying out, add a slice of bread to the container; the bread will absorb excess moisture.
Freezer Friendly
Wrap each cookie individually in plastic wrap, then stack them in a freezer bag. They can be stored for up to two months. When ready to eat, let them thaw at room temperature for 10 minutes before serving.
Best Reheating Method
To revive frozen cookies, preheat your oven to 325°F (165°C). Place the cookies on a parchment‑lined tray and bake for 5 minutes. For a quick refresh, microwave on low for 10 seconds, but watch closely to avoid melting the chocolate.
Add a tiny splash of water before reheating; it steams back to perfection, restoring moisture and softening the crumb.