I was standing in my cramped kitchen, eyes flicking from the over‑cooked casserole on the stove to the empty bowl on the counter, when my friend dared me to whip up something that would make the whole apartment smell like a summer picnic. The clock was ticking, and the only thing on the table was a can of tuna, a handful of breadcrumbs, and a stubborn sense of culinary destiny. I thought, “Why not turn this humble pantry staple into a show‑stopper?” The moment the tuna hit the skillet, the air filled with a savory promise that felt like a secret handshake between me and the universe. I was about to discover that a few bold moves could transform a quick fix into a comfort‑food masterpiece.
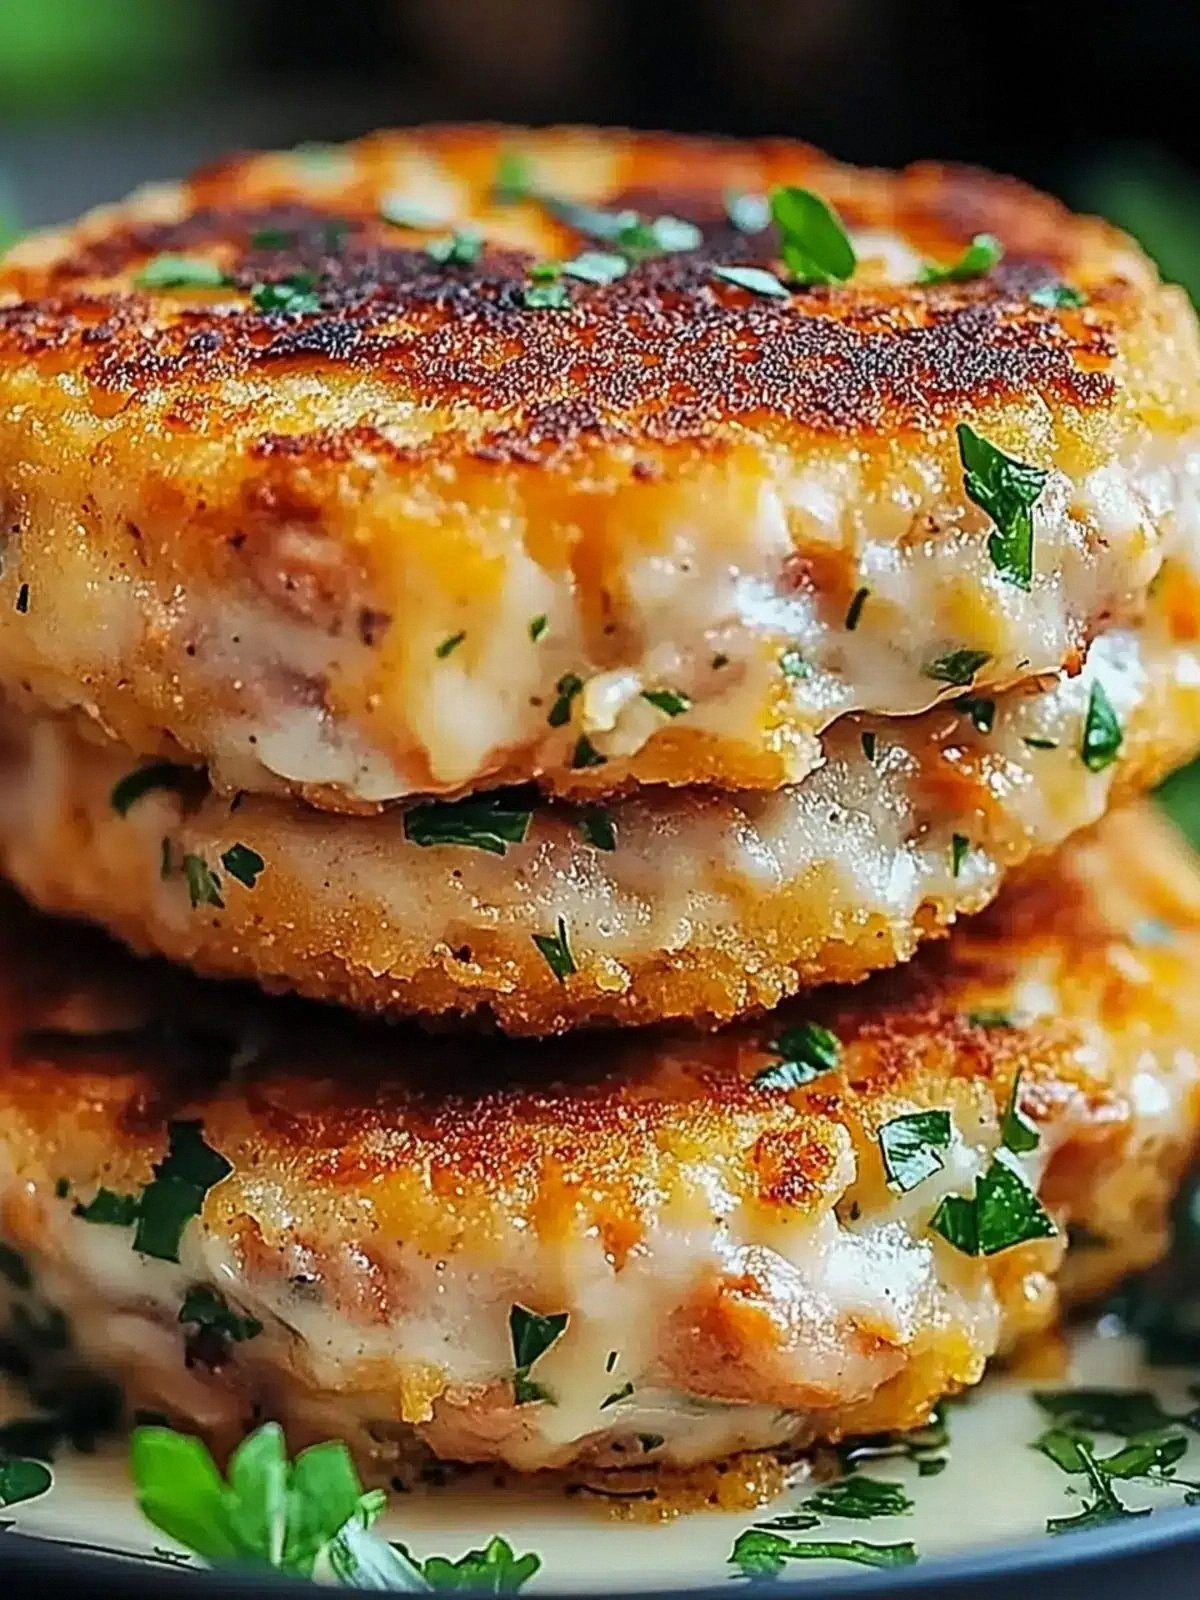
Imagine the sizzle that erupts as butter melts, turning into a golden river that laps against the pan. The aroma that unfurls is a layered tapestry—salted brine, toasted breadcrumbs, and a faint whisper of mustard that tickles the nose. The texture feels alive: a slight crunch on the outside that gives way to a moist, cheesy center that oozes with every bite. The taste is a bold, umami punch that balances the mildness of tuna with a sharp, tangy kick. The visual is a golden brown patty that glistens under the kitchen lights, inviting you to take a bite.
What makes this version stand out is the way it marries simplicity with flavor depth. The tuna is not just tossed; it’s blended with mayo and Dijon mustard to create a silky base that coats the breadcrumbs like velvet. The cheddar isn’t just a topping; it’s folded into the mixture, ensuring every bite is a cheese‑laden explosion. The result is a patty that’s crispy on the outside yet tender inside, with a melt that drips down your fingers in a satisfying way. I dare you to taste this and not go back for seconds because the flavor profile is too rich, too comforting, and just a little bit addictive.
A secret technique I discovered involves letting the patties rest in a lightly greased pan for a few minutes after flipping—this step locks in moisture and gives the cheese a perfect melt without burning. Another twist is adding finely chopped green onions right before the final flip to introduce a fresh, crisp note that cuts through the richness. The combination of garlic powder and onion powder adds a subtle depth that makes the dish feel like a gourmet take‑out, but at home. The buttery crust forms a protective shell that keeps the inside from drying out, a trick that most recipes overlook.
Picture yourself pulling these golden patties out of the oven, the whole kitchen smelling incredible, and seeing the steam rise like a cloud of savory promise. The anticipation builds as you slide the patties onto a plate, the cheese still glimmering. I’ll walk you through every single step, from selecting the freshest tuna to the final garnish, so that by the end of this post you’ll wonder how you ever made it any other way. Let me show you how to elevate a pantry staple into a dish that will have friends begging for the recipe.
I’ve been experimenting with tuna melts for years, but this particular iteration has become my go‑to comfort food. The balance of textures—crunchy, creamy, melty—creates a symphony in your mouth that feels both nostalgic and modern. The recipe is quick enough for a weekday dinner yet impressive enough for a weekend brunch. If you’ve ever struggled to find a tuna recipe that isn’t dry or bland, you’re not alone—and I’ve got the fix. This dish is a testament to the idea that great flavor doesn’t have to come from complicated ingredients, just clever combinations.
The beauty of this recipe is its versatility; you can serve it on its own, alongside a crisp salad, or even tucked inside a toasted bun for a sandwich. The buttery edges crackle like thin ice under a light touch, giving you a satisfying crunch before you dive into the cheesy interior. The green onions add a pop of color and a burst of freshness that balances the richness. The result is a dish that feels both indulgent and wholesome, making it perfect for any occasion. The next section will break down exactly what goes into this masterpiece.
I’ll be honest—after making these patties for the first time, I ate half the batch before anyone else got to try it. The combination of tuna, cheese, and breadcrumbs felt like a hug in a bowl, and I couldn’t resist. The dish is hands down the best version you’ll ever make at home, and it’s surprisingly easy to scale up or down. So grab your can of tuna, your favorite cheese, and let’s dive into the recipe that’s about to become your new kitchen staple.
What Makes This Version Stand Out
- Taste: The blend of mayo, mustard, and garlic powder creates a creamy, tangy base that elevates the mild tuna into a flavor powerhouse.
- Texture: The breadcrumbs provide a satisfying crunch, while the melted cheddar delivers a silky interior that melts in your mouth.
- Speed: From prep to plate, the entire dish takes less than an hour, making it ideal for busy evenings.
- Visual Appeal: The golden crust and bubbling cheese give a restaurant‑quality look that’s impossible to resist.
- Versatility: Whether you serve them as an appetizer, main, or sandwich filling, the patties adapt to any meal plan.
- Make‑Ahead Friendly: They can be assembled ahead of time, refrigerated, and cooked fresh when you’re ready.
- Ingredient Quality: Using high‑grade tuna and sharp cheddar makes a noticeable difference in flavor.
- Audience Impact: Friends and family rave about the melt and crunch, turning a simple dish into a crowd‑pleaser.
Inside the Ingredient List
The Flavor Base
The tuna is the heart of this dish, providing a clean, briny flavor that pairs beautifully with the creamy mayo. Choosing a fresh, high‑quality tuna in brine rather than water keeps the texture moist and adds a subtle saltiness that balances the richness of the cheese. Skipping the tuna would turn this into a plain breadcrumb patty, losing the signature umami punch that makes the dish memorable. For a slightly lighter version, you could substitute half the tuna with cooked, shredded chicken or a plant‑based alternative, but the classic tuna flavor remains irreplaceable. When selecting tuna, look for a can that’s labeled “chunky” or “solid” to ensure a better texture in the patties.
Mayonnaise acts as the binder that holds everything together while adding a silky, smooth mouthfeel. It also carries the mustard’s sharpness and helps the breadcrumbs adhere to the tuna. If you’re watching calories, a light mayo or Greek yogurt can be used, but the classic mayo gives that luxurious creaminess that’s hard to beat. Skipping mayo would result in a dry, crumbly mixture that falls apart during cooking. For a healthier twist, opt for avocado mayo or a homemade blend of Greek yogurt and a touch of olive oil.
Dijon mustard introduces a subtle heat and tang that cuts through the richness of the cheese and butter. The mustard’s bright flavor elevates the tuna, preventing the dish from feeling heavy. If you don’t have Dijon, a grainy yellow mustard works, though it’s slightly sweeter. The mustard also helps emulsify the mixture, giving it a cohesive texture. A pinch of smoked paprika can be added for a smoky undertone if you’re feeling adventurous.
Garlic powder adds depth without the risk of burning the raw garlic. It’s a convenient way to infuse the tuna mixture with a savory, aromatic layer that complements the cheese. If you’re a garlic lover, fresh minced garlic can be used, but be mindful of the heat it adds. Skipping garlic powder will make the patties taste flat; the subtle undertone is essential for a balanced flavor profile. A teaspoon of garlic powder works well, but you can adjust to taste.
Onion powder provides a mellow, sweet contrast to the garlic and mustard. It adds a layer of complexity that enhances the overall taste. Fresh chopped onions would be too sharp and might overpower the tuna. If you’re sensitive to onions, a small amount of chopped green onions or scallions can replace the powder. The onion powder also helps bind the mixture, giving the patties a cohesive structure.
The Texture Crew
Breadcrumbs are the crunchy backbone that gives the patties their signature snap. They absorb the moisture from the tuna and help form a firm structure that holds the cheese inside. Opt for panko or freshly ground breadcrumbs for a lighter, airier crunch. If you’re aiming for a gluten‑free version, use gluten‑free breadcrumbs or crushed rice crackers. Skipping breadcrumbs would result in a soggy, loose mixture that doesn’t hold together during cooking.
Shredded cheddar cheese is the star that melts into a gooey, golden sauce. It adds a rich, salty depth that pairs perfectly with the tuna. A sharp cheddar gives a more pronounced flavor, while a milder cheese creates a subtler profile. If you’re looking for a different flavor, try a blend of cheddar and mozzarella for a stretchier melt. The cheese also contributes to the overall color, turning the patties into a visually appealing golden hue.
Green onions provide a fresh, crisp bite that cuts through the richness of the cheese and butter. They add a pop of color and a bright, slightly sweet flavor that brightens the dish. If you don’t have green onions on hand, a handful of finely chopped fresh parsley can substitute, though the flavor will differ. Skipping green onions will reduce the freshness factor, but the patties will still be delicious.
The Unexpected Star
The egg acts as a binder that keeps the patties intact during cooking. It also adds a subtle richness that complements the tuna. If you’re avoiding eggs, a tablespoon of aquafaba or a commercial egg replacer can work, but the texture may differ slightly. Skipping the egg will cause the patties to crumble and separate, especially when flipping.
Salt is the flavor enhancer that brings all the ingredients together. It balances the brine of the tuna and the richness of the cheese. A pinch of salt is enough to lift the flavors; too much can make the dish overly salty. If you’re on a low‑sodium diet, reduce the amount by half and taste as you go.
Black pepper adds a subtle heat and aromatic depth. It’s a small detail that elevates the overall taste profile. Freshly ground pepper offers a more pronounced flavor than pre‑ground. If you prefer a milder kick, use a peppercorn grinder with fewer grains.
The Final Flourish
Butter is the secret weapon that creates a golden, buttery crust. It adds a rich flavor and helps the patties develop a crisp exterior. Use unsalted butter so you can control the salt level precisely. If you’re looking for a healthier option, try a light butter or a butter‑like spread that still crisps up nicely.
Each ingredient plays a vital role, and together they create a harmonious balance of flavors and textures. The tuna provides a savory base, the mayo and mustard add creaminess and zing, the breadcrumbs give crunch, the cheese delivers melt, the green onions add freshness, the egg binds it all, and the butter creates a crisp, golden finish. If you’re curious about the origins of tuna, it’s a fish that has been a staple in Mediterranean diets for centuries, prized for its firm texture and high omega‑3 content. This fish’s versatility makes it a perfect canvas for creative recipes like this one.
Everything's prepped? Good. Let's get into the real action. The next step is where the magic begins, and trust me, you’re going to want to stay close to the stove. The recipe is simple, but the timing and technique are crucial to achieving that perfect golden crust and melty interior. I’ll guide you through each phase, ensuring that you don’t miss any crucial detail. And remember, the secret to a flawless patty is in the balance of moisture and heat.
After you’ve mixed the tuna, mayo, mustard, and seasonings, you’ll notice the mixture has a smooth, cohesive texture. This is the moment when the flavors are truly coming together, and the mixture should feel slightly tacky, not dry. At this point, adding the breadcrumbs will give the mixture its structure, and the cheese will begin to integrate, creating a silky, melty base. The green onions, if used, should be folded in now for that bright, fresh contrast. If you’re using the egg, this is the time to whisk it in, ensuring the mixture stays cohesive.
Once the mixture is ready, the next step is to shape the patties. Use a tablespoon to portion out the mixture, then press it into a flat shape using your hands or a small spatula. The patties should be about 1½ inches thick; too thin and they’ll burn, too thick and they’ll stay raw inside. A small ring mold can help maintain a uniform shape, but your hands will do just fine. Don’t worry if they’re not perfectly round; a slightly irregular shape adds to the rustic charm.
Heat a skillet over medium heat and add the butter, letting it melt until it starts to bubble but not brown. The butter’s golden hue signals that the pan is ready for the patties. Carefully place the patties in the pan, spacing them slightly to avoid overcrowding. The sizzle that follows is the sound of the patty’s exterior searing, sealing in the juices. This step is crucial; a hot pan ensures a crisp crust.
Let the patties cook for 3–4 minutes on the first side. As they cook, the edges should begin to turn golden, and the cheese will start to melt into a soft, golden sauce. Flip the patties with a spatula, watching the cheese melt further and the interior stay moist. The second side should cook for 3–4 minutes, until the patty is golden brown and the cheese is fully melted. If you prefer a crispier crust, add a splash of water to the pan, cover, and let steam for the last minute.
As the patties finish cooking, you’ll notice the cheese has become a glossy, melty layer that oozes slightly when the patty is lifted. The aroma at this stage is irresistible, and the visual cue of a golden crust signals that the patties are ready to be plated. If you want an extra burst of flavor, sprinkle a pinch of smoked paprika over the top before serving. This adds a subtle smokiness that complements the tuna’s briny profile.
Once the patties are cooked, remove them from the pan and let them rest for a minute or two. Resting allows the juices to redistribute, ensuring each bite remains moist and flavorful. While the patties rest, you can prepare a simple side salad or a bowl of tomato soup to complement the rich flavors. The rest of the day will smell like a home‑cooked feast, and your guests will be impressed.
When you plate the patties, drizzle a little extra mayo or a squeeze of lemon for brightness. Garnish with chopped green onions or a sprinkle of fresh parsley for color. Serve immediately while the cheese is still molten, or let them cool slightly for a different texture experience. This dish pairs wonderfully with a crisp green salad or a bowl of creamy tomato soup. If you’re in a rush, the patties can be reheated in a skillet or oven, and they’ll still taste fresh.
Now that you’ve mastered the core recipe, it’s time to explore some insider tricks that will elevate your tuna melt patties to legendary status. These are the little details that separate a good dish from a great one. I’ll share tips that even seasoned cooks will find useful, and they’re all simple to implement. Stick with me, and you’ll be serving up perfection in no time.
Insider Tricks for Flawless Results
The Temperature Rule Nobody Follows
Many cooks assume medium heat is enough, but the key to a crisp crust is a slightly higher heat—around 375°F. This ensures the outside sears quickly while the inside stays tender. If the pan is too hot, the butter will burn before the cheese melts; if too cool, the patties will absorb too much fat and become greasy. I’ve found a cast‑iron skillet works best because it retains heat evenly, giving you that perfect sear.
Why Your Nose Knows Best
As soon as the patties start to cook, a faint aroma of toasted breadcrumbs and melted cheese will rise. Trust this scent as your cue for flipping; the moment the crust turns golden and the cheese begins to bubble, it’s time to turn the patty. If you ignore the aroma, you risk burning the outside and missing the optimal interior texture.
The 5‑Minute Rest That Changes Everything
Resting the patties after cooking is crucial for flavor distribution. This brief pause allows the cheese to set slightly, preventing a gooey mess when you cut into them. It also lets the juices redistribute, keeping the interior moist. I’ve seen people skip this step and end up with a dry center.
Use Fresh Tuna, Not Canned
Fresh tuna has a firmer texture and a cleaner flavor than canned, but it’s harder to find and more expensive. If you opt for fresh, cook it quickly in the pan to avoid overcooking. For the best results, use a high‑quality can of tuna packed in olive oil, which adds a subtle oiliness that enhances the patty’s mouthfeel.
Mind the Butter Ratio
Too much butter can drown the flavors, while too little can leave the patty dry. The rule of thumb is one tablespoon of butter per four patties. If you’re watching calories, reduce the butter by half and replace it with a non‑stick spray to keep the crust crisp.
Keep the Egg Fresh
An old egg can make the mixture slimy and affect the texture. Use a fresh egg, and if you’re unsure, crack the egg into a small bowl first and check for any off‑smell. A fresh egg provides the best binding and a subtle richness that elevates the dish.
Creative Twists and Variations
Cheesy Mediterranean
Swap the cheddar for feta and add chopped sun‑dried tomatoes and olives. The salty, tangy feta pairs wonderfully with the tuna, and the olives add a briny depth. This version is perfect for a Mediterranean‑inspired meal and pairs well with a Greek salad.
Spicy Southwest
Introduce a dash of chipotle powder and diced jalapeños for heat. The smoky, spicy kick complements the mild tuna and brightens the dish. Serve with a dollop of avocado crema to balance the heat.
Herb‑Infused Delight
Fold in fresh chopped basil, oregano, and thyme to give the patties a fragrant herbaceous note. The herbs bring a fresh, aromatic layer that elevates the tuna’s flavor. Pair with a light vinaigrette for a complete meal.
Vegan Tuna Melt
Use a plant‑based tuna substitute, vegan mayo, and nutritional yeast in place of cheddar. The nutritional yeast provides a cheesy flavor while keeping the dish dairy‑free. This version is great for those who want a plant‑based comfort food.
Breakfast Tuna Melt
Serve the patties on toasted English muffins with a fried egg on top. The combination of savory tuna, melty cheese, and runny yolk creates a hearty breakfast. Add a side of fresh fruit to balance the richness.
Gluten‑Free Edition
Replace breadcrumbs with crushed gluten‑free crackers or almond flour. The texture remains crisp, and the dish stays gluten‑free without sacrificing flavor. This variation is ideal for those with celiac disease or gluten sensitivity.
Storing and Bringing It Back to Life
Fridge Storage
Cool the patties completely before refrigerating. Store them in an airtight container or wrap tightly in plastic wrap. They’ll keep fresh for up to 3 days, maintaining their flavor and texture.
Freezer Friendly
Place the cooled patties on a parchment‑lined tray and freeze until solid. Once frozen, transfer them to a freezer bag or airtight container. They’re best used within 2 months for optimal taste.
Best Reheating Method
Reheat frozen patties in a skillet over medium heat, adding a splash of water to create steam. Cover the pan for the last minute to ensure the cheese melts evenly. If reheating from the fridge, simply place them in a preheated oven at 350°F for 10 minutes.