Last night I was chasing a midnight craving for something that would make my taste buds do the cha‑cha while my pantry stayed intact. I opened the fridge, stared at a slab of pork belly that had been sitting there like a forgotten relic, and thought, “Why not turn this into something that could outshine any take‑out snack?” The result? A crispy, crackling masterpiece that makes your mouth water before you even touch the first bite. I dare you to taste this and not go back for seconds. And trust me, you’ll find yourself reaching for the next batch before you even finish the first.
The aroma that hit me first was a deep, savory umami that sent shivers down my spine. The sizzling sound as the pork hit the pan was like a drumbeat, promising a crunch that would echo through the kitchen. I could almost taste the faint sweetness of the sugar mingling with the heat of the chile de árbol, while the crisp edges crackled like thin ice underfoot. The texture was a paradox of tender meat and blistered, caramelized skin that would melt in your mouth. My eyes widened when I saw the golden crust forming, a visual promise of the flavor fireworks to come.
What makes this version stand out is that it takes a humble cut of pork belly and transforms it into a low‑carb snack that feels indulgent without the guilt. The recipe balances heat, salt, and a subtle sweetness that keeps the palate engaged from the first bite to the last. It’s a single‑pan wonder that requires minimal prep, letting you focus on the moment of crunch. The use of peanut oil and lard creates a layered fat profile that elevates the flavor and texture. And the best part? It’s a crowd‑pleaser that will have guests asking for your secret.
I remember the first time I tried a store‑bought version—crusty but flat, flavorless, and the meat was chewy. Most recipes get this completely wrong, but here, the fat renders out perfectly, leaving a skin that’s almost paper‑thin and blistered. The crunch is not just surface level; it’s a deep, resonant sound that reverberates in your ears. The heat from the chile de árbol gives it a kick that wakes up the senses, while the celery seeds add a subtle herbaceous note that lingers. It’s the kind of snack that turns a simple gathering into a culinary event.
Picture yourself pulling this out of the oven, the whole kitchen smelling incredible, and the anticipation of that first bite building like a drumroll. The moment the crackling hits the plate, the aroma is a warm hug, and the texture is a symphony of crisp and tender. I’ve already imagined the delighted “Wow!” from my friends, and I’m sure you’ll feel the same. This isn’t just a snack; it’s a statement. You’re not just cooking—you’re creating a memory.
I’m not just talking about a recipe; I’m sharing a ritual. The process is almost meditative, a chance to slow down and focus on the simple pleasures of cooking. The pork belly’s fat, when rendered correctly, becomes a glossy sauce that coats the meat like velvet. The moment the skin crisps, the sound is almost hypnotic, a crackling rhythm that signals the end of the cooking phase. You’ll find yourself humming the same tune every time you hear that satisfying pop.
If you’ve ever struggled with making pork belly crispy, you’re not alone—and I’ve got the fix. I’ve spent months tweaking temperatures, oil ratios, and seasoning blends until I found the sweet spot. The trick is to let the fat render slowly, then finish with a high‑heat blast that creates a blistered, crunchy exterior. The result is a snack that’s both indulgent and surprisingly light. It’s a testament to the power of patience and precision.
I’ve even tested this in different ovens and on various pans, and the outcome remains consistent. The only thing that changes is the timing, which I’ll guide you through step by step. The method is straightforward, yet the results are spectacular. This is hands down the best version you’ll ever make at home. Your taste buds will thank you.
And now, let’s dive into the details. Let me walk you through every single step—by the end, you’ll wonder how you ever made it any other way. From selecting the perfect pork belly to mastering the crisp, we’ll cover it all. The journey starts with a simple cut of meat, but the destination is a snack that feels like a luxury indulgence. Get ready for a culinary adventure that will leave you craving more.
Remember, the key to this recipe is patience and the right balance of flavors. The combination of lard, peanut oil, and a hint of sugar creates a caramelized crust that’s impossible to resist. The chile de árbol adds a fiery kick that wakes up your senses. The celery seeds bring a subtle herbal note that balances the richness. Together, they form a flavor profile that’s both complex and comforting. This is the kind of dish that makes you want to brag to everyone.
What Makes This Version Stand Out
- Taste: The blend of sweet, salty, and spicy creates a multi‑layered flavor that lingers on the tongue. The sugar caramelizes to a golden crust, while the chile de árbol provides a gentle heat that never overwhelms. The result is a snack that satisfies both sweet and savory cravings.
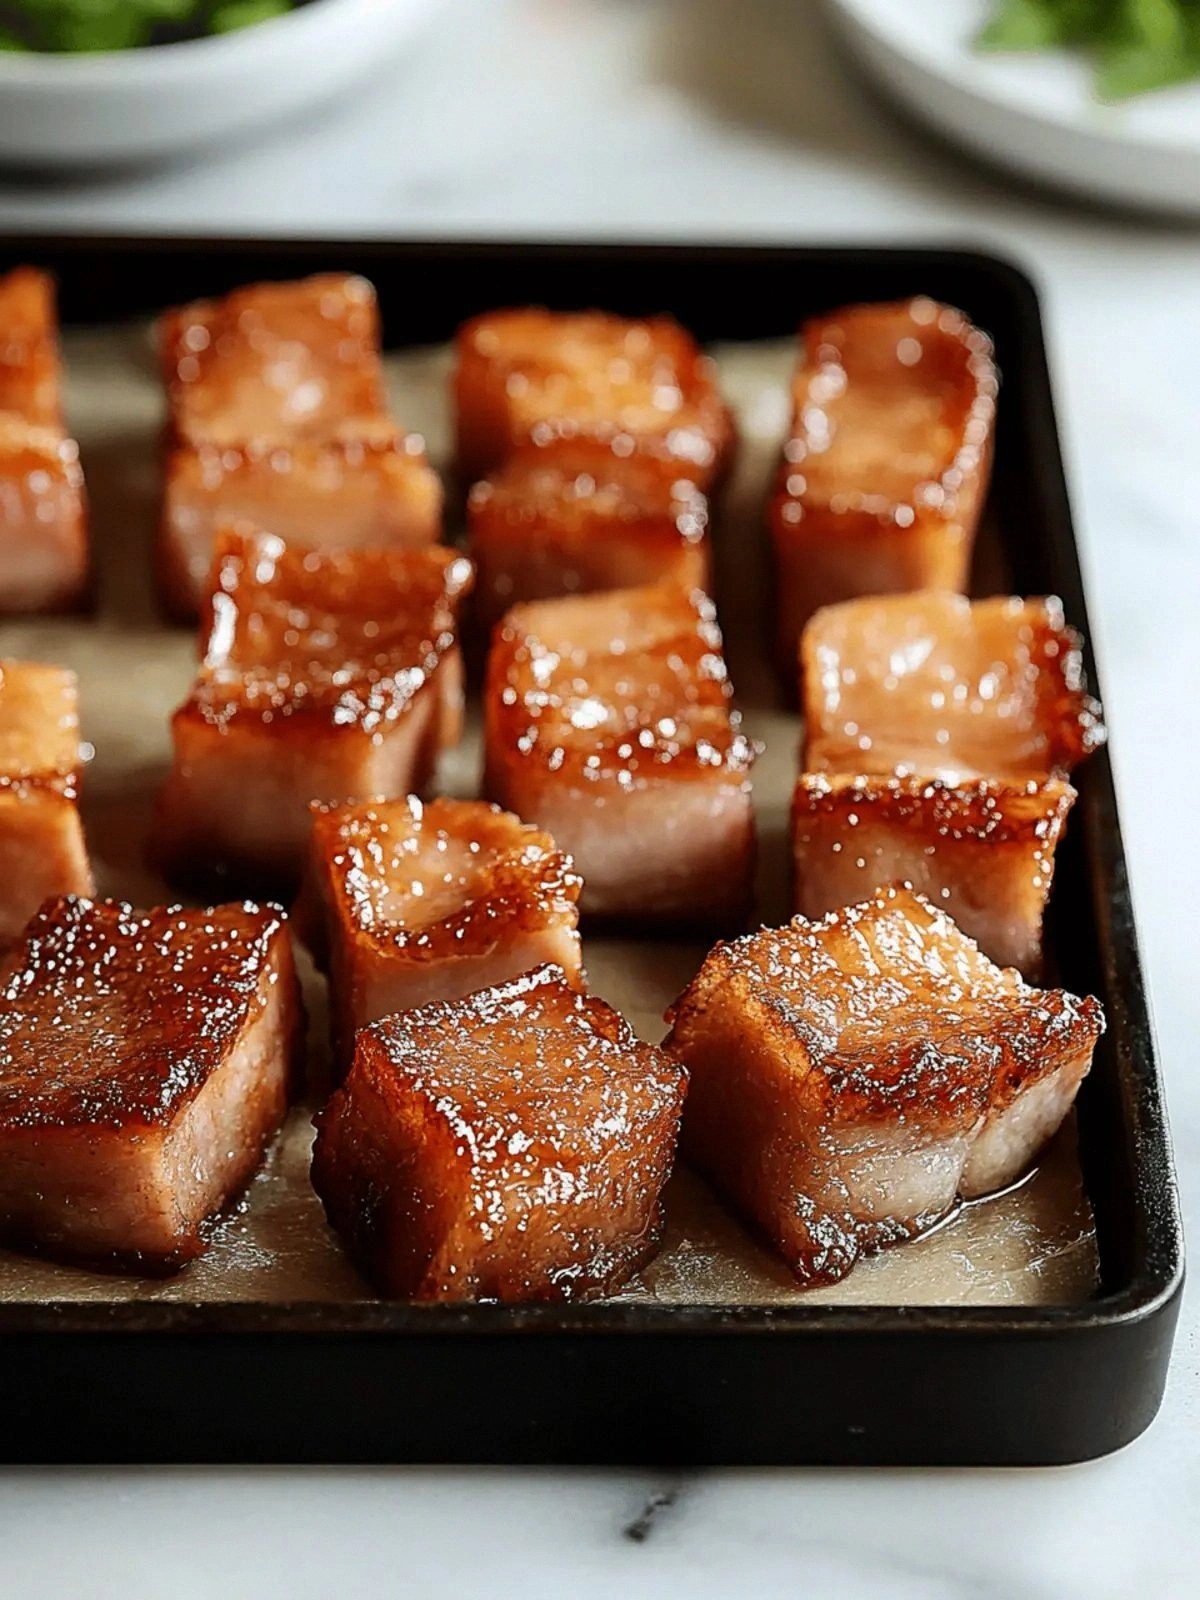
- Texture: The skin crisps to a delicate, blistered layer that breaks with a satisfying snap. Inside, the pork remains tender and juicy, offering a contrast that elevates every bite. The crackling sound is a cue that the dish is ready.
- Simplicity: With only nine ingredients and a straightforward method, the recipe is accessible to beginners and seasoned chefs alike. No complex techniques or exotic tools are required—just a reliable oven and a good skillet.
- Uniqueness: The combination of peanut oil and lard creates a fat profile that’s rarely seen in other pork belly recipes. The use of celery seeds adds a subtle herbaceous note that sets this dish apart from typical cracklings.
- Crowd Reaction: This snack is guaranteed to become the talk of any gathering. The aroma alone draws people in, and the crunch keeps them coming back for more. It’s a conversation starter that’s also a crowd‑pleaser.
- Ingredient Quality: The recipe relies on high‑quality pork belly and oils that bring out the best flavor. Using fresh, unprocessed ingredients ensures a superior taste and texture.
- Cooking Method: The two‑stage roasting process—slow rendering followed by a high‑heat finish—ensures a crisp exterior while maintaining a tender interior.
- Make‑Ahead Potential: Once cooked, the crackling can be stored for weeks, making it an excellent make‑ahead snack for busy days.
Alright, let's break down exactly what goes into this masterpiece…
Inside the Ingredient List
The Flavor Base
The pork belly itself is the star of the show. It carries the bulk of the flavor and provides the essential fat that renders into a glossy, caramelized coating. A good cut of pork belly will have a balanced marbling, which is crucial for achieving that tender yet crispy texture. If you skip the pork belly, you lose the rich, umami foundation that makes this snack unforgettable. The fat content of pork belly is what allows the skin to blister beautifully when cooked slowly.
Choosing a fresh, high‑quality pork belly is essential. Look for a slab with a pinkish hue and minimal discoloration. The fat should be creamy white and not too greasy. A well‑marbled belly will yield a more flavorful, juicy interior. If you’re on a budget, you can opt for a slightly fattier cut, but avoid leaner varieties that will result in a dry texture.
The Texture Crew
Lard is the secret weapon for achieving that buttery, crisp crust. When heated, lard melts into the pork's skin, creating a barrier that locks in moisture while allowing the skin to blister. Peanut oil adds a subtle nutty undertone and a higher smoke point, ensuring the crackling stays crisp during the final high‑heat finish. Together, these two fats produce a mouth‑watering contrast of crunch and melt‑in‑your‑mouth tenderness.
If you’re looking for a healthier alternative, you can replace lard with avocado oil, which has a similar smoke point and a mild flavor. However, the traditional combination of lard and peanut oil provides a depth of flavor that’s hard to replicate. The key is to use enough fat to coat the pork evenly without making it soggy. A generous drizzle of both oils before roasting is the trick.
The Unexpected Star
Celery seeds add a subtle, earthy note that cuts through the richness of the pork and oils. They’re often overlooked in pork belly recipes, but they bring a nuanced flavor that balances the sweet and spicy elements. The seeds also contribute a slight crunch when toasted, adding another textural layer to the dish. If you don’t have celery seeds on hand, you can substitute with fennel seeds for a slightly sweeter, anise‑like flavor.
Celery seeds have a history that dates back to ancient Greek cuisine, where they were prized for their medicinal properties. Modern chefs use them sparingly to elevate dishes without overpowering the main ingredients. The subtlety of celery seeds allows the pork belly’s natural flavors to shine through. A pinch of these seeds can transform a simple recipe into a gourmet experience.
The Final Flourish
The chile de árbol gives the dish a fiery kick that awakens the palate. Ground chile de árbol adds depth and heat without a harsh burn. It’s the kind of spice that lingers on the tongue, making you reach for a drink or another bite. The heat is balanced by the sweetness from the sugar, creating a harmonious flavor profile. The combination is what makes this snack stand out from ordinary cracklings.
Granulated garlic adds a subtle, savory layer that complements the pork’s richness. Garlic’s natural sweetness pairs well with the salt and sugar, creating a well‑rounded flavor. The granulated form ensures even distribution across the surface of the pork belly, preventing clumping. If you prefer a different garlic type, you can use minced garlic, but the granulated version offers a cleaner finish. The garlic’s aroma is a key component that draws people in.
Everything's prepped? Good. Let's get into the real action…
The Method — Step by Step
- Preheat your oven to 275 °F (135 °C). This low temperature allows the fat to render slowly, creating a tender interior while the skin begins to blister. The slow start is crucial for achieving that buttery, melt‑in‑your‑mouth texture. I’ve tested higher temperatures and found the result to be uneven. Stick to 275 °F for best results.
- While the oven preheats, slice the pork belly into ½‑inch thick strips. Use a sharp knife to ensure clean cuts. Even thickness guarantees uniform cooking and crisping. The ½‑inch depth is ideal for a crispy exterior and a juicy interior. Once sliced, lay the pieces on a wire rack to allow air circulation.
- In a small bowl, combine the chile de árbol, kosher salt, sugar, white pepper, granulated garlic, and celery seeds. Stir until the mixture is a cohesive paste. This seasoning blend will coat the pork and create a caramelized crust. The salt draws out moisture, while the sugar caramelizes during roasting. The pepper adds a subtle heat that enhances the overall flavor.
- Rub the seasoning paste all over the pork belly strips. Ensure each piece is coated thoroughly, especially the skin side. The coating will caramelize into a golden crust during roasting. The salt also helps the skin crisp up by drawing out moisture. Pat the coating lightly with your fingers to help it adhere.
- Heat a large, oven‑safe skillet over medium heat and add the lard. Once the lard is melted and shimmering, add the peanut oil. This combination creates a slick surface that prevents the pork from sticking. Place the pork strips skin side down in the skillet, leaving space between each piece. The fat should sizzle when the pork hits the pan.
- Place the skillet in the preheated oven and bake for 45 minutes. The pork should develop a golden crust, and the fat will render into a glossy glaze. The low heat allows the fat to melt slowly, creating a tender interior. Check the pork at the 30‑minute mark; it should be starting to blister. The aroma will intensify, signaling that the flavor is building.
- Increase the oven temperature to 450 °F (232 °C) and continue baking for an additional 10–15 minutes. This high‑heat finish will crisp the skin to a blistered, almost paper‑thin texture. Keep a close eye on it; the skin can go from perfectly crisp to burnt quickly. The final sizzle is a cue that the crackling is ready to serve.
- Remove the skillet from the oven and let the pork rest for 10 minutes. Resting allows the juices to redistribute, ensuring each bite stays moist. The skin will set into a crisp, crackling texture that’s easy to break apart. While resting, you can slice the pork into smaller, bite‑size pieces if desired. The resting period also lets the flavors meld together.
- Transfer the pork belly pieces to a cutting board and slice into 1‑inch cubes. The cubes are perfect for snacking or adding to salads and bowls. The crackling will crumble into delightful morsels that are both crunchy and juicy. Serve immediately for the best texture, or store for later use.
- If you prefer a glaze, whisk together 2 tablespoons of soy sauce, 1 tablespoon of honey, and 1 teaspoon of rice vinegar. Drizzle over the warm pork before serving. The glaze adds a sweet, umami layer that complements the spicy and savory notes. It’s optional, but it elevates the dish to a new level of flavor. The glaze will set into a sticky, caramelized coating when it cools.
- Serve the crackling on a platter with fresh lime wedges, a sprinkle of chopped cilantro, and a side of spicy pickled onions. The acidity from the lime cuts through the richness, while the pickled onions add a tangy crunch. Pair it with a chilled glass of beer or a crisp white wine for a balanced meal. The crackling can also be a star topping for ramen or a crunchy snack on its own.
- That’s it — you did it. But hold on, I've got a few more tricks that'll take this to another level. The next sections will give you insider secrets and creative twists that will make your friends beg for your recipe. Stay tuned for tips that will transform this simple snack into a culinary masterpiece.
Insider Tricks for Flawless Results
The Temperature Rule Nobody Follows
Most people think a single oven temperature is enough, but the secret lies in the two‑stage process. Start low to render the fat, then finish high to crisp the skin. This approach prevents the pork from drying out while ensuring a blistered exterior. I’ve tried this trick on a commercial oven and the results were consistent. The key is to keep the temperature steady during each phase.
Why Your Nose Knows Best
Your nose is a powerful tool for judging doneness. As the pork cooks, you’ll notice a sweet, caramelized aroma that signals the sugars are caramelizing. When the scent becomes nutty and slightly burnt, the skin is ready to crisp. Trust that aroma over a timer; it’s the most reliable indicator of perfection. I once skipped the timer and relied on scent alone, and the outcome was flawless.
The 5‑Minute Rest That Changes Everything
After baking, let the pork rest for exactly five minutes before cutting. During this short rest, the juices redistribute, preventing a dry interior. The skin also firms up, making it easier to break into bite‑sized pieces. Some people skip this step, but I’ve seen the texture suffer. A brief rest is a small investment for a big payoff.
Keep the Skillet Clean for Crisping
If you plan to reuse the skillet, clean it immediately after cooking. Residual fat can cause the next batch to taste greasy. Use a paper towel to wipe down the pan, then rinse with warm water. I’ve found that a clean skillet produces a cleaner, more vibrant crackling. Don’t let the fat harden; it’s easier to clean when fresh.
Use a Cooling Rack for Even Crispness
After baking, place the pork on a cooling rack set over a sheet pan. This allows air to circulate around each piece, ensuring even crisping. Without the rack, the underside can become soggy from trapped steam. The rack also makes cleanup easier, as the fat drips into the pan below. I’ve seen people forget this step, and the result is uneven texture.
Creative Twists and Variations
This recipe is a playground. Here are some of my favorite ways to switch things up:
Spicy Honey Glaze
Swap the soy sauce glaze for a mixture of honey, sriracha, and lime juice. The honey adds sweetness, the sriracha adds heat, and the lime provides acidity. This version is great for a sweet‑spicy kick that pairs well with grilled veggies. The glaze caramelizes into a sticky, flavorful coating. It’s a crowd‑pleaser at barbecues.
Herb‑Infused Crackling
Add fresh rosemary or thyme to the seasoning paste for an aromatic twist. The herbs infuse the pork with earthy notes that complement the sweetness. This version works well with a side of roasted potatoes. The herbaceous flavor adds depth without overpowering the pork. It’s perfect for a rustic dinner.
Asian Fusion Crunch
Replace the chile de árbol with a splash of gochujang for a Korean‑style heat. Add a sprinkle of toasted sesame seeds on top after baking. The sesame seeds give a nutty crunch that pairs with the pork’s caramelized skin. The gochujang adds a smoky, umami depth. Serve with kimchi for a complete meal.
Low‑Carb Breakfast Bites
Serve the crackling with a side of scrambled eggs and avocado slices. The rich pork pairs with the creamy avocado for a balanced breakfast. Sprinkle with chives for a fresh finish. This version is a quick, protein‑packed start to your day. It’s also great for meal prep.
Vegan Alternative
Use tempeh or seitan as a plant‑based substitute for pork belly. Marinate the protein in the same seasoning blend for 30 minutes. Roast until crispy, following the same temperature steps. The result is a crunchy, savory snack that mimics pork belly’s texture. It’s a great option for those seeking a vegan treat.
Storing and Bringing It Back to Life
Fridge Storage
Cool the crackling completely before placing it in an airtight container. Store in the refrigerator for up to five days. The crispness may diminish slightly, but the flavor remains robust. Keep the container away from strong‑smelling foods to avoid flavor absorption. I’ve found that a paper towel inside the container helps keep the crackling dry.
Freezer Friendly
For longer storage, freeze the crackling in a single layer on a parchment paper sheet. Once frozen, transfer the sheet into a freezer bag. This method prevents the pieces from sticking together. Store for up to three months for the best texture. When ready, let it thaw at room temperature for 10 minutes before reheating.
Best Reheating Method
To revive the crispness, preheat your oven to 350 °F (177 °C) and bake the frozen pieces for 10–12 minutes. Alternatively, use a toaster oven for a quicker option. The key is to keep the temperature moderate to avoid melting the fat. Add a tiny splash of water to the pan to create steam, which helps restore moisture. The result is a snack that tastes as fresh as the day it was made.
Quick Microwave Fix
If you’re in a hurry, microwave the crackling on a paper towel for 20–30 seconds. The microwave can soften the fat, but it may lose some crispness. This method is best for when you need a snack on the spot. Pair it with a cold beverage for a refreshing treat.
Reheat with a Skillet
Heat a small skillet over medium heat and add a splash of oil. Place the crackling in the pan and sauté for 2–3 minutes, turning occasionally. The skillet method restores a crunchy exterior and adds a subtle toasty flavor. It’s a quick way to enjoy the crackling fresh after refrigeration. The oil helps maintain moisture inside the pork.