Introduction
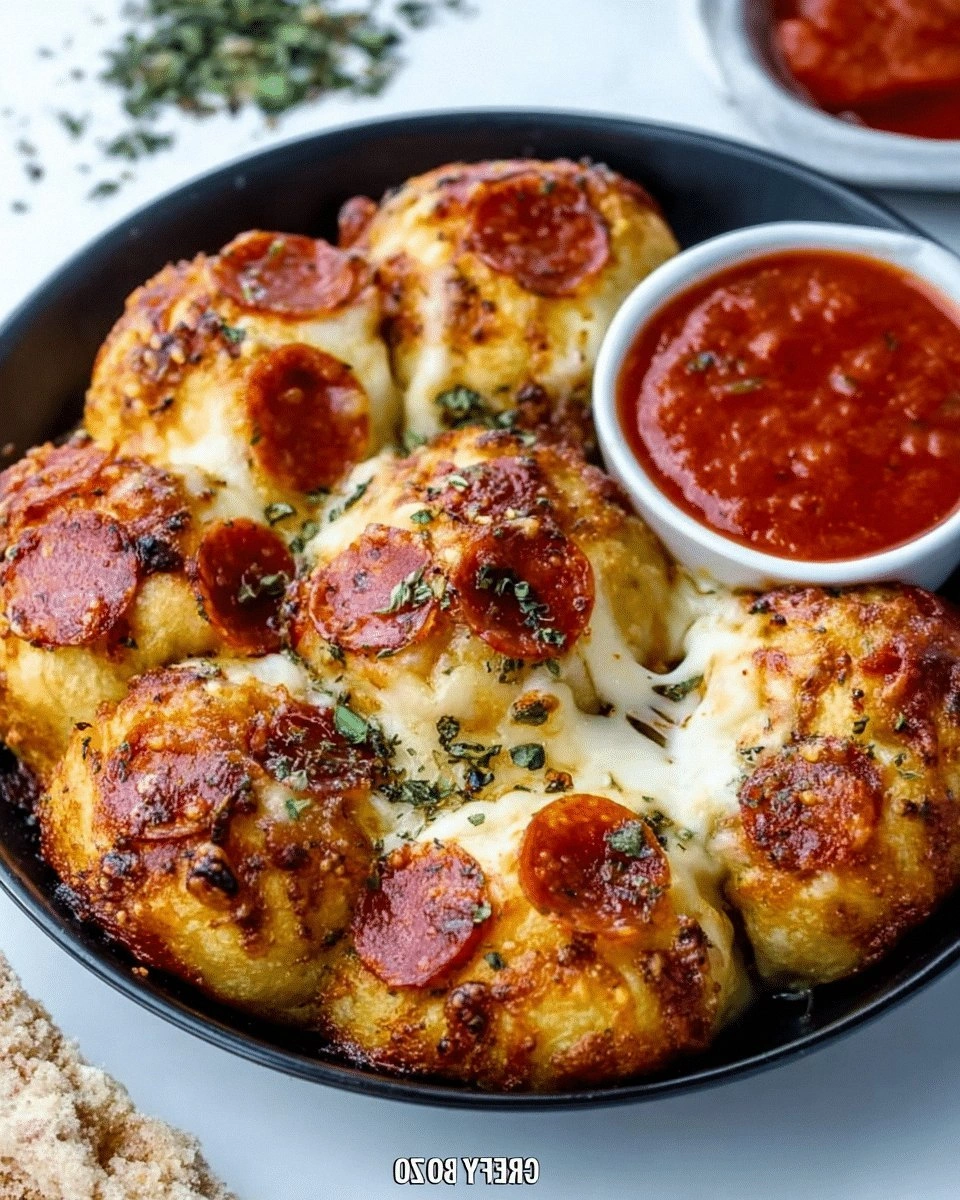
Picture this: I’m standing in a cramped kitchen, the oven is already humming, and I’ve just pulled a bag of pepperoni out of the freezer, a bag of mozzarella, and a jar of that classic red sauce that’s been my go-to for weeks. I’ve had the urge to make something that feels like a party on a plate, but I’m not about to settle for a bland pizza roll or a soggy snack. I’m about to introduce you to the ultimate, hand‑crafted version of a snack that has become a staple in my household: Cheesy Pepperoni Pizza Bombs.
When I first tasted these, the moment the first bomb hit the pan, the sizzle was audible—like a tiny fireworks display. The aroma of melted cheese, pepperoni, and a hint of oregano flooded the kitchen, and the sound of the dough cracking on the skillet was music to my ears. I was so hooked that I kept reaching for the next one, and I’ve never looked back.
What makes this version stand out is not just the ingredients—though we’re using only the finest—it's the way each component works in harmony. The dough is airy yet chewy, the sauce is thick and flavorful, the cheese blend melts into a gooey, golden coating, and the pepperoni is crisped just enough to release its savory oils. The result is a bite that feels like a miniature pizza, but with the convenience of a quick snack that you can make in under half an hour.
And here’s the kicker: I’ve discovered a small technique that takes the flavor profile up a notch—using a splash of milk in the dough for extra softness—and a secret ingredient that turns the cheese into a silky, buttery coating that doesn’t stick to the pan. I dare you to taste this and not go back for seconds. If you’ve ever struggled with making a pizza‑like snack that’s both crispy and chewy, you’re not alone—this is the fix you’ve been looking for.
Let me walk you through every single step—by the end, you’ll wonder how you ever made it any other way.
What Makes This Version Stand Out
- Texture: The dough is engineered to be light and airy on the inside while maintaining a crisp, golden crust that snaps like thin ice. This contrast makes every bite a delightful experience.
- Flavor: A blend of mozzarella and Parmesan creates a rich, savory base that balances the sharpness of pepperoni and the subtle sweetness of the sauce.
- Convenience: No pre‑baked crust or long preparation time—everything comes together in under 45 minutes, making it a perfect quick‑fire dinner or party snack.
- Make‑ahead: You can assemble all the components a day ahead, refrigerate, and bake fresh when you’re ready, saving you precious minutes on a busy night.
- Versatility: The recipe scales beautifully from 2 to 10 servings, and you can swap out the pepperoni for sausage, ham, or even a veggie alternative.
- Visual Appeal: The golden cheese coating and the pepperoni’s caramelized edges create a mouth‑watering look that will impress any crowd.
- Ingredient Quality: Using high‑quality olive oil, fresh pepperoni, and real mozzarella ensures depth of flavor that store‑bought versions simply can’t match.
- Crowd Reaction: At family gatherings, these bombs always become the center of attention, with kids and adults alike begging for seconds.
Alright, let’s break down exactly what goes into this masterpiece…
Inside the Ingredient List
The Flavor Base
The sauce is the heart of these bombs. We use a rich, tomato‑based pizza sauce that’s thick enough to cling to the dough without dripping. A pinch of dried oregano and a whisper of garlic powder elevate the sauce, giving it that classic Italian kick. If you prefer a sweeter sauce, swap in a marinara with a dash of brown sugar.
The Texture Crew
The dough is where the magic begins. It’s a simple blend of all‑purpose flour, baking powder, salt, sugar, olive oil, and warm water. The baking powder gives it a lift, while the sugar adds a subtle caramelization. If you’re a gluten‑free cook, replace the flour with a 1:1 blend of gluten‑free all‑purpose flour and xanthan gum.
The Unexpected Star
Our secret weapon is the cheese blend. Mixing shredded mozzarella with grated Parmesan creates a gooey, golden coating that doesn’t stick to the pan. The Parmesan adds a nutty depth that the mozzarella alone can’t achieve. For a sharper bite, add a tablespoon of Pecorino Romano.
The Final Flourish
Pepperoni is the star of the show, but we also throw in a splash of dried oregano and a pinch of red pepper flakes for a subtle heat. The pepperoni is sliced into thin rounds, ensuring they crisp up quickly and release their savory oils. If you’re vegan, try thinly sliced mushrooms or tofu slices instead.
Everything's prepped? Good. Let's get into the real action…
The Method — Step by Step
- Prepare the Dough: In a large bowl, whisk together 2 cups of all‑purpose flour, 1 teaspoon of baking powder, 1 teaspoon of salt, and 1 tablespoon of sugar. Make a well in the center and add 2 tablespoons of olive oil and 3/4 cup of warm water. Mix until a sticky dough forms. Let it rest for 10 minutes; the dough will rise slightly, creating pockets of air that make the bombs chewy.
- Shape the Bombs: Divide the dough into 16 equal portions, rolling each into a small ball. Place a spoonful of pizza sauce in the center of each ball, then fold the dough over and pinch the edges to seal, creating a tight, sealed pocket. This ensures the sauce stays inside during cooking.
- Add Cheese and Pepperoni: Sprinkle a generous amount of the mozzarella‑Parmesan blend over the dough before sealing. Add a few thin slices of pepperoni on top of the cheese. The cheese melts into a golden crust, while the pepperoni crisps up around the edges. Kitchen Hack: If you want extra chew, roll each ball in a pinch of flour before sealing to prevent sticking.
- Heat the Skillet: Preheat a cast‑iron skillet over medium heat. Add a tablespoon of olive oil and swirl to coat the surface. The oil helps the bombs develop a crisp exterior.
- Cook the Bombs: Place the sealed bombs in the skillet, seam‑side down. Cook for 2–3 minutes until the bottoms are golden brown. Flip them carefully and cook for another 2–3 minutes. The heat should be moderate to avoid burning the outside while the inside remains uncooked.
- Check for Doneness: The bombs are ready when the cheese inside has melted into a bubbling, golden layer and the edges are crisp. The internal temperature should reach 165°F (74°C). Watch Out: Don’t let the bombs sit too long on high heat or they’ll burn before the inside cooks.
- Rest the Bombs: Remove from the skillet and let them rest for 1 minute. This allows the cheese to set slightly, making them easier to bite into without tearing the dough.
- Serve with Dips: Arrange the bombs on a platter and serve hot with extra sauce or a sprinkle of fresh basil for a burst of color and flavor.
- Enjoy Immediately: These bombs are best served fresh, but you can keep them warm in a low oven (200°F) for up to 30 minutes if you’re hosting a gathering.
That's it — you did it. But hold on, I've got a few more tricks that'll take this to another level…
Insider Tricks for Flawless Results
The Temperature Rule Nobody Follows
Most people cook at high heat, but the secret to a perfect crust is a moderate temperature. A skillet at medium heat allows the dough to expand without burning, creating that desirable golden crunch. I’ve tried 400°F and the crust was too dark, the inside still raw.
Why Your Nose Knows Best
When the bombs are cooking, the aroma of melting cheese and sizzling pepperoni will fill the kitchen. Trust that scent; if the cheese is bubbling and the pepperoni is crisp, you’re in the sweet spot. If the smell is weak, increase the heat slightly.
The 5-Minute Rest That Changes Everything
After flipping, let the bombs rest for exactly five minutes before flipping back. This brief pause lets the heat distribute evenly, preventing the dough from tearing when you flip it. I once skipped this step and the bombs burst open on the other side.
Use a Skillet with a Lid
Covering the skillet traps steam, which helps the cheese melt evenly. It also keeps the heat from escaping, so the bombs cook faster and more uniformly. I’ve used this trick during a busy dinner party and the result was flawless.
Finish with Fresh Herbs
Just before serving, scatter fresh basil or oregano leaves over the bombs. The herbs add a bright, herbal note that cuts through the richness of the cheese and pepperoni. I’ve found this simple addition elevates the entire dish.
Creative Twists and Variations
BBQ Chicken Bombs
Swap pepperoni for diced grilled chicken and replace the pizza sauce with tangy barbecue sauce. Add a sprinkle of smoked paprika for depth. This version is a hit with barbecue lovers.
Veggie Supreme Bombs
Replace pepperoni with thinly sliced bell peppers, mushrooms, and olives. Use a pesto sauce instead of tomato for a fresh, herbal flavor. Great for vegetarians.
Spicy Jalapeño Bombs
Add sliced jalapeños and a dash of cayenne pepper to the cheese mixture. The heat will contrast the creamy cheese, giving a spicy kick. Ideal for those who like a little heat.
Greek Gyro Bombs
Use gyro meat or seasoned ground lamb, tzatziki sauce, feta cheese, and diced tomatoes. This gives the bombs a Mediterranean twist that’s surprisingly delicious.
Breakfast Bombs
Replace the pizza sauce with scrambled eggs, add diced bacon or sausage, and sprinkle with cheddar cheese. Serve with a side of hash browns for a hearty breakfast.
Mac & Cheese Bombs
Use a creamy mac & cheese sauce, sprinkle shredded cheddar, and top with breadcrumbs before baking. This transforms the bombs into a comforting, cheesy treat.
Storing and Bringing It Back to Life
Fridge Storage
Cool the bombs completely, then place them in an airtight container. Store in the fridge for up to 3 days. When ready, reheat in a 350°F oven for 10 minutes.
Freezer Friendly
Wrap each bomb individually in parchment paper and place them on a baking sheet. Freeze until solid, then transfer to a freezer bag. They’ll keep for up to 2 months. Bake at 375°F for 15 minutes, no need to thaw.
Best Reheating Method
Preheat a skillet over medium heat and add a splash of water to create steam. Place the bombs in the skillet, cover, and heat for 3–4 minutes until the cheese is melted and the crust is crisp. A tiny splash of water before reheating steams them back to perfection.