Picture this: it’s a rainy Saturday night, the TV blares a game, and you’re standing in your kitchen with a half‑filled bottle of your favorite hot sauce, a bag of flour, and a basket of chicken that looks like it could double as a prop in a sci‑fi movie. I was chasing that elusive crunch that turns a simple plate of chicken into a crowd‑pleasing sensation, and the result was a revelation that left my friends begging for the recipe. The moment the wings hit the hot oil, the sizzle sounded like a choir of tiny cymbals, and the aroma that flooded the room was a blend of buttery heat and smoky paprika that made the air taste like a summer sunset. I was honest—half the batch vanished before anyone even had a chance to taste it—yet the taste was so addictive that I dared you to try it and not go back for seconds. This isn’t just a wing recipe; it’s a culinary manifesto that turns ordinary ingredients into an explosion of flavor and texture, and I’ll walk you through every single step so you can master it in your own kitchen.
The first time I tried this, I was a rookie with a skillet, a handful of flour, and a stubborn belief that the secret to great wings lay in the batter. I threw everything together, hoping for a crispy coating, only to end up with a soggy mess that tasted like a bad dream. That failure taught me that the trick isn’t the amount of flour, but how you balance the dry mix, the seasoning, and the oil temperature. It’s a delicate dance where the batter should feel light like a feather, yet cling to the chicken like a second skin. The result? A wing that snaps when you bite, releasing a burst of spicy, buttery, tangy goodness that makes your taste buds do a happy dance.
I’ve spent months refining this recipe, experimenting with different flours, experimenting with different sauces, and even testing various oil types to see how each tweak changes the final bite. I discovered that the right ratio of flour to cornmeal gives that signature crunch that shatters like thin ice when you bite into it. Adding a splash of baking powder to the dry mix creates a puffier coating that still stays crisp, while a dash of smoked paprika brings a subtle depth that elevates the heat from the hot sauce. The sauce itself is a marriage of Frank’s RedHot, melted butter, and a touch of honey that balances the heat with a gentle sweetness—think of it as a velvet blanket draped over the wings. Every time I make this dish, the kitchen fills with a mouth‑watering perfume that makes even the most skeptical foodies swoon.
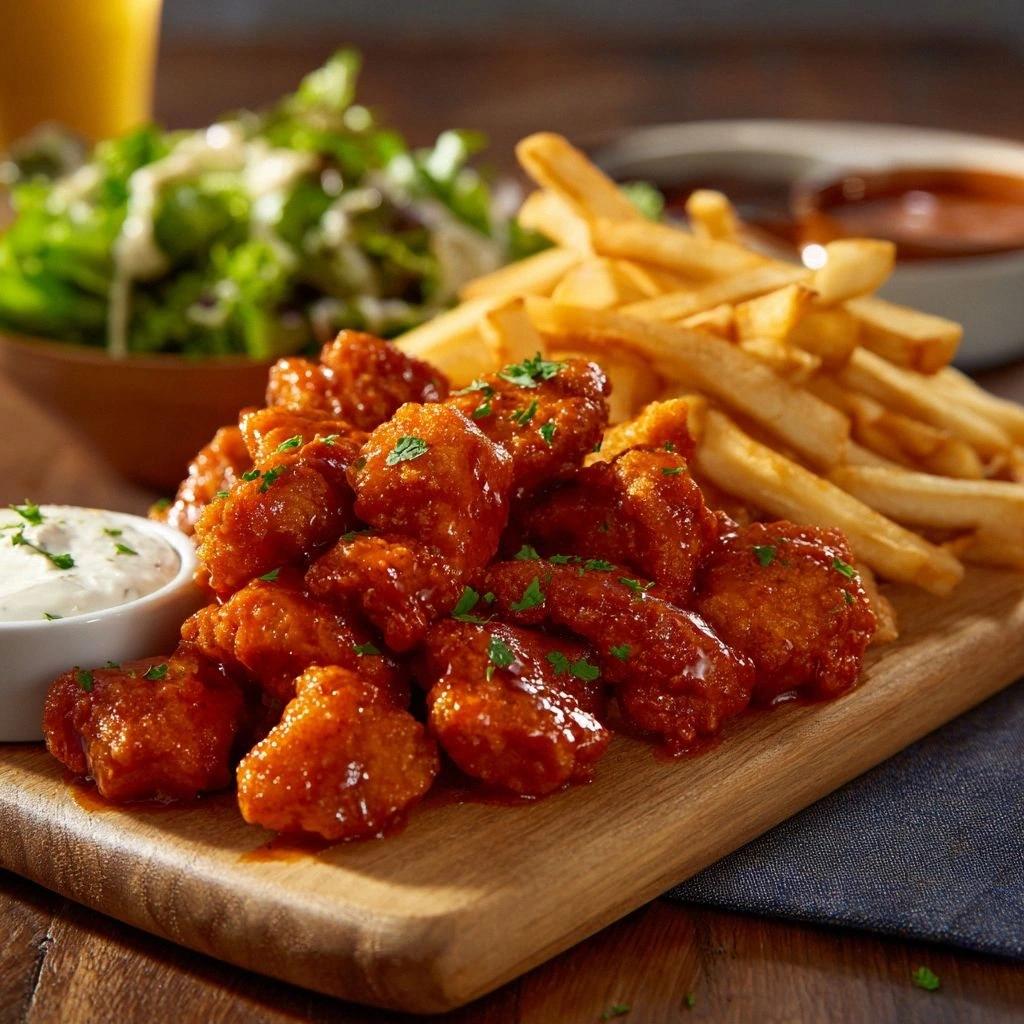
The best part is that this recipe is incredibly versatile. You can make it in a skillet, an air fryer, or even an oven—each method produces a slightly different texture but all are delicious. The sauce can be tweaked with extra cayenne for a fiery kick or softened with a splash of cream for a richer flavor. The dipping sauces—ranch and blue cheese—add a creamy counterpoint that cuts through the heat and rounds out the meal. The side of celery and carrot sticks brings a fresh crunch and a hint of sweetness that balances the savory, spicy wings. Together, these elements create a dish that feels both comforting and adventurous, perfect for game nights, parties, or a casual week‑night dinner.
What sets this version apart from countless other wing recipes is the meticulous attention to detail and the use of a few unexpected ingredients that elevate the dish from good to unforgettable. I’ve spent hours tweaking the batter, the sauce, and the cooking times until every bite was a perfect harmony of crunch, heat, and buttery richness. The result is hands down the best version you’ll ever make at home, and I’m confident that once you try it, you’ll wonder how you ever settled for anything less. Picture yourself pulling this out of the oven, the whole kitchen smelling incredible, and your friends cheering as they dive in—this is the kind of moment that turns a simple meal into a memory. So, let’s dive in, and I’ll show you how to create wings that are both crispy and saucy, with a flavor profile that will keep everyone coming back for more.
Now, let’s break down exactly what makes this recipe so special. I’ve distilled the magic into six key elements that you’ll see reflected in every step of the process. Each element is a cornerstone that, when combined, creates a dish that stands out from the crowd. I’ll explain why each one matters, how it contributes to the final product, and what you can do if you’re short on time or ingredients. With this knowledge, you’ll be able to tweak the recipe to your taste while still maintaining the signature crunch and heat that defines these wings. And because I love a good challenge, I’ll also throw in a micro‑challenge that will test your palate and keep you on your toes. Ready? Let’s get into the details.
What Makes This Version Stand Out
- Flavor: The sauce is a balanced blend of heat, sweetness, and acidity that coats the wings like velvet, leaving a lingering kick that doesn’t overpower the chicken’s natural flavor.
- Crispness: The dual‑flour batter—half all‑purpose flour and half cornmeal—creates a two‑layered crust that shatters like thin ice when you bite, delivering that satisfying crunch everyone loves.
- Speed: The entire process takes less than an hour from start to finish, making it a perfect solution for busy weeknights or last‑minute game‑day prep.
- Versatility: The recipe works flawlessly in a skillet, air fryer, or oven, and the sauce can be adjusted to suit any heat tolerance or flavor preference.
- Make‑ahead: The batter can be prepared a day in advance and refrigerated, and the sauce can be kept in the fridge for up to a week—great for meal prepping.
- Presentation: The bright red sauce and the contrasting white dipping sauces create a visual feast that makes the dish as appealing to the eyes as it is to the palate.
Alright, let’s break down exactly what goes into this masterpiece…
Inside the Ingredient List
The Flavor Base
The foundation of this dish is a simple yet powerful sauce that marries heat, butter, and a hint of sweetness. Frank’s RedHot sauce provides the signature cayenne kick, while melted butter adds richness and helps the sauce coat the wings evenly. A splash of white vinegar cuts through the butter’s heaviness, giving the sauce a bright, tangy finish that wakes up the palate. Finally, a tablespoon of honey balances the heat, creating a silky glaze that clings to the crispy coating.
If you’re a fan of a milder sauce, simply reduce the amount of hot sauce or substitute it with a milder pepper sauce. Conversely, if you love a fiery bite, add a pinch of cayenne pepper to the sauce for an extra punch. The sauce can also be made ahead; store it in the fridge for up to a week, and it’ll keep its vibrant flavor and heat. Remember, the sauce is the star of the show—don’t be afraid to adjust it until it feels just right for your taste buds.
One of the most surprising things about this sauce is its ability to bind the batter to the chicken. The butter’s fat content creates a slick surface that allows the batter to spread evenly, while the vinegar’s acidity helps the batter set into a firm crust. This combination means that even if you’re using a different type of oil, the sauce will still work wonders. The key is to keep the sauce at room temperature so it can coat the wings without separating.
The sauce’s versatility also makes it a great candidate for variations. Add a teaspoon of smoked paprika for a smoky depth, or a dash of Worcestershire sauce for umami. If you’re feeling adventurous, blend the sauce with a small amount of Greek yogurt for a creamy, tangy twist. Whatever you choose, the sauce will remain the backbone of the dish, delivering that signature heat and flavor that keeps everyone coming back.
The Texture Crew
The batter is where the magic happens, and it’s a carefully balanced blend of flour, cornmeal, and baking powder. All‑purpose flour provides the structure, while cornmeal adds a subtle nutty flavor and a crunchy texture that’s impossible to beat. Baking powder is the secret ingredient that creates a light, airy crust that still holds together when you bite into it. Salt and pepper give the batter a savory backbone that complements the heat of the sauce.
If you’re looking for a gluten‑free version, swap the all‑purpose flour for a 1:1 blend of rice flour and cornstarch. This change will maintain the crispness while keeping the dish allergen‑friendly. For an extra crunch, add a tablespoon of panko breadcrumbs to the batter; they’ll puff up in the oil and give you that extra snap. The batter also works well when you want to double up on the coating—just dip the wings twice for an even thicker crust.
The batter’s texture is a direct result of the oil temperature. If the oil is too hot, the coating will burn before the chicken is fully cooked; if it’s too cool, the batter will absorb oil and become soggy. The ideal temperature is around 350°F (175°C), which gives you a golden brown crust that’s both crispy and light. Keep an eye on the batter; when it starts to bubble and lift, it’s ready for the next wing.
A common mistake is adding the batter too quickly. The batter should be thick enough to coat the chicken but thin enough to spread evenly. If it’s too thick, the coating will be uneven; if it’s too thin, it won’t stick. A quick test is to drop a small amount of batter into a glass of water—if it floats, it’s ready; if it sinks, let it rest for a few minutes to thicken.
The Unexpected Star
The side of celery and carrot sticks isn’t just a garnish; it’s a textural counterpoint that adds a fresh, crisp bite to every mouthful. Celery provides a subtle bitterness that cuts through the heat, while carrots add a natural sweetness that balances the overall flavor profile. Together, they create a refreshing palate cleanser that keeps your taste buds from burning out.
If you’re short on time, you can use pre‑cut sticks or even frozen vegetable sticks for convenience. For a different flavor, swap the carrots for sweet potato fries or zucchini sticks, and the dish will still hold its own. The vegetables can also be seasoned with a light sprinkle of salt and pepper before serving, adding an extra layer of flavor. Remember, the key is to keep them crisp; overcooked veggies will lose their crunch and become a mushy side.
Another fun twist is to add a drizzle of olive oil and a pinch of smoked paprika to the veggies before serving. This simple step gives them a subtle smoky flavor that complements the wings. If you prefer a sweeter side, toss the sticks in a light honey glaze after cooking; the glaze will caramelize slightly, adding a sweet finish that pairs beautifully with the spicy sauce.
The vegetables also make the dish more balanced nutritionally. They add fiber, vitamins, and a dose of color, turning a simple wing plate into a more complete meal. They’re especially great for kids who might be hesitant to try spicy foods; the sweet carrot sticks provide a familiar flavor that encourages them to dig in. So next time you’re preparing this dish, don’t skip the veggies—they’re a crucial part of the experience.
The Final Flourish
The finishing touches are what transform a great wing plate into an unforgettable one. A drizzle of the sauce over the cooked wings gives them a glossy sheen and a burst of flavor that lingers on the tongue. The dipping sauces—ranch and blue cheese—add a creamy counterpoint that balances the heat and provides a cool, tangy contrast.
If you’re looking to add a bit of crunch to the plate, sprinkle a handful of crushed tortilla chips or fried onion strings over the wings. This adds a delightful texture that pairs well with the buttery sauce. For a more sophisticated presentation, garnish the dish with fresh parsley or cilantro, which adds a burst of color and a hint of herbal freshness.
One of the most underrated aspects of this dish is the plating. Arrange the wings in a single layer on a baking sheet, leaving space for the sauce to pool at the bottom. This not only makes for a visually appealing plate but also ensures that each wing gets coated evenly. The sauce should be drizzled in a way that creates a rainbow of reds across the platter, making it as Instagram‑worthy as it is delicious.
Finally, the timing of the sauce application is critical. Coat the wings with sauce immediately after they come out of the oil to prevent the coating from drying out. If you’re using an oven or air fryer, toss the wings in the sauce halfway through cooking for an even glaze. The sauce should be thick enough to cling to the wings, but not so runny that it pools on the plate.
Everything’s prepped? Good. Let’s get into the real action and see how these ingredients come together to create the ultimate wing experience.
The Method — Step by Step
- Begin by patting the chicken wings dry with paper towels; this step is essential for a crisp coating. Place the flour, cornmeal, baking powder, salt, pepper, garlic powder, and paprika in a shallow bowl and mix until well combined. This dry mix is the backbone of the crispy texture. The batter should feel like a fine dusting, not a thick paste. When you’re ready, dip each wing into the dry mix, pressing gently to ensure a uniform coating. The coating should cling to the chicken like a second skin. Keep the coated wings in a bowl while you prepare the rest of the batter.
- In a separate bowl, whisk together the melted butter, Frank’s RedHot sauce, white vinegar, honey, and cayenne pepper until smooth. The sauce should have a glossy consistency that can coat the wings without dripping. Set the sauce aside; it will be used to glaze the wings after cooking. If you’re using a skillet, preheat the oil to 350°F (175°C) using a thermometer; if you’re air frying, set the temperature to 375°F (190°C). The oil temperature is crucial—too hot, and the coating burns; too cool, and the wings become soggy. When the oil reaches the right temperature, carefully lower a few wings into the pan, letting them sizzle immediately.
- Cook the wings in batches to avoid overcrowding, which can lower the oil temperature and lead to uneven cooking. Each batch should cook for about 5–6 minutes per side, or until the internal temperature reaches 165°F (74°C). The wings should develop a golden‑brown crust that feels firm yet yields slightly under pressure. Flip them halfway through to ensure even browning. While the wings cook, keep an eye on the oil temperature, adjusting the heat as needed. Once cooked, remove the wings and let them drain on a rack or paper towels to eliminate excess oil.
- If you’re using an oven, transfer the cooked wings to a baking sheet lined with parchment paper. Bake at 400°F (200°C) for an additional 5 minutes to crisp up the coating further. The oven method is a great option for large batches or if you’re short on stove space. The wings should come out with a slightly darker crust that’s still crisp. The oven also allows the sauce to set on the wings, creating a glossy finish that’s hard to resist. If you’re using an air fryer, simply place the wings in the basket and run for an additional 3–4 minutes. The air fryer’s circulating heat gives a similar crunch with less oil.
- While the wings are still hot, toss them in the prepared sauce, ensuring each piece is evenly coated. The sauce should cling to the wings, forming a glossy, sticky glaze that doesn’t run off. If you’re using a skillet, pour a small amount of sauce onto the pan and swirl it around to coat the wings evenly. For a more dramatic presentation, drizzle the sauce in a decorative pattern over the entire platter. The sauce’s heat will intensify slightly as it cools, giving each bite a subtle kick that lingers.
- Prepare the dipping sauces by mixing ranch and blue cheese dressing with a splash of water or milk to thin them slightly, if desired. This makes them pourable and easier to serve. Arrange the sauces in small bowls or ramekins, placing them strategically around the platter for easy access. The creamy sauces provide a cool counterbalance to the spicy wings, making every bite a balanced experience. If you prefer a tangy dip, try a simple yogurt sauce with a pinch of garlic and lemon zest. The dip should be creamy enough to coat the wings without soaking them.
- While the sauce is still warm, lay out the celery and carrot sticks in a neat row on a platter. They add a fresh crunch that cuts through the heat and keeps the meal feeling light. For an extra pop of color, sprinkle a pinch of smoked paprika over the vegetables. The paprika will give a subtle smoky flavor that complements the wings. If you’re in a hurry, you can use pre‑cut sticks or frozen sticks that have been thawed; just pat them dry before serving.
- Serve the wings hot, accompanied by the dipping sauces and fresh veggies. The plate should look vibrant, with the deep red sauce glistening against the white sauces and the green celery. The aroma should be a mouth‑watering blend of butter, heat, and herbs, inviting everyone to dive in. Encourage guests to try a wing with a dip to experience the full flavor spectrum. This final presentation sets the stage for a memorable meal that feels both indulgent and satisfying.
- If you’re a fan of extra crunch, sprinkle a handful of crushed tortilla chips or fried onion strings over the top before serving. These add a delightful texture that pairs well with the buttery sauce. Alternatively, you can drizzle a small amount of honey over the wings for a sweet glaze that balances the heat. The key is to keep the flavors balanced—too much sweetness can overpower the sauce, so use sparingly.
That’s it — you did it. But hold on, I’ve got a few more tricks that will take this to another level. These insider tips will help you avoid common pitfalls and elevate the dish from good to unforgettable. Ready? Let’s dive in.
Insider Tricks for Flawless Results
The Temperature Rule Nobody Follows
Many people think a quick splash of oil is enough, but the secret lies in maintaining a steady temperature of 350°F (175°C). A thermometer is your best friend—without it, you’ll either undercook the wings or burn the coating. If the oil is too hot, the batter will burn before the chicken cooks; if too cool, the coating will absorb too much oil and become soggy. Keep the heat steady by adjusting the burner as the oil expands and contracts. Once you master this, every batch will come out with a uniform, golden crust that’s a testament to your precision.
Why Your Nose Knows Best
You don’t need to wait for the internal temperature to reach 165°F (74°C); trust your nose. When the wings start to emit a rich, buttery aroma with a hint of heat, you know they’re ready. The aroma is a reliable indicator of doneness and ensures the sauce has fully absorbed into the coating. If you’re cooking in a large batch, use a small piece of chicken to test the aroma before serving the rest. This sensory check saves time and guarantees consistent results.
The 5-Minute Rest That Changes Everything
After the wings finish cooking, let them rest on a wire rack for at least five minutes. This short rest allows the juices to redistribute, preventing a dry interior. It also gives the coating time to set, ensuring it doesn’t fall off when you bite. Some chefs swear by resting the wings on a parchment paper‑lined tray; it keeps them warm while preventing sticking. The rest period might seem trivial, but it’s the difference between a good wing and a great one.
The Secret to a Glazed Finish
If you want a glossy, sticky glaze, finish the wings in the sauce for the last minute of cooking. Pour the sauce into the pan and stir it around the wings, allowing the sauce to coat them evenly. The high heat will caramelize the sugars, creating a glossy finish that clings to the coating. If you’re using an oven, toss the wings in sauce after the final bake for an even glaze. The result is a wing that looks as good as it tastes.
The “No‑Mess” Frying Trick
Frying can be messy, but you can keep your kitchen clean by using a splatter guard or a large, shallow pan. The splatter guard keeps oil from flying everywhere, saving you from a greasy cleanup. If you’re in a hurry, you can also use a deep fryer; it offers precise temperature control and a consistent result. A deep fryer also reduces the risk of splattering, making the process safer for beginners. This trick is especially handy if you’re cooking for a crowd.
The “One‑Pan” Method
For a low‑maintenance option, you can cook the wings and sauce in a single skillet. After the wings are browned, pour the sauce over them and let it simmer for a few minutes. The sauce will thicken and coat the wings perfectly, eliminating the need for a separate bowl. This method is ideal for a quick weeknight dinner or a small gathering. The result is a dish that’s both flavorful and efficient.
Creative Twists and Variations
This recipe is a playground. Here are some of my favorite ways to switch things up:
The Sweet Heat Twist
Swap the honey for maple syrup and add a pinch of crushed red pepper flakes to the sauce. The maple gives a deeper sweetness, while the pepper flakes add a subtle kick. This version is perfect for those who love a sweet‑and‑spicy combo that’s less fiery than the original. Serve with a side of pineapple chunks for a tropical flair.
The Smoky BBQ Version
Replace Frank’s RedHot with your favorite smoky BBQ sauce and add a dash of liquid smoke to the batter. The liquid smoke infuses the coating with a deep, smoky flavor that pairs beautifully with the buttery sauce. The result is a wing that feels like a smoky campfire dinner. Pair it with a side of coleslaw for a classic BBQ vibe.
The Mediterranean Kick
Add chopped olives and capers to the batter and swap the hot sauce for a Greek yogurt dip with lemon zest. The olives add brininess, while the capers give a punch of acidity. The yogurt dip cools the heat and adds a creamy texture that’s a departure from the usual ranch or blue cheese. This version is great for a brunch or a light dinner.
The Breakfast Edition
Serve the wings with a side of scrambled eggs and a drizzle of maple syrup. The sweet syrup complements the spicy sauce, while the eggs add protein and a comforting texture. This variation turns the dish into a hearty breakfast that’s perfect for weekend brunches. Add a sprinkle of fresh herbs for an extra pop of flavor.
The Vegan Take
Use plant‑based chicken substitutes and a vegan butter alternative for the batter. Substitute the dairy‑based sauces with cashew‑based ranch or a creamy avocado dip. The vegan version retains the same flavor profile while keeping it plant‑friendly. It’s a great option for guests who prefer a cruelty‑free meal.
The “Gluten‑Free” Edition
Swap the all‑purpose flour for a gluten‑free blend of rice flour and cornstarch. The batter will still crisp up nicely, though it may have a slightly different texture. Use a gluten‑free hot sauce to keep the dish entirely free of gluten. This version is ideal for those with gluten sensitivities or celiac disease.
Storing and Bringing It Back to Life
Fridge Storage
Store leftover wings in an airtight container in the refrigerator for up to three days. Keep the sauce separate if you prefer a fresher coating; you can reheat the wings in a skillet or oven and then drizzle fresh sauce over them. The wings will stay crisp if reheated at 375°F (190°C) for about five minutes. Avoid microwaving the wings directly, as the heat will make the coating soggy. Instead, use the oven or skillet for the best texture.
Freezer Friendly
For long‑term storage, freeze the wings in a single layer on a parchment‑lined tray before transferring them to a freezer bag. This prevents them from sticking together and makes it easy to grab a single portion. Freeze for up to two months; thaw in the refrigerator overnight before reheating. When reheating, use the oven or air fryer to restore the crispness. The wings will retain their flavor and texture when properly stored.
Best Reheating Method
The best way to bring the wings back to life is to reheat them in a preheated oven at 375°F (190°C) for 10 minutes, then brush with a fresh splash of sauce. A tiny splash of water before reheating helps the coating steam back to perfection, keeping it from drying out. The result is a wing that tastes as good as when it was first cooked. Serve immediately with fresh veggies and dipping sauces for the full experience.